lone73
Well-known member
I fought this for weeks so I thought this might save some time for those that have the same prob. Its at least a different approach to a solution and may serve as inspiration for some. Hope it helps somebody...
Apparently, after a C4 door panel has been off a few times it can develop the problem of getting loose at the top after reinstallation and a few slams of the door. My problem was not so much age and use as it was a poor repair job from a body shop after being hit in the left door. I ended up with the same symptom however.
There are tabs along the top of the fiberglass door frame (the structural part of the door under the interior panel) that are supposed to hold the upper edge of the panel to the door. They are sloped inward causing a slightly loose panel to launch itself up and inward every time the door is slammed. After 10 ~ 20 door slams (in my case at least) the door panel will jump over the upper tabs and be sloppy and loose after that. Not cool at all. I posted my problem with this a while back and was supplied a link to a vette article by a forum member that addressed it to some degree. The article described adding an additional post to the door frame’s top edge that simply stuck up higher than the original tabs to catch the panel. I decided what I’d really like is to get the panel to stay down where it belonged. After going through a few iterations of reattaching the panel I came up with an idea to attach it securely. As mentioned the panel really needs to drop in relation to the door frame. Since the panel attaches primarily to the shiny aluminum panel directly beneath the interior panel, the fix seemed to be to get that aluminum panel to drop down a ¼ inch or so. I was able to accomplish that by simply slotting the screw holes in the fiberglass door frame downward. (You might be able to do the same by slotting the holes in the aluminum piece upward ). I then had to redrill the few plug holes along the bottom of the door so that I could get those plastic plugs back in without them pushing back upward on the panel. I had to go thru a dry run of attching the panel to draw the new hole locations along the bottom edge of the door. I set the interior panel in place temporarily and held it down with a clamp. I pulled the panel downward by clamping between the top side of the armrest and the underneath side of the door using a quick-clamp. I then bumped the top edge of the panel a few times with my fist to get the panel thoroughly seated along the top of the door frame and squeezed the clamp a bit to get it seated snugly, then marked the new plug hole locations with a felt tip pen. Before marking the new holes do a quick check along the bottom edge of the interior panel and make sure it aligns with the bottom edge of the door. You obviously don’t want the panel to be adjusted down too far. The holes must be drilled down far enough to create at least 75% of a new hole. If the hole encroaches on the original slot too much the plastic plug won’t stay in place. If you cannot drill that far down you’ll have to fill the original slots with glass and redrill. As can be seen in the below pic the rearward hole is too close to the original and the plug is now loose. The others are holding the door panel fine.
My drivers door panel is now very firmly mounted and does not rattle when I slam the door. The only side effect of this procedure is that the seal along the top of the panel pushes on the window just a bit and causes the window to catch the weatherstrip just slightly when its slammed with the window all the way up. I’ll have to adjust the window upper stop down just a tiny bit.
I would have been hesitant about drilling new holes in my door but as I stated above this all started from a sloppy body shop repair job after my car was hit in the drivers door. I had to settle for a used door that was apparently a little different than my original. I also had to learn how to adjust and repair C4 doors.
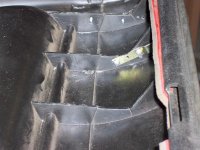
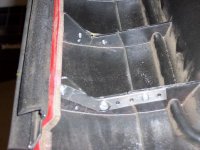
Here are a few pics showing the screws moved down from their original position as well as the redrilled holes along the bottom.
This pic shows the lower holes drilled for the plastic plugs along the bottom of the door frame.

.
.
This is the upper half of the door showing the screws attaching the inner panel to the frame. The amount they are lowered is visible from the marks left by the screw heads.

regards
.
.
.
Apparently, after a C4 door panel has been off a few times it can develop the problem of getting loose at the top after reinstallation and a few slams of the door. My problem was not so much age and use as it was a poor repair job from a body shop after being hit in the left door. I ended up with the same symptom however.
There are tabs along the top of the fiberglass door frame (the structural part of the door under the interior panel) that are supposed to hold the upper edge of the panel to the door. They are sloped inward causing a slightly loose panel to launch itself up and inward every time the door is slammed. After 10 ~ 20 door slams (in my case at least) the door panel will jump over the upper tabs and be sloppy and loose after that. Not cool at all. I posted my problem with this a while back and was supplied a link to a vette article by a forum member that addressed it to some degree. The article described adding an additional post to the door frame’s top edge that simply stuck up higher than the original tabs to catch the panel. I decided what I’d really like is to get the panel to stay down where it belonged. After going through a few iterations of reattaching the panel I came up with an idea to attach it securely. As mentioned the panel really needs to drop in relation to the door frame. Since the panel attaches primarily to the shiny aluminum panel directly beneath the interior panel, the fix seemed to be to get that aluminum panel to drop down a ¼ inch or so. I was able to accomplish that by simply slotting the screw holes in the fiberglass door frame downward. (You might be able to do the same by slotting the holes in the aluminum piece upward ). I then had to redrill the few plug holes along the bottom of the door so that I could get those plastic plugs back in without them pushing back upward on the panel. I had to go thru a dry run of attching the panel to draw the new hole locations along the bottom edge of the door. I set the interior panel in place temporarily and held it down with a clamp. I pulled the panel downward by clamping between the top side of the armrest and the underneath side of the door using a quick-clamp. I then bumped the top edge of the panel a few times with my fist to get the panel thoroughly seated along the top of the door frame and squeezed the clamp a bit to get it seated snugly, then marked the new plug hole locations with a felt tip pen. Before marking the new holes do a quick check along the bottom edge of the interior panel and make sure it aligns with the bottom edge of the door. You obviously don’t want the panel to be adjusted down too far. The holes must be drilled down far enough to create at least 75% of a new hole. If the hole encroaches on the original slot too much the plastic plug won’t stay in place. If you cannot drill that far down you’ll have to fill the original slots with glass and redrill. As can be seen in the below pic the rearward hole is too close to the original and the plug is now loose. The others are holding the door panel fine.
My drivers door panel is now very firmly mounted and does not rattle when I slam the door. The only side effect of this procedure is that the seal along the top of the panel pushes on the window just a bit and causes the window to catch the weatherstrip just slightly when its slammed with the window all the way up. I’ll have to adjust the window upper stop down just a tiny bit.
I would have been hesitant about drilling new holes in my door but as I stated above this all started from a sloppy body shop repair job after my car was hit in the drivers door. I had to settle for a used door that was apparently a little different than my original. I also had to learn how to adjust and repair C4 doors.
Here are a few pics showing the screws moved down from their original position as well as the redrilled holes along the bottom.
This pic shows the lower holes drilled for the plastic plugs along the bottom of the door frame.
.
.
This is the upper half of the door showing the screws attaching the inner panel to the frame. The amount they are lowered is visible from the marks left by the screw heads.
regards
.
.
.


