Welcome to the Corvette Forums at the Corvette Action Center!

Question: Installing Front Fascia, Front Bumper Cover

jwawhite

Well-known member
Joined
Jun 23, 2004
Messages
157
Location
oxnard
Corvette
2003 Anny Coupe
I am about to install the front cover and have a question. I believe I should lay the core over the top and perhaps put some loose dowels in, to hold it in place along with placing the cover over the bolts... The question I have , should I warp the lower tangs of the cover down or up , over the skid plate? My thoughts are to heat up the "tangs" so it is more pliable along with blue tape to protect the paint and also some wd40 so it will slide over the tangs either up or down, any experience or suggestions? The job is almost done ,can't wait ta get driven again!
the tangs were not sliced at the designated? Spot on the cover but sliced through next to it.!:happyanim:
 
I pretty much repaint my front fascia every year do to paint chips and I have never had to do anything that you are describing. Are you talking about a cheap, after market cover or a OEM cover?

wreck60.jpg


wreck34.jpg


wreck27.jpg


wreck64.jpg
 
Thanks and

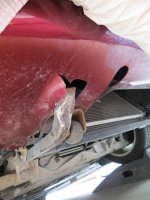
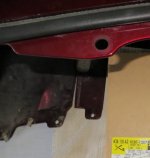
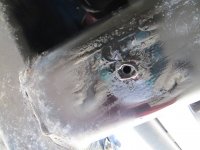
you are very talented at that painting stuff, it looks great! It is an OEM cover. The bottom of the cover has eyelits that pass over the lower skid plate. The eyelits have slits that travel towards the rear/bottom of the cover. The slits open up and the skid plate bar slides through then into the eyelits. My question is when you install the cover, which way is better to bend the tangs--the piece by the slit-- up or down over the skid plate?Damage.jpg This is a photo of the damage when I hit the curb, see how the skid plate comes down out of the eyelit of the cover? there is a slit behind the eyelit to allow the skid plate to pass through. I removed the skid plate with the cover on but noticed that I had more work to do so I removed the cover. Tang.jpg Here is a view of the tang, what is easier, up or down? Do you heat it up to be more pliable? WD 40 to slide easier? Tape the paint so it doesn't scratch? You do nice refinishing! Why can't you add more clear to existing paint? BTW
 
You can't add more clear than what is already on the rest of the car because it will change the color of the paint. Think of clear coat like water in swimming pool. The deep end looks more blue than the shallow end, although the water is completely clear (just like clear coat). So if you add too much clear, the colors won't match and you'll either need to strip and and paint again, sand a lot of the clear off or paint the whole car.

As for the front fascia, it just slips on! I have never had to do anything other than carefully place it on the car. The flaps where the slits are just open up and you slide them around the skids. Are your skids still bent up or did you replace them?
 
Now that

how it should be explained to someone, me, about clearcoat. Reading the GM repair manuals (1-3) it reads about a clear coat gauge, what does this tool look like?? I really, really like your HID (?) headlamps. I am of a certain age that when I drive the 'Vette at night, I can't see! Will work on that next perhaps. Yes, I did replace the skidplate, did not want to remove the cover but when a nutinsert fell out of the frame rail, upper right, I had no choice.FrameRail.jpg I know it looks bad but it held the torque..as you can tell I used a home made tool --stud and two nuts--- to install the nut insert. BTW where is the build sheet in the front xmember? Part of the poor photo quality is from the enamel paint and flash, it really doesn't look that bad except for lack of uniformity of the nut insert. I used a hot gun to roll the cover tear back to it's normal position and used a urethane hot iron and stick but it did not hold so I will try a bumper epoxy tomorrow that does not list urethane as a repair option.....Noticed your after market cover with the enlarged scoops....I put on an upgrade on the brakes, drilled and slotted, larger.
 
A clear coat gauge (or better yet, paint thickness gauge) is very expensive for our cars. Being that they are made of fiberglass, you need a special gauge that can take readings off of that material. The problem is that most gauges read a value that consist of the TOTAL value of the given substances on top of the fiberglass panel (that being primer, base coat and clear coat). That means that you would have to guess or assume as to how much of that total value is actually the clear coat.

Now the PROPER paint thickness gauge is going to give you a reading that consist of a individual reading for each layer. That means that you will know exactly how much primer, base coat AND clear coat is on the car. A company called DeFelsko makes a paint thickness gauge called the Positector 200B/C Advanced (B for measuring polymer coatings on wood, plastic, etc... and C for measuring multiple layers on fiberglass, concrete, etc...). The Advanced Series meter (there are 2 different 200 series), will measure up to three different materials on a given source. So with this meter, you can get an exact reading of EXACTLY how much clear coat is on any given part of the car. At a hefty $2800 price tag, it is not cheap.

The HID's that I have are called light cannons. They put out an insane amount of light, so much so that I can make people change lanes in the daytime with my high beams. They were not cheap (I paid a whopping $1200 for mine), but like you, I could not see at night either. Needless to say, they are a life saver.

light_cannons.jpg


wreck55.jpg


wreck61.jpg


angel_eyes.jpg


The build sheet is located in the front cross rail of the frame.

build_sheet.jpg
 
Thanks Junkman!

Got it all back together and I believe it came out well. The issue with the "Tangs" was a non-issue and the cover went on without any problems. Thanks for answering my questions about the special clear coat tools, headlamps and cover! Question, with the multiple cover removals and installations that you do, have you ever found something loose? The torque values on some items seem very low. I put perma blue on the studs for the skidplate and hand tightened the cover with a box wrench--not bearing down on the nuts... the torque of was it 4nm just didn't seem correct to me. The skidplate from ZIPS was off a bit from the factory? jig or if they make them for GM, the nutinserts did not line up with the air pump so (on air pump mounting bracket) I elongated one and enlarge the other holes and bolted it on. The drivers side bar does not center on the cover eyelit, I just left it alone, I saw a video on another person replacing theirs and they used a crow bar and wood to line it up. I'd wager it may have been from ZIPs. I installed FANGS this time instead of wheels, looks cleaner and you can't tell from street view that the one skid bar is not lined up, had to clip an edge on the one fang to install it because of the one skid bar out of alignment. Front cover looks great with the new signal lamps, clay bared and waxed! Installed clear shields over the signal lamps this time, perhaps they won't crack now from road debris.
 
I have never had any issues with stuff being loose or fitting because I use either factory parts or quality aftermarket parts. I would have never went through all that you did. I would have sent that crap back and bought OEM if I were you.
 
Torque Value

I have a question about the torque value on the cover. The G M manual reads 4 NM! How can that be so low? Would not the alignment of fender and cover slip? 4 is nothing, what do you do?
 
I have a question about the torque value on the cover. The G M manual reads 4 NM! How can that be so low? Would not the alignment of fender and cover slip? 4 is nothing, what do you do?

Which bolts are you talking about? There are different torque values depending on the bolt in question. I'm attaching the document from the service manual for your car. 4 N·m is not mentioned anywhere in that document and the values that are mentioned make perfect sense to me considering the various locations of the bolt in question. Add to that, N·m values are a LOT less than that their equivalent value in foot pounds or inch pounds.
 

Attachments

  • 2003 Fascia Replacement - Front Bumper.pdf
    182.2 KB · Views: 231
And Junkman comes through again....

Look at pg 4 of your attachment. They, the 4 nuts/studs are named fender reinforcement studs. A bit farther down, your attachment reads 5NM. Don't you think that is a bit to low? What do you do for yours? I am ok with my alignment, but I do not like how the fender at the junction of the hor and vert area aligns. The fender in this area sticks out a bit. I saw aC5 at the Dealer Body shop yesterday and the alignment was horrible...but the area I mentioned just before just sticks out. Is this normal? What do you do to tighten?
 
Two things. Aligning the dog house and any part of it is an artform. There is no way that I can explain it to you. You just have to know how to do it of have someone do it for you. The very first time that I did mine, it took me 16 hours of fooling with the darn thing before I was happy with it. It get's much easier after that but everything works that way. I am no expert at it but I have come a long way since that first time.

Second, those values are perfectly correct and that's what I use. If you over-tighten things, you take the chance of warping the front fascia edges where they meet up with the fender. Don't do that.
 
Thanks

Again, it's always beneficial to speak with someone who has gone before....I wrote "sheets" a long time ago for body repairs and we called that spot in front of rear wheel the "dog leg". I see your point about torque on the front Fasica, I always try to get the correct specs when working on a mechanical item. The space inside of the fenders over the nuts is limited. Will shop for a pint sized torque NM wrench, will try Sears on-line to see what they have. There were two items on the ZIP skid plate that I did not care for, to refresh, the nut inserts were not in the correct position to bolt on the air pump (AP) and the L skid bar is not aligned properly, it's inboard a bit. I elongated one eye-lit on the AP bracket and bolted it up. Two, the inboard skid plate, will have to stay until I can figure a way to bend it outward-- so, I sent two reports to ZIP about the issues of their skid-plate and to date no response. I do think the skid plate is made by the same supplier to GM (?) who else would do this? But then again I'm not positive if nut inserts come on the Parts Dept supplied skid plate, will ask next time I am at the Dealer. I want my "Dog House" to line up better, the horizontal and vertical and even the headlamp lines were okay.
 

Corvette Forums

Not a member of the Corvette Action Center?  Join now!  It's free!

Help support the Corvette Action Center!

Supporting Vendors

Dealers:

MacMulkin Chevrolet - The Second Largest Corvette Dealer in the Country!

Advertise with the Corvette Action Center!

Double Your Chances!

Our Partners

Back
Top Bottom