firstgear
Well-known member
- Joined
- Oct 11, 2003
- Messages
- 1,895
- Location
- Norwalk, Ohio
- Corvette
- 15 Z06, 01 Vert, 63 SWC & 60 ALL RED
Made a lot of progress this weekend. Won't be able to do any work next weekend as we have other plans for the whole weekend.
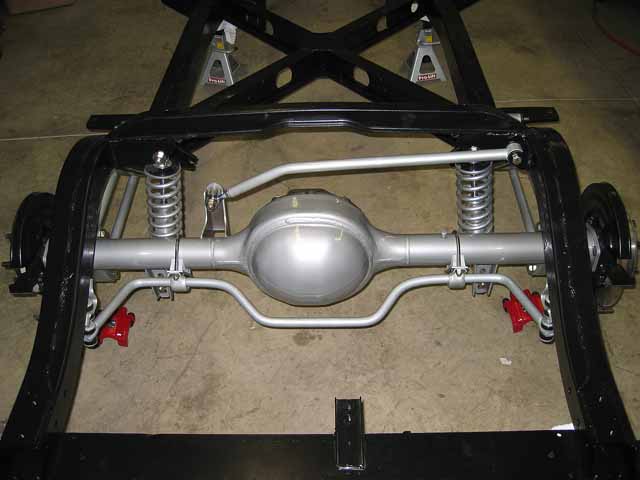
Decided to go for now with the "bent bolt" that came with the kit for the rear sway bar. Here it is installed, not so bad after all.

not much of it shows and if it gets to the point where I don't like how it looks, I will pull it out and replace it with something else. The powder silver with clear over the top came out pretty good. I like the way it looks at for sure its finish.
The frame has a few buggers here and there, I guess no Riddler award for my car, oh well....
I found some stainless steel U bolts from an antenna supplier for people with short wave radios and the like. The bolts are a high strength SS, they need to be or under some wicked wind conditions you can count on your antenna blowing down, so I am pretty comfortable with those U bolts. They also have some nice cast aluminum saddles that came with the kit. I liked them better than what Myers supplied so I used them instead.

I need to attach the rear calipers as well as torque down the axle cover bolts. Probably get to that in a couple of weeks.

I have the 3rd member all torqued down with the gasket and blue sealant on both sides of it. I need to add rear gear lube as well as posi lube. That is on my list of things to do yet.
I got busy on the front end. UGH....I had tools from one end of the floor to another end of the floor, here it is with just a small population of what ended up down there....2 torque wrenches, 4 taps (to clean out powder covered holes), 2 dies, multiple wrenches, multiple sockets from 3/8 to 1/2" drive, allen head sockets, screw drivers, 3 different tpyes of hammers, 2 3/8" drive ratchets, the list goes on and on...

Here I was after I got the first spindle on.....anyone see anything wrong with it? (Hint, it is a F body front spindle and caliper set up)

Closer look

If you noticed that it was on backwards, you guess right. By now my arms are falling off and I am hungry for dinner. Got it back off with Sharon and a hammers help, here it is on the correct way!

Those calipers will be painted RED some time this week. Sharon is taking on that task! THANK YOU THANK YOU!!!!!

Prior to attaching the rack and pinion, you have to make some measurements between the rack attachment points on the front spindle. It calls for CUTTING each end of the pinion attachment points. OK, there was a little sweat rolling off my head as I was cutting (dear god please don't let me screw this up!). Wasn't so bad, only cut off less than 3/16 from each end. Thank goodness for that die grinder, with the cutoff wheel it makes short work of anything. If you don't have a die grinder in your arsenal of tools, GET ONE! Those buggers come in handy and don't take crap from anything. Just remember to wear your safety goggles, ALWAYS!
Rack and pinion from Flaming River, easy installation after the nerves of cutting each end.

Everything that could get torqued down was torqued down as well as having Loctite BLUE applied to each and every bolt or nut.
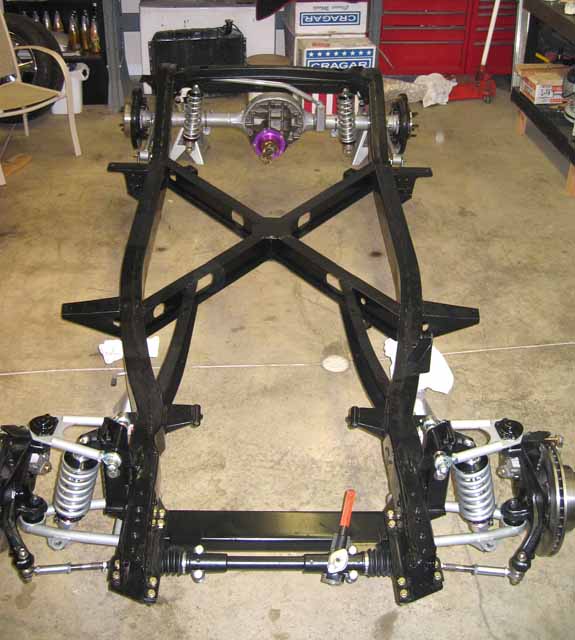
After I got all the tools put away, here is the end product so far....need to add the front sway bar and a couple of other things. I need to bead blast the front sway bar as well as its pieces and then powder coat them silver with clear coat powder.

It was a good weekend. Short term goal is rolling chassis by end of summer. Finished car goal is Carlisle 2007!
Got more work to do.....it is fun, but I am whipped!

Stay tuned for the next exciting chapter.........
Decided to go for now with the "bent bolt" that came with the kit for the rear sway bar. Here it is installed, not so bad after all.

not much of it shows and if it gets to the point where I don't like how it looks, I will pull it out and replace it with something else. The powder silver with clear over the top came out pretty good. I like the way it looks at for sure its finish.
The frame has a few buggers here and there, I guess no Riddler award for my car, oh well....
I found some stainless steel U bolts from an antenna supplier for people with short wave radios and the like. The bolts are a high strength SS, they need to be or under some wicked wind conditions you can count on your antenna blowing down, so I am pretty comfortable with those U bolts. They also have some nice cast aluminum saddles that came with the kit. I liked them better than what Myers supplied so I used them instead.

I need to attach the rear calipers as well as torque down the axle cover bolts. Probably get to that in a couple of weeks.

I have the 3rd member all torqued down with the gasket and blue sealant on both sides of it. I need to add rear gear lube as well as posi lube. That is on my list of things to do yet.
I got busy on the front end. UGH....I had tools from one end of the floor to another end of the floor, here it is with just a small population of what ended up down there....2 torque wrenches, 4 taps (to clean out powder covered holes), 2 dies, multiple wrenches, multiple sockets from 3/8 to 1/2" drive, allen head sockets, screw drivers, 3 different tpyes of hammers, 2 3/8" drive ratchets, the list goes on and on...

Here I was after I got the first spindle on.....anyone see anything wrong with it? (Hint, it is a F body front spindle and caliper set up)

Closer look

If you noticed that it was on backwards, you guess right. By now my arms are falling off and I am hungry for dinner. Got it back off with Sharon and a hammers help, here it is on the correct way!

Those calipers will be painted RED some time this week. Sharon is taking on that task! THANK YOU THANK YOU!!!!!

Prior to attaching the rack and pinion, you have to make some measurements between the rack attachment points on the front spindle. It calls for CUTTING each end of the pinion attachment points. OK, there was a little sweat rolling off my head as I was cutting (dear god please don't let me screw this up!). Wasn't so bad, only cut off less than 3/16 from each end. Thank goodness for that die grinder, with the cutoff wheel it makes short work of anything. If you don't have a die grinder in your arsenal of tools, GET ONE! Those buggers come in handy and don't take crap from anything. Just remember to wear your safety goggles, ALWAYS!
Rack and pinion from Flaming River, easy installation after the nerves of cutting each end.

Everything that could get torqued down was torqued down as well as having Loctite BLUE applied to each and every bolt or nut.
After I got all the tools put away, here is the end product so far....need to add the front sway bar and a couple of other things. I need to bead blast the front sway bar as well as its pieces and then powder coat them silver with clear coat powder.

It was a good weekend. Short term goal is rolling chassis by end of summer. Finished car goal is Carlisle 2007!
Got more work to do.....it is fun, but I am whipped!

Stay tuned for the next exciting chapter.........


