Welcome to the Corvette Forums at the Corvette Action Center!

Help! Rear automatic transmission seal on a 2000

joeg

Member
Joined
Mar 6, 2013
Messages
10
Location
bolingbrook
Corvette
2000 Pewter Convertable
I have been away from the Corvette Action Centre for many years because I sold my 66 roadster and never thought I would be able to buy another Corvette.
Well I'm back because I just purchased a 2000 convert with 40k miles. My problem is the rear trans seal is leaking, I cannot find any info on how to replace the seal.
Can the rear trans seal be replaced without removing and dismantling the trans? I know the diff has to be removed ..

Joe
 
Welcome back Joe!

One of our more tech minded members should be along soon. I just wanted to give a wave and a welcome!

:wJane Ann
 
If you have the output shaft seal on the trans leaking, ATF is likely transferring into your rear axle.

You need to repair that immediately before the rear axle fails due to its gear lubricant being diluted by ATF.

Unfortunately, replacing the trans rear seal is not an easy job. Unless your an advanced DIY with a lift and C5 experience, I'd look for a service shop which can do it.

If you're going to take a whack at it, you need the Factory Service Manual which will contain the instructions on how to replace the seal.

FSMs can be purchased from CAC sponsor, Zip Products.
 
Ive been restoring cars for many years and not concerned about complexity, I also have a lift.
I purchased the 3 set 2000 Corvette GM factory service manuals, I could not find anywhere the procedure for removing the rear seal on the trans.
The manuals dictate how to diagnose a leak including the seal labeled as #106, but that's all I could find.

Joe


If you have the output shaft seal on the trans leaking, ATF is likely transferring into your rear axle.

You need to repair that immediately before the rear axle fails due to its gear lubricant being diluted by ATF.

Unfortunately, replacing the trans rear seal is not an easy job. Unless your an advanced DIY with a lift and C5 experience, I'd look for a service shop which can do it.

If you're going to take a whack at it, you need the Factory Service Manual which will contain the instructions on how to replace the seal.

FSMs can be purchased from CAC sponsor, Zip Products.
 
Hi there,

Lets clear up a few things here.

#1, there are 3 seals within the area in question. Transmission output shaft seal, differential input cover oring and differential input shaft seal.

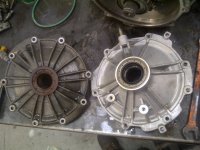
The accompanying picture is the input cover with input shaft seal.

As far as fluid transfer, it will not happen because of the little weep hole at the bottom of every c5 driveline adapter housing. It is put there so that there is trace leakage should a seal fail.

#2, the transmission output shaft seal and differential input shaft seal are the SAME part number. The oring should only be replaced if the cover is removed from the differential assembly.

So now, that leaves one other question. Did the vehicle sit for a long period of time?? These seals are known to take a set and leak while sitting, but once driven, will reset and not leak.

The new seal part number is 24228816.

You will have to remove the rear subframe and the differential assembly to get to this seal.
 

Attachments

  • IMG-20120405-00434.jpg
    IMG-20120405-00434.jpg
    119.4 KB · Views: 174
Thanks for your quick response. I have to pick the car up this weekend and I will see how bad the leak really is. It's trans fluid so I pretty sure it's the the case output shaft seal leaking as you described. I understand the task at hand i.e. removing the subframe and diff assemble to get to the seal, that part doesn't bother me.
How is the seal removed from the case and what is the correct procedure for re-installing the new seal. If I have to replace the seal I want to make sure I do it right because of the task involved.

Thanks again,
Joe


Hi there,

Lets clear up a few things here.

#1, there are 3 seals within the area in question. Transmission output shaft seal, differential input cover oring and differential input shaft seal.

The accompanying picture is the input cover with input shaft seal.

As far as fluid transfer, it will not happen because of the little weep hole at the bottom of every c5 driveline adapter housing. It is put there so that there is trace leakage should a seal fail.

#2, the transmission output shaft seal and differential input shaft seal are the SAME part number. The oring should only be replaced if the cover is removed from the differential assembly.

So now, that leaves one other question. Did the vehicle sit for a long period of time?? These seals are known to take a set and leak while sitting, but once driven, will reset and not leak.

The new seal part number is 24228816.

You will have to remove the rear subframe and the differential assembly to get to this seal.

Maybe sometimes...I oughta concentrate on grilling my crow and just shut up. Better yet, I should do a little more research. Now that I think about it, the idea that transaxle would be engineered such that fluid transfer could occur is preposterous. What was I thinking? Or just not. Somebody oughta... :SLAP

Least I can do is give "c4c5Specialist" a Beacon of Reality Award for posting the right information.

So repeating "c4c5Specialist's"k advice, if it sat for a long time, drive it a while, at least until all the lubricants get up to temp. Then see if it's still leaking. If it is...say "Uh-oh" and buy a Service Manual, find a rack along with the appropriate tools.
 
Last edited:
HI there,

JUST had an idea: Please private message me your VIN, so I can give you actual diagrams from GM parts so that there is no discrepancy between what you see and the information I give you, OK ?

There is NO information within the Corvette service manual to replace the output shaft seal to the transmission.

However, please allow me till this evening to post the information from the transmission overhaul manual and I will also show you how I do it with pics so that way it might help you more.

HIB, relax man, I have one benefit I do it everyday, you dont, so how can you know this little BS stuff. Your still a wealth of knowledge and we need you here!

Allthebest, Paul
 
Last edited:
PM sent,

Thanks again for your help!

Joe

HI there,

JUST had an idea: Please private message me your VIN, so I can give you actual diagrams from GM parts so that there is no discrepancy between what you see and the information I give you, OK ?

There is NO information within the Corvette service manual to replace the output shaft seal to the transmission.

However, please allow me till this evening to post the information from the transmission overhaul manual and I will also show you how I do it with pics so that way it might help you more.

HIB, relax man, I have one benefit I do it everyday, you dont, so how can you know this little BS stuff. Your still a wealth of knowledge and we need you here!

Allthebest, Paul
 
HI there,

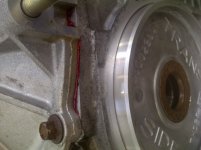
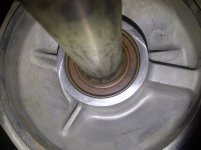
Ok, so here is the low down on this. The basic reason why they do not give you a procedure is because essentially, they want you to pull the unit so that you can get the correct install depth for the output shaft seal. However, this is how I do it and it should work for you if your patient.

First picture is the rear of the transmission. The seal is light brown and its a very small seal, and requires a special seal installer but you can make it work without it.

Then, using a small scale, measure the DEPTH of the seal below the housing plate. Now, some have a depth, some are flush, so you must determine WHERE the seal is in the housing and write it down.

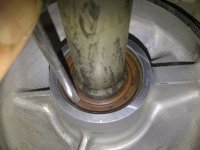
Second pic is using a small punch, put a small hole in the seal. JUST ENOUGH so that you can screw in an attachment for a slidehammer or a regular screw.

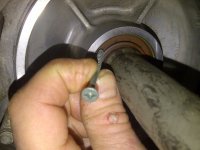
Third pic is threading the screw into the seal. I usually put one on each side and then grip the screws and pull the seal out with a slidehammer.

Then, I purchases a piece of PCV pipe from Home Depot that was the same diameter as the seal and used that to tap the new seal into place.

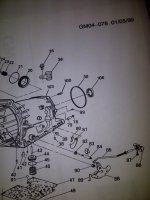
The last pic is the actual exploded diagram of the rear of the transmission. Note the seal, which is 106

Hope this helps, Paul
 

Attachments

  • IMG-20130307-00494.jpg
    IMG-20130307-00494.jpg
    123 KB · Views: 180
  • IMG-20130307-00495.jpg
    IMG-20130307-00495.jpg
    120.4 KB · Views: 169
  • IMG-20130307-00496.jpg
    IMG-20130307-00496.jpg
    118.6 KB · Views: 170
  • IMG-20130307-00493.jpg
    IMG-20130307-00493.jpg
    122.5 KB · Views: 169
Perfect, exactly what I was looking for.... If I have to go down this road I understand the diff LH / RH output seals are also an issue with this vintage. I suppose I should replace those as well as long as I have it out of the car. What is the correct part number for those seals, any tricks other than what the service manual shows?

Thanks again for your help, I really appreciate your knowledge.

Joe

HI there,

Ok, so here is the low down on this. The basic reason why they do not give you a procedure is because essentially, they want you to pull the unit so that you can get the correct install depth for the output shaft seal. However, this is how I do it and it should work for you if your patient.

First picture is the rear of the transmission. The seal is light brown and its a very small seal, and requires a special seal installer but you can make it work without it.

Then, using a small scale, measure the DEPTH of the seal below the housing plate. Now, some have a depth, some are flush, so you must determine WHERE the seal is in the housing and write it down.

Second pic is using a small punch, put a small hole in the seal. JUST ENOUGH so that you can screw in an attachment for a slidehammer or a regular screw.

Third pic is threading the screw into the seal. I usually put one on each side and then grip the screws and pull the seal out with a slidehammer.

Then, I purchases a piece of PCV pipe from Home Depot that was the same diameter as the seal and used that to tap the new seal into place.

The last pic is the actual exploded diagram of the rear of the transmission. Note the seal, which is 106

Hope this helps, Paul


Hi Paul,

I have done procedures such as you describe, but not on this particular transmission. Just wondering, wouldn't it be better to position the new seal above or below the original seal position so the new seal is contacting a new point on the shaft, in case there is a small groove in the shaft from the old seal riding on it? Hope all is going well for you, pretty slow in my area. Gotta love fuel prices. :)
 
the diff LH / RH output seals are also an issue . What is the correct part number for those seals, any tricks other than what the service manual shows?

Thanks again for your help, I really appreciate your knowledge.

Joe

Hi there,

Now your really opening up a can of details. First off, the seals that you are talking about are 2, the oring that goes around the entire circumference of the side cover and the axle shaft seal itself. Now, do NOT, I REPEAT, DO NOT use the procedure in the service manual.

It has been updated with a TSB with a revised procedure along with special sealant to prohibit further leaks.

The first pic shows the front of the right side and left side cover and the axle seal respectively.

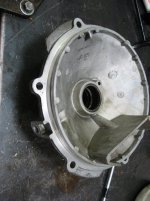
The second pic shows the groove where the oring sits.

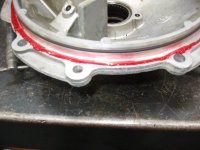
The third pic is the bead of Anerobic flange sealant used on the flange itself. The sealant does NOT TOUCH THE ORING.

Torque specifications in the service manuals are correct and should be used CORRECTLY.

Now, that being said, your final 2 details are CRITICAL TO ACCURATE REPAIR.

#1, usage of the correct fluid, 88862624 DEXRON LS is crutial to a differential that lasts as long as the car can go.

#2, do NOT, repeat DO NOT fill the fluid all the way to the top. Fill the fluid till it is within 1/4 inch of the top of the fill hole when cold. Heat with usage will create expansion that will raise the fluid level. If you do not do this, you WILL get blowout from the vent on top of the differential housing.

Part numbers: Oring 89047953 Axle seal 88996703 Anerobic sealant 1052942

Allthebest, Paul
 

Attachments

  • IMG-20120405-00428.jpg
    IMG-20120405-00428.jpg
    121.6 KB · Views: 172
  • Work 017.jpg
    Work 017.jpg
    118.4 KB · Views: 156
  • Work 022.jpg
    Work 022.jpg
    114 KB · Views: 157
Last edited:
WOW!! Thanks again for all your help!!!!! Great instructions and attention to details...

Joe


Hi there,

Now your really opening up a can of details. First off, the seals that you are talking about are 2, the oring that goes around the entire circumference of the side cover and the axle shaft seal itself. Now, do NOT, I REPEAT, DO NOT use the procedure in the service manual.

It has been updated with a TSB with a revised procedure along with special sealant to prohibit further leaks.

The first pic shows the front of the right side and left side cover and the axle seal respectively.

The second pic shows the groove where the oring sits.

The third pic is the bead of Anerobic flange sealant used on the flange itself. The sealant does NOT TOUCH THE ORING.

Torque specifications in the service manuals are correct and should be used CORRECTLY.

Now, that being said, your final 2 details are CRITICAL TO ACCURATE REPAIR.

#1, usage of the correct fluid, 88862624 DEXRON LS is crutial to a differential that lasts as long as the car can go.

#2, do NOT, repeat DO NOT fill the fluid all the way to the top. Fill the fluid till it is within 1/4 inch of the top of the fill hole when cold. Heat with usage will create expansion that will raise the fluid level. If you do not do this, you WILL get blowout from the vent on top of the differential housing.

Part numbers: Oring 89047953 Axle seal 88996703 Anerobic sealant 1052942

Allthebest, Paul
 
2000 tranny rear seal leak

I have a 2000 with 140000 miles on it,, I had to replace the front engine seal and harmonic balancer,, the balancer had a deep groove worn in it,, so when tha tranny started to leak I thought the worst,, it seemed it would leak only when the car sit a few days and the temperture would drop below 20* or so... Then it quit leaking as quick as it started and hasn't leaked since...when it leaked it was only about a table spoon or so then would stop... any body have any input on that? Gene
 

Corvette Forums

Not a member of the Corvette Action Center?  Join now!  It's free!

Help support the Corvette Action Center!

Supporting Vendors

Dealers:

MacMulkin Chevrolet - The Second Largest Corvette Dealer in the Country!

Advertise with the Corvette Action Center!

Double Your Chances!

Our Partners

Back
Top Bottom