Welcome to the Corvette Forums at the Corvette Action Center!

Help! 1972 LS5 (454) carb help PLEASE!!!!

Bolisk

Well-known member
Joined
Nov 2, 2007
Messages
441
Location
Crystal Lake IL
Corvette
1972 LS5 Convertible PS, PB, A/C
Hello all!

Just became the owner of this 1972 all numbers matching origional LS5 convertible with A/C, PS, PB, M21 4-speed, and factory hard top. Found it stilling in a barn in Bull Valley IL. She had been sitting since 1996 collecting dust, mice, and lots of poo.
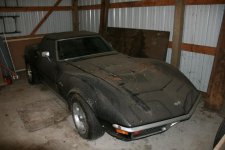
photo.JPG

I've had her for two weeks and have been slowly bringing her back to life. Took a couple of weeks to catch and dispose of all the mice. . .as well as the mess that they have made. She will be getting a new interior. Anyway, after soaking the cylinders for two weeks in Marvel Mystery oil, she spins freely. She may have spun freely anyway. . .but I didn't want to risk trying to turn her over. Anyway, I'm getting closer to starting her for the first time.

Before I can do that, I need to rebuild the carb. After removing the air cleaner. . .I noticed that this carb is missing the choke vaccume pull off, the thermostat and the rod that conncets the secondary upper butterflies to the vaccume pulloff. I've also become concerned that the vaccume hoses that connect to the carb are not run or connected in the correct places. For instance, the PCV valve was connected to the back of the carb rather than the front of the carb like all earlier models. In fact the front vaccume fitting on this car is just wide open to the world. Not sure that is correct either.

Anyone with an NCRS or Bloomington Gold correct LS5 in 1972 be willing to take a photo of the top of the engine (without the air cleaner in place) that would allow me to see where everything gets connects to the car correctly?!?!? That would be a big help.

Please note that the assembly manual is not much of a help with this as it's not 100% correct either.

Also please note that this CARB is as I understand it the origional carb to the car. It's a carter quadrajet and it's number is 7042217

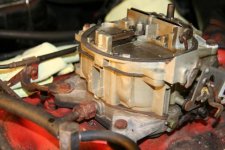
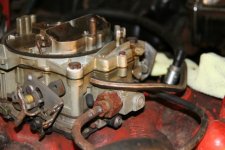
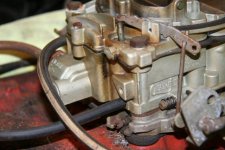
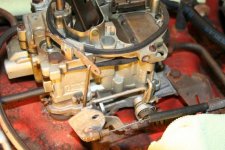
Here are some photos of how the carb looks on my car before I take it off. Please let me know what's wrong with these pictures. Thanks!!!
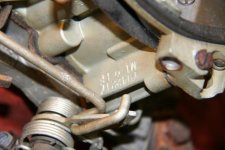
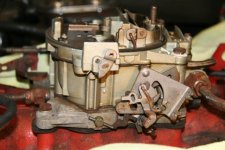
72-Corvette-010712-0026_640x427.jpg72-Corvette-010712-0019_640x427.jpg72-Corvette-010712-0020_640x427.jpg72-Corvette-010712-0021_640x427.jpg72-Corvette-010712-0022_640x427.jpg72-Corvette-010712-0024_640x427.jpg72-Corvette-010712-0025_640x427.jpg
 
Looks like a nice original carb - good candidate for rebuild and setup. You're just missing the choke pulloff and the secondary airvalve rod, along with all the divorced choke hardware. The pulloff is available from NAPA (I can give you the part number if you need it), but you'll have to find the secondary airvalve rod from a donor carb. I fabricate my own rods from 1/8" stainless GTAW welding rod, using an original rod as a template, for the carbs I get with missing rods (it's a common problem, because people don't understand the secondary airvalve system, so they intentionally remove the control hardware to "get the secondaries to work"). The choke components and rod are all available from any of the Vette or Camaro parts suppliers - Classic Industries has good quality reproduction divorced choke parts for every Camaro/Vette engine combo.

Make sure you check all jetting components against the spec for your carb number - people do a lot of "performance mods" on Q-Jet jetting, and really screw things up. Set it up to the stock specs before you do any changes to rods or jets.

Lars
 
I just ordered a HP rebuild kit from Clifs High Performance Quadrajets. He also had the secondary pull off link rod, and the correct choke pull off. I'm going ot get the divorced choke and rod assmbly from Paragon or Vol Vette. I think that was all that was missing on this carb.

My biggest concern is where all the vaccume lines go and how they are run. This car has nothing connected to the front lower vaccume at the base plate. . .it's just open to the world (e.g. dust, dirt, and grim).

-JR
 
Make sure you check all jetting components against the spec for your carb number - people do a lot of "performance mods" on Q-Jet jetting, and really screw things up. Set it up to the stock specs before you do any changes to rods or jets.

Lars

Good point. . .I guess I was assuming that this cab was stock on the inside. I was going to keep it stock because I've been told that changing the jetting of quarajets was not a good idea. Ok. . .so your point is taken. . .just dont' know where to go to get the orgional specs. Any idea on where to get that?
 
Yikes!!!

I just broke down the carb and the main fuel bowl has leprocy or something. The surfaces of the bowl were sluffing away. Almost as if the walls were skinning themselves! Anyone ever seen anything like this?!?!!

There is no way this carb would have run as is, as the bowl was full of this material. Is the carb trash? Can it be salvaged? It's in the carb cleaner dip right now. Is there a replacement bowl for the 7042217?

Let's see what else. The float needle seat is a press in brass piece with two o-rings. I've never seen that. All the ones I've done for 1972 had a screw in float needle seat.
 
So I tried carb dips strippers and mechanical tools ( dental picks. . .etc. . .).

I finally gave up and decided to duct tape up every inch of the carb except for the fuel bowl. Next, I rolled some duct tape into small little balls and jumped them into all the holes in the fuel bowl.

Then I went to the glass bead blaster and went to town on the corosion and crud. A few moments later the fuel bowl was more or less clean.

Evidently the bad fuel got under the plating and caused corrosion. The glass beads blew all the bad stuff out and left the still well attacked plating in place. Wherever the playing was bubbling the glass beads removed it.

I feel like the carb me now be reusable! According to Lares, I can helicoil the float needle seat, so between these two solutions, I think I will have a useable correct carburator. I'll let everyone know. Just need to make sure i get all the beads out of the passages.
 
Ok. . .so I admit I'm a newbie to carbs. . .but I'm not completely numpty headed.

After installing my rebuilt carb using a Cliffs performance kit. . .I noticed that some fuel was pooling on the top of the carb near the accelerator pump shaft. And under idle fuel was dribbeling down the venturies onto the primpary butterflies.

I took the carb off and readjusted the float to 3/8th of an inch. Put it all back together. . .and same problem. Except it always dribbles down the venturies now.

Float / Seat problem? Anything else? Any ideas?

Note, the rebuild book i have says to hang the needle from the front of the bar the covers the seat. . .not the rear. Does that matter?

Thanks.

Did you replace the floats or just clean and re-install? I you weigh the float, you may find it heavier than they're supposed to be thus flooding the carb... For the cost, I'd replace it just for rote.
 
It was a complete rebuild kit with all new parts. I was able to get the idle below 1000 and the dribbling from the mains stopped. She just runs like crap below 1000. Had to back the idle screws out 3 turns to get it to run at about 800 rpm. Not sure what to think now.
 
Ok, I think I'm getting somewhere. . .(thanks to information from Lars, and others). . .but I’m not there yet.

I want to document what I have seen in the event that it might help others. I will try to provide all the details. What I will not go into (because this will be a long e-mail to begin with. . .is my vacuum leak issues that made this an even longer story. So, what I will tell everyone who reads this is. . .disconnect and plug all vacuum lines to the carb and manifold except for the choke pull off and the vacuum advance on the distributor. This includes the power break booster line, the manifold line that supplies vacuum to the head lights and wiper doors, the PCV valve and EVAP canister. After you get everything working the way you want. . .start plugging those items back in one by one and note any changes to how your car runs. . .because you may have a problem)


While I consider myself to be fairly mechanically inclined. . .having restored my first corvette myself. . .this is my first time with carburetors that do not go on old lawn mowers. My first car’s cab was rebuilt professionally by previous owner. So bear with me. . .I was stupid on a few things. . .and I call myself out on it.

I rebuilt the carb with “all new” parts from the deluxe kit that Cliffs High Performance sells. I followed his (and others) books on how to perform the rebuild and correctly adjust the carb to the factory specs for that carb (not the car that the carb was going on to). That was critical, as that is what is recommended by Lars and Cliff.

Now, after completing the rebuild and adjusting everything. . .I know that I made one mistake. I set the idle mixture screws to 1.5 turns from fully seated. . .because that was how I set all my other carbs in my life. I did not check to see what the proper initial setting is for the mixture screws.

Note: The one thing that was missing from my car was the choke thermostat and push rod that actually controls the choke. So NO choke control on this car. . .so therefore choke is always off.
After the rebuild, I put the carb on the car and she fired right up on the first try and ran beautifully. “Great!!!” I thought. “I must be one hell of a carb rebuilder!!! What’s so hard about Quadrajets!?!?! I don’t understand why people thing these Q-Jets are hard!?!?!”

Note: What I failed to realize was that my car started and ran fine on the first try in a 34 degree (F) garage without a choke. I was so proud of my amazing carb job that I failed to note the white elephant in the room (how in the hell is this car running off choke?)
Now after running for 10 minutes I noticed that she started to sputter and run rough. . .and that she was running rather fast. So I went and adjusted the idle speed down a bit and the car ran worse but was running and eventually died. After restart and idle speed adjustment she ran fastish. . .and very rough. I could not tell what the idle speed actually was because the tach on my new acquisition was broken. To check idle speed, I borrowed a muitimeter / tach tool that allowed me to read the rpms off of an induction connector like a timing light. Car was running at about 1100 prm. . .rough. I could not get the car to idle down below 1000 rpm without dieing.

REMEMBER: My car does not have a choke at this point. . .so the choke is fully off at all times.

NOTE: I didn’t catch on to the fact that my idle mixture screws might be incorrectly set and that may be why I was not able to get the idle below 1000rpm.

After a bit of futzing around (still not checking the idle mixture screws because I knew they were correct at 1.5) I noticed that fuel was dribbling out of the mains at idle (or my fast idle of 1000prm without the choke). Upon everyone’s advice I checked for float level setting, I check the needle and seat. . .I replaced the needle and seat. . .and I replaced and rechecked the float over an over again. Every time. . .I had the same result. . .dribbling out the mains. I must have removed disassembled and reassembled the carb at least 5 times (I’m getting good at that now). . .checking for cracks in the air horn or warpage. . .or any indication that the gasket wasn’t getting seated correctly or firmly. Every time the same results. . .fuel dribbling down venturies from the mains.

Note: I sill have not played with the idle mixture screws. . . (ARGH I feel stupid writing this now). . .nor have I used the choke. I’ve been running the car in 34 and below weather with no choke. . .at 1000prm. . .and I’m wondering why the car will not run right. Just stupid on my part. . .
So, after talking with Lars on PM, he let me know that the idle mixture setting should be between 3 and 6 turns for initial adjustment.

BINGO!!!! There it was. . .3 to 6 turns. . .but sadly I ignored it. . .and continued to futz around with other crab (taking the carb apart and rebuilding it over and over again) because I was convinced that my carb was flooding slightly.
After noodling on it another day or two. . .I finally re-read Lar’s PM and saw his comment about initial idle mixture setting. So I figured I might as well get that correct. So I set the idle mixture to 3 and started her up. As usual she started and ran fine without the choke. . .dribbling fuel from the mains. Then as usual she started to run rough as she got warmer. This time however. . .once she got to op temp. . .I started backing down the idle and she keep running all the way down to 780 rpm. . .but she was running wose than ever. Even when I tried to adjust the idle mixture screws. . .it didn’t seem to help smooth her out. A quick look into the primaries. . .and I was shocked to see that the dribbling from the mains had stopped!!!!! Holey crap!!! The dribbling stoped!! So I ran the idle speed back up and once she hit about 980 prm. . .the dribbling started again. So I backed the idle down again. . .and the dribbling stopped but the car was running like crap. . .after playing with the screws again. . .the car eventually died on me. . .and I had to go spend time with the family. I think I was getting dribbling because my idle speed screw was set too high. . .and there wasn't enough velocity in the venturies to properly atomize the fule. . .so she just dribbled. I need someone like Lars to say whether that is a good explination or not

NOTE: I’m not sure that the dribbling is EVER a good thing. . .still looking for confirmation on that one. Anyone?
That night it dawned on my that I had not yet connected the choke (that I odered). . .and decided I need to do that ASAP. The next day, I connected the choke thermostat and rod and I’m reasonably sure that the idle mixture is set to something closer to correct. . .as well as the idle speed screws. Now, with the choke ON, the car will start but die the second I take my foot off the gas.

Not sure if I need to adjust the fast idle screw. . .but I’m thinking I will start there.

I’m also not convinced that my alternator is working 100% correctly. . .or if my coil may be going bad. . .but I’m slowly working through the issues. My immeadte need is to figure out how to get the running with the choke ON. Any help there would be appreaciated.

I’ll documents my progress as I learn / discover more.
 
Note, the rebuild book i have says to hang the needle from the front of the bar the covers the seat. . .not the rear. Does that matter?

Thanks.

Yes, it matters, and the book is wrong. The needle clip goes over the half-round protrusion on the rear edge of the bar. Putting it over the front edge can cause jamming of the needle and improper fuel control.

Lars
 

Corvette Forums

Not a member of the Corvette Action Center?  Join now!  It's free!

Help support the Corvette Action Center!

Supporting Vendors

Dealers:

MacMulkin Chevrolet - The Second Largest Corvette Dealer in the Country!

Advertise with the Corvette Action Center!

Double Your Chances!

Our Partners

Back
Top Bottom