Welcome to the Corvette Forums at the Corvette Action Center!

Little Irritants/Hood Fit

paul67

Well-known member
Joined
Mar 2, 2003
Messages
1,113
Location
Ontario, Canada
Corvette
1974 convertible
It's Boxing Day and I have time to contemplate my navel. The 1967 is in storage and the garage is empty so here goes. Corvetting in winter is an indoor activity for me. For those of us who do not have the bravado, time or expertise to do body-offs and other major projects there is always the small things to occupy unbusy minds. Mine is the fit of an aftermarket stinger hood (I believe Ecklers', hand-laid). Trivia but these things can irritate.

A local shop did a fine job with a paintjob last spring. And the paint held up perfectly during the 2005 driving season. They did have a fitment problem with the used BB stinger hood that I bought last winter and asked them to install in place of the original SB hood. I worked with them visually on that subject and we reached a compromise on what may be a basic production tolerance problem.

The compromise was on the front edge line of the stinger hood bulge. The front-to-back outer lines (alignment) of the hood are very good as are the two front corners. But that hood bulge sticks up about 1/8" from the corresponding front body surface near the emblem. I can't see how to get it down without dropping the front rounded corners as well. Any thoughts? With new paint I do not wish to start grinding.

Were there factory tolerances on this fit? I have done a search of 1967 pics on the internet and some hoods seem to be perfect and others like mine just a wee bit off. Is this a case of anal perfectus?

hood005.jpg


paintfinal019.jpg
 
Paul

not sure if this idea is feasible or not but.......
instead of trying to drop the center of the hood in the front, would it be possible at all to somehow shim up the center area of the front hood surround in any way to get it to even out and align with the hood?
 
Paul
I just noticed something on the 2nd phot showing the car dead on.
is it the ground the car is sitting on, or is it sitting just slightly lower on the passenger side than it is on the driver side?

I hadn't noticed the same problem on my own car but my painter mentioned it to me that he noticed it and I need to look at that same issue on mine myself. I'm hoping it's something as "simple" as the spring on one side isn't seated properly.
 
Barry,
As you know I do not have access to my car and thus cannot see what is under that front panel for a possible minor shimming. But it certainly is a good thought.

On sitting low, it is camera angle and the pavement outside the paintshop. I did the measurements on both sides and they are very close. The car drives and tracks perfectly. I have gotten myself into so many "if it isn't broken, break it" situations that I will leave that one alone ;) .
 
Paul
I tried to look at mine for you to see if shimming up the front surround is possible or not but in my garage the lighting is lousy plus with the hood on and up I really couldn't determine how the surround is being held down in the front so I guess we have to wait until someone who knows how the body panels are attached chimes in.

yes, i thought it was a possiblilty the cars stance was only because of the ground but figured it was worth mentioning "just in case".
I need to check mine though - where should I be measuring each side from? From the ground to what point on the frame or body?
 
There comes a time to say "close enough" and I think you've reached it.

In the midst of my restoration, as I was preparing my bare frame, I looked at a number of places where the fine craftsmen on the assembly line dragged the welding rod from point to point rather than lifting it. Since I was thinking "factory correct" at that point, I didn't attempt to repair the minor flaw (if it could be called a flaw) but since I've been involved in a couple of "better than factory" restorations, I never forget about that shortcut the welders took to keep the arc hot.

My point? Fit and finish back then wasn't high on the priority list. Getting the "product" through the line as fast as possible was. As long as it looked close enough, it was exactly that- close enough. For folks with perfectionist tendancies, finding the line is never easy but it's really easy to go past it.

Another example? Sure... While working on a 57 Belaire two door hardtop, we carefully counted shims when we popped the body off. Part of the frame restoration included a quick "pull" on a frame straightening machine despite the fact there wasn't any indication it'd been in a collision... it was just off that much.
After all the sheetmetal repairs and frame restoration was done, as we loaded the body back onto the frame, it became quickly evident that we shouldn't have bothered counting the shims. Comparing the shims we used to what we removed was interesting. After restoration, the distribution was pretty even. Before, the passenger's rear quarter was very high. Was this because the frame was off or the body was off? Who knows! Evidently, to the assembly line in 1957, it was close enough. That's what shims were for, right? Close enough.

-Mac
 
Mac,
Thank you for that reply. How quickly we forget 1960s assembly line techniques. I hesitate to call it quality control. I remember stories re the body to frame fit (before unibodies) being so bad for some cars that they were pulled off the line to a separate area for the frame to be "yanked" into a reasonable condition via chains and some other machinery. Made for some interesting alignment shim combinations at the far end.
 
Barry,
I just measured from top of tire to fender lip. They were even. That was two years ago and I haven't given it a thought since.

If you are going to start pulling out A-arms and springs I would forewarn you there are dangers involved re spring tension. And you need special tools.
 
It's so easy to drive yourself insane trying to work on the fitment... all the door gaps and the hood alignment... fenders... especially if you've got perfectionist tendancies... :ugh

The other lesson which I keep relearning is the cost benefit analysis of my time versus professional time. I like to do things myself but I know my recreation time is limited so I watch the balance, not only in my hobbies but household jobs as well.

After playing around with drywalling while renovating my basement, I finally got a guy to finish the mud & tape. He completed in two days what I had started two months ago. The work I'd done was fine but I move too slowly... I mixed my own drywall compound; he used premixed. My trowel isn't 'curved' like his... and he knows exactly how much to apply for every situation. His results weren't any better than mine but he made it happen NOW whereas I puttered away slowly.

I didn't even bother thinking about painting. I just got quotes.

-Mac
 
paul67 said:
Barry,
I just measured from top of tire to fender lip. They were even. That was two years ago and I haven't given it a thought since.

If you are going to start pulling out A-arms and springs I would forewarn you there are dangers involved re spring tension. And you need special tools.

thanks Paul, in the next couple of days i'll have to check the measurements on mine.

yep, i know those springs are tricky. i'm not prepared to deal with them this winter if I do find issues after i measure so any possible problems to fix will wait until next year anyway.
By than i'll hopefully have more experience working on the car and the confidence to tackle the job.
 
Mac,
I hear you. The pros know how to do it. But they cost $s. I am semi-retired and have time on my hands. I dry-walled the garage in our new/old house on a Saturday afternoon last September. Those sheets are heavy but it was not a terribly difficult job. And I do mud pretty well despite my career as a desk jockey. But I ran out of temperature to get the sealer and latex paint on. That will come in the spring.
 
It's 8:35pm EST and I have some family things to do. Look forward to additional comments tomorrow!
 
Paul, don't believe it will be possible to easily shim the front body as it is bonded to the metal header support that headlamp supports bolt into. Note I said EASILY, as anything is possible with enough effort, I guess.

I have a similar vertical misalignment with my '66 hood, but mine is along the front to rear side gap on the passenger's side. I have heard (note heard, no further credible information on this) that placing a heavy weight at the high spot to force it down will cause the fiberglass to take a permanent set. Since we're talking 1/8 inch or less, I don't see how this could cause any damage to paint, etc., since you're talking about such a small change in relative height overall. But, since I haven't tried it, I can't talk from experience. I do plan to give it a try in the future, however, as I don't believe it can do any harm (as to whether it can do any good or not remains to be seen).

On another note, replaced my Holley with the 1406 using your info provided earlier (same setup you're running) and couldn't be happier. Such a difference in the two I'm sure glad I went that direction.

Merry Christmas!!!

Ron
 
I have done a search of 1967 pics on the internet and some hoods seem to be perfect and others like mine just a wee bit off.

Paul I think the above phrase could be used for a couple other parts on mid-year corvettes like -- door fit, stainless trim around windshield, bumpers etc.
 
Ron,
Thanks for the advice and I am pleased that your Edelbrock conversion worked. Those carbs are not the cat's meow for performance but they sure are dependable.

JL66,
Quite true. I have looked at a number of C2s at shows and cruises and they are have some quirks. In fact some character criticized my car last summer for not having enough waves in the body panels. The painter did too good a job on sanding??

Barry,
I didn't comment on your jackstand thread despite an unnerving experience I had with my 1979 about 10 years ago. But I woke up to find this article in the morning paper. So as with front coil springs, be careful!!

http://www.canada.com/ottawacitizen/news/story.html?id=1a578ea7-01cd-40d2-acf1-de40827b0292&k=44307
 
gee, thanks for the fun reading and confidence in me Paul.......

well, think of the bright side, if that were to happen to me, at least you won't have to worry about a 9-page thread from me asking "Help, how do I get a car off me"
 
Barry,
I was not being critical. For those of us without hoists, and crawl around under cars, it is too easy to make a mistake.

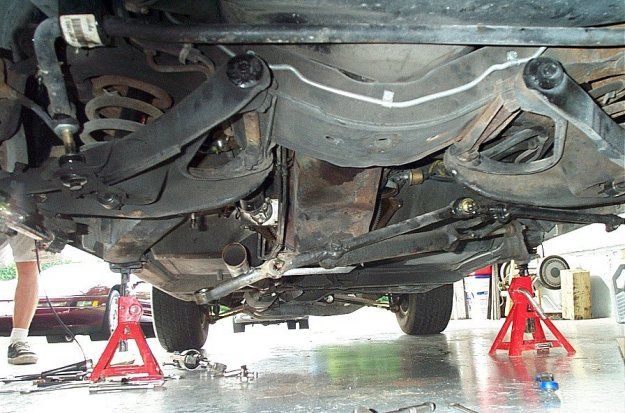
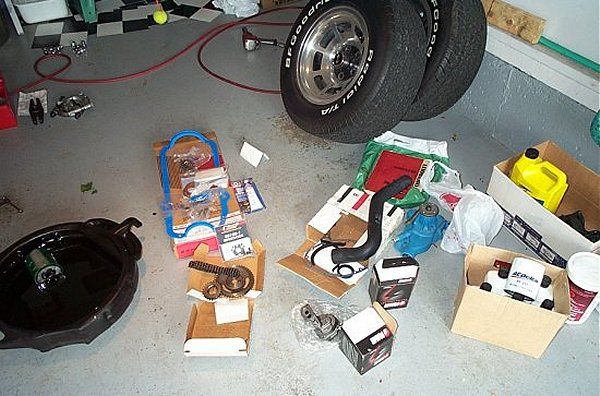
This pic shows a rear main seal job on my 1979. Love those 2-1-2 exhausts with the cross-over pipe under the oil pan! and conforming to the "while you're at it" mentality we did waterpump, oil pump, FelPro one-piece oil pan gasket, front seal, dual roller timing chain, all belts, etc. But the point is that the car was anchored securely.

bigjob_0151.jpg


bigjob_0091.jpg
 
Safety first... each and every time. :w

-Mac
 
I understand Paul and appreciate it :)

As you can imagine, since most everything I do regarding the car is new I do try to be careful and cautious no matter what it is which also explains why only I would bother to start a thread that ends up going on page after page on a simple thing like how to jack up a car onto stands! ;LOL
I do figure it's better to be thought a fool, than to be a flattened fool because I didn't ask.
 
Please keep asking. We do not need flattened fools. And you are not a fool. Some day I will relate how I almost bit the biscuit with jackstands. I was the fool then.
 

Corvette Forums

Not a member of the Corvette Action Center?  Join now!  It's free!

Help support the Corvette Action Center!

Supporting Vendors

Dealers:

MacMulkin Chevrolet - The Second Largest Corvette Dealer in the Country!

Advertise with the Corvette Action Center!

Double Your Chances!

Our Partners

Back
Top Bottom