Welcome to the Corvette Forums at the Corvette Action Center!

Question: Mechnical Flat Tappet Rebuild

1. I used viton
2. I got mine from Comp
3. Kit comes with a little plastic sleeve to put on the valve stem. Use a retainer to push them on.
4. Use a little oil to get it over the stem.
 
I believe the guides need to be cut on the OD to allow positive seals to fit. I certainly could be wrong as this is not something I regularly do but be prepared. I have a set of world heads I may want to intall the positives on but I don't know the guide diameter of those off hand either.
 
Any news on the cause yet & repair? I started to do the same over the weekend myself.
 
Thanks for reminding me to post an update.So i did a lot of looking arround on the web, and came accoss several other forum discussions regarding me exact same problem: Smoke in the following cases, 1) at idle 2) when i pull away from a prolonged stop at a light 3) blip the throttel when at idle. I do not get smoke while cruising or under hard acceleration. The other weird thing is that i get a puf of smoke at start up ( seals), then nothing for five minutes or so. Once the car is close to op temp, then it starts to smoke from the exhaust...suggesting, oil in the exhaust starting to burn off. The two most commong problems (on the internet) appear to be valve seals, and/or intake manifold to head mating.

So, here is what happened since my origional post:

I drove the car down to bloomington gold on friday, probably 50 miles round trip. After the car cooled down, i noticed i burned approx 1/2 quart of oil. So i toped the oil off.

I drove the car down to bloomington gold on saturday, and after the car cooled down, burned another half quart. Smoked like crazy, was very embarrasing at the stop lights. People covering there mouths and noses.Saturday night i toped the oil off again, and after reading the other forums, decided to tighten up the intake as a test. Gave most of the bolts a good tug.

I drove the car down to bloomington gold on sunday, not as embarrasing, but still pretty bad. Checked the oil that night, and noticed that it was only about a 1/4 down. Hmmmmmm

So, i decided to redo my intake. When i loosened up the bolts, i noticed the intake slowly pop up at the ends and some coolant started to leak up. This time i decided to not use the rubber seals on the front and back of the intake. I took the intake off, removed the rubber seals, then checked the side gaskets. They did not appear to be conpressed at the bottom, and the appeared to be oil in the intake runners and on the gasket.

Before i started reassembly, i put enerything back on, except for the front and back gasket, and torqued everything down. I checked to see that there was an end gap at the front and back, there was, then i took it all apart and verified that the side gaskets compressed. They did. Needless to say everthing pointed to this being the culprit.

So this time i slopped on the hight-tack, on both sides of the new intake side gaskets, then i used ultra black on the front and back locations. I torqued everything down to 30 ft/lbs and let it sit for 24 hours to make sure the ultra black had time to cure.When i started the car for the first time, after warm up, smoked worse than ever. Damn it!!!!

Drove arrond about 20 miles, horrible smoking. Since then i have put about 70 miles on the car and it no longer smokes out of the driver side exhaust. Sill smokes out of the passenger exharust, but no longer embarrasing. Was hopping that this is gust the extra high tack burring off in the exhaust heat riser crossover. Dip stick does not appear to have much oil loss over those 70 miles. Note, i changed the plugs befor driving this 70 miles, and just checked them today. All plugs but 1 (cylinder 1), are absolutle perfect! 1 is horribly oil fouled!

I,ve done a compression test, amd all cylinders are between 210 and 215 psi. So i can't imagine that it is rings. So, spark plug 1 ( front driver side) is badly oil fauled, all rest are perfect...so what i cannot explain is, why all the smoking is comming from the passenger side!!!!!! Is would seem that it should be comming from driver side, bacause of spark plug one. Only thing i can think of is if the exhaust is being sucked up and ove the heat riser to the passenger side.

Note, i do not have a heat riser valve in the passenger pipes. So, at the least, i have a bad seal on number 1 intake. Can't think of any thing else. Note this car never burned oil prior to the head work, and the car had many miles of hard good drivibg on it before the exhaust valves went south.Anyone got ideas or explanations?
 
Weird. . .

So yesterday I wrote about how it no longer smoked from the right side. . .and how the it was less embarrasing. Well, I got in the car this am. . .started it up. . .and backed out of the driveway in a cloud of somke. . . again after it go warmed up a bit. The first half of my 20 mile commute was an absolution smoke fest. The second half (after I got some gass) was still smoky. . .but right back to how it was last night.

So it occured to me that I DID do something lask night that "might" have something to do with this. . .but I'm not sure.

So as I mentioned before, this car did not have hardened valve seats prior to this head rebuild. . .and now the smoking problem. Before my heads went, I was using a lead substitue in the fuel. . .very sparingly. . .as lead substitue was expensive. . .and some times I just forgot to add it to my tanl. The product I was using is CD-2 Lead Substitute. I would put approximatly 1 ounce per tank.

Since I have rebuilt the heads. . .I have been putting 2 or 3 ounces in my tank to try to get rid of the remainder of this lead substitue that I don't need anymore. Rather than throw it in the trash. . .figured I would burn it in the gas. . .and just us more than I normally would. So I added 2 or 3 ounces to my 1/2 full tank last night. . .then put approx 10 miles on it this am. . .before I got to the gass station. . .at which point I filled the tank up and immedatly noticed an improvment in the amount of somke that was comming from the tail pipes.

Could this be the culprit? Could this really be what is causing the smokeing now? Oil loss on the dip stick is almost un-noticable. . .and I have no other explanation for it. Clearly cylinder 1 still has an oil issue. . .but it still does not explain the smoke from the passenger bank. Neither does the CD-2 being the culpirt. . .now that I think about it. . .but it is something that is easy to test. I just will not put any CD-2 in my tank for several fuel stops and see if the problem gets better or goes away.

Anyone have any ideas?
 
This is an interesting problem.

Since it started AFTER you had the heads re-done, I'd suggest that the shop didn't replace any guides or valves. Unfortunatly, the only way I can think of to find out is to pull the heads and then remove the springs while they"re on the bench and see how much side movement there is.

Even in your 1970 engine, I'll wager you can't drive it far enough or long enough to see any problems caused by unleaded fuel. Supposedly, not having hardened seats would allow the exhaust valves to beat the seats back into the head (recession). Since your problem is oil burning/consumption, I can't see how that could play onto the equation. It would cause a drivabilty issue- engine running rough/missing is that happened.


All that leads me right back to the valves and guides. Compression is good on all cylinders as you stated, so that takes out rings and valve sealing. When the engine is running, remember the valves are bouncing around on the seats and supposed to be turning at the same time- not much, but they do turn a bit. If the guide is too big, the valve could be moving at an angle to the seat/guide, the snapping into the seat when the compression gets there. A leak down test "might" show something, but I suspect it will not.
 
So i did all tese tests before having the heads redone. The valves were bad and the guides were very loose. I specifically ordered hardened vavle seats, valves, guide sleves, springs and seals. All this was verified by me when i got them back, as i installed the heads myself. The only thing i did not confirm is vavle guides (e.g. I did not remove the valves and check that they did not have side play.)
 
So It's probably not the CD-2, because this AM i starterd the car. . .no smoke for about 5 minutes. . .then it started smoking from both tail pipes. It was a smoke fest for 10 miles or so. . .then is became less to where the driver side bank does not smoke anymore, but the right side does.

So, this problem appears to be directly related to how "warm" the eingine and exhaust is. Begining to wonder if it is the rings. . .e.g. the block expands at warm up. . .therefore the rings leak. . .then when the cylinders expand later, it seals better. I'll probably replace the seals this weekend. . .and if that doesn't work. . .I'll attack the rings over the winter.
 
Ok update,

Lars takes the prize on this one!! :)

So after doing the intake a bunch of times . . . with very little success. . .and after verifity the ange of the heads and intake with the alignment tool from fel-pro. . .I finally go arround to getting myself a stud mount spring compressor to check my new valve seals.

Sure enough both viton positive stop seals on the intake and exhaust of cylinder 1 were torn!!!! The top part of the seal was riped apart from the bottom part of the seal. No chance in hell of it keeping oil out. The top portion of the seal easly slid off the valve steam!

So now I have some new problems. The viton positive stop seals that were put on my car were pressed on to the valve guide. . .in other words the guides were not machined to accept a slip or press fit valve seal. These were just pressed over the existing as cast guides. Do they even make that kind of seal?!?!?!?!?!?

NEXT, the new valves that were installed in my heads do NOT have the second groove for the old school o-ring seal!?!?!?

Obviously, I will be haveing a lengthy discussion with the machine shop tommrow. Having said that, I would like to know what my options are for a DIY at this point? Do I have to have grooves in the valve steam for the umbrella and or o-ring type seals? is there any way to seal these suckers without pulling the heads off and going back to the machine shop?

Any help / advice would be great!!
 
Ok update,

Lars takes the prize on this one!! :)

Obviously, I will be haveing a lengthy discussion with the machine shop tommrow. Having said that, I would like to know what my options are for a DIY at this point? Do I have to have grooves in the valve steam for the umbrella and or o-ring type seals? is there any way to seal these suckers without pulling the heads off and going back to the machine shop?

Any help / advice would be great!!
Lars knows what he's talking about and if you follow his advice, you will probably spend a lot less time and money fixing problems. On the other hand, my advice is often off-base and simply the result of trial and error, and error, and error.

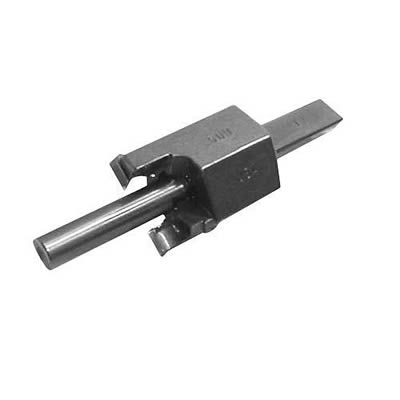
I don't do machine work and I am at the dangerous end of the amateur scale in auto work (I try almost anything and sometimes get it right on the second try). If you paid to have the valve guides cut for positive seals and they weren't cut, your machine shop should fix the problem. If you didn't pay for that work to be done, it is probably something you should have done -- or do it yourself. In any case, I think you are going to have to pull the heads to fix the problem. To cut the guides, you need a valve guide cutting tool with the right size pilot (matching your valve stem size) and cutter (matching your positive seal size). Summit and lots of other speed equipment outlets sell the tool (around $75). It's meant for a milling machine but I've seen it used on a 1/2-inch drill at low speed and it looks like this:

hrs-92040_w.jpg


Here's a link to a bunch of different size cutters:
Search Results for valve seal cutter - SummitRacing.com
 
Ok update,

Lars takes the prize on this one!! :)

Sure enough both viton positive stop seals on the intake and exhaust of cylinder 1 were torn!!!! The top part of the seal was riped apart from the bottom part of the seal. No chance in hell of it keeping oil out. The top portion of the seal easly slid off the valve steam!

The viton positive stop seals that were put on my car were pressed on to the valve guide. . .in other words the guides were not machined to accept a slip or press fit valve seal. These were just pressed over the existing as cast guides. Do they even make that kind of seal?!?!?!?!?!?

NEXT, the new valves that were installed in my heads do NOT have the second groove for the old school o-ring seal!?!?!

Yeah, I had a funny feeling you were sucking oil down those guides...

The Viton Positive Stop seals cannot be used with as-cast guides. If they are jammed down over the top of a cast guide boss, they will not seal, and they will likely tear, as you have observed.

Valves without the upper stem seal groove cannot be used without positive stop seals.

Your "machine shop" has missed the boat on the parts combination used on your heads, and you will need to make some corrections.

If you want to keep the valves, you're going to have to have the valve guide bosses on your heads machined by a qualified machine shop to properly accept the positive stop stem seals. There are some "umbrella seals" available that will shield and cup over the top of the as-cast bosses, but these seals are not intended to be used by themselves without the upper stem groove seals: They are a "band-aid" to slap on a stock worn engine to reduce oil consumption from worn valve guides.

To do the job right, you need to pull the heads and take them to a real machine shop for proper sizing of the guide bosses to the seals. There are tools to do this with the heads on the engine, but I've never seen the finish come out right, and you stand to generate a lot of metal chips in your open heads - I wouldn't do it, although many people will; I'm sure I will get argument.

Good job finding the source of the problem, and good luck with the upcoming repair solution!

Lars
Denver
 
Yeah, I had a funny feeling you were sucking oil down those guides...

The Viton Positive Stop seals cannot be used with as-cast guides. If they are jammed down over the top of a cast guide boss, they will not seal, and they will likely tear, as you have observed.

Valves without the upper stem seal groove cannot be used without positive stop seals.

Your "machine shop" has missed the boat on the parts combination used on your heads, and you will need to make some corrections.

If you want to keep the valves, you're going to have to have the valve guide bosses on your heads machined by a qualified machine shop to properly accept the positive stop stem seals. There are some "umbrella seals" available that will shield and cup over the top of the as-cast bosses, but these seals are not intended to be used by themselves without the upper stem groove seals: They are a "band-aid" to slap on a stock worn engine to reduce oil consumption from worn valve guides.

Lars
Denver

Hi Lars,
I just reread this since I've been chasing a oil burning issue with my 350 for the past 4500 miles since rebuild. Everything so far has been checking out ok with my tests, but I don't get to work on it much. The last time was around the 4th of July!. Anyway the heads on this engine are WP SR Torquers,nothing HP but good for my needs. I bought them 10 years ago from an ebay shop in the mid-west and when they came in were covered in chips, the shop said they machine them. I did take them apart, did a mild port & polish to them and assembled them back with the Umbrella seals as they came in. The valves only have the groove for the retainers,nothing for an o-ring. Now I wondering if that is my problem, compression is great at 200 psi but the leakdown was bad but I suspect my gauge may not be accurate.
I was completely unaware of the fact about the singe groove valve stems. I believe WP head guides are machined to .530-.531" OD but can't confirm unless I pull the spring off one and mic it. Does anyone know if that is true? Calls & emails to WP didn't get through and the one time someone did pickup he wasn't sure about it ?

Thanks for the advice, if this prevents me from pulling the engine next spring all is good!
 
Just posted the resolution to this issue to the wrong thread. . .I've copied it here:

Ok, so final story on this one.

I agree with lars, I think the postitive stop seals were installed incorrectly. In other words, the machine shop (who shall remain nameless) attempted to install these (Manley 24045-8 - Manley Viton® Valve Stem Seals - Overview - SummitRacing.com) .530 sized postivie stop seals on my guides which were machined (a long time ago) to .570. When I inspected those seals. . .many of them were torn/ripped at install because they were hammered apon to get them to fit on the existing guide. When I pulled those seals off. . .they viton inside the metal sleave was all bunched up and squished up to the top and all jamped together. In several cases the tops were sperated from the base. . .and in others, the metal case was split from being over stressed. I removed them.

When I talked to the machine shop, they said that those seals were special ones that would fit on that sized guide. I called Manley, Felpro, and Edelbrock, and all of them had the same story. . .those seals come it two sizes to fit the same size guide O.D. .530 and .500.

I looked in vain for several days to try and find larger positive stop valve seals. I gave up and decided to go back to the o-rings. . .only to find that the new valves do not have the second groove for the o-rings. Thanks again. . .mr. machince shop. Then I decied to go with umbrella seals. . .only to find that no one makes an umbrella seal that will work with the hi-perf springs that have the damper coil in them. All the umbrella seals that I found. . .would not fit inside the spring.

Then at one autoparts stop, they showed me these fel-pro seals: Fel Pro SS72527 Fel-Pro Valve Stem Seals

These are viton (according to the fel pro packageing) even though both JEGS and Summit say they are rubber. Anyway, these positive stops seals have a spring retainer that can streatch arround the .570 guide. So I tried them and they went on without any issues and appear to be solidly connected to teh guide. My only concern is that these were slighly bigger in the OD over the other seals. . .and I was concerned with clearance betweent he OD of the seal and the ID of the spring (with damper).

After installing and checking it. . .these fel-pro seals do not touch the spring. . .but they are DAMN close. Got it all back together last night, and started her up.

ZERO exahust smoke!! Car runs perfect, and is not embarrasing.

If you are reading this thread. . .and have similar behavior. . .check the seals first, then play with the intake. Take my word for it. :)

Regards,
Bolisk​
 
One other thing that I did. . .even though ti's probably not right. . .and will do nothing. . .but I figured that it couldn't hurt. . . .

I put the o-rings on the valve stems (with out the grooves) anyway. . .being carefull not to have the seal drop below the retainer. So the orings are wedged between the retainer and the bottom of the keepers. This is in conjunction to the new positive stop seals that I installed from felpro. Figured the worst thing that could happen is that the seals pop down below the retainier. . .and they just ride on the stem. Anyway. . .new seals appear to work great.
 

Corvette Forums

Not a member of the Corvette Action Center?  Join now!  It's free!

Help support the Corvette Action Center!

Supporting Vendors

Dealers:

MacMulkin Chevrolet - The Second Largest Corvette Dealer in the Country!

Advertise with the Corvette Action Center!

Double Your Chances!

Our Partners

Back
Top Bottom