Welcome to the Corvette Forums at the Corvette Action Center!

Question: Paint issues

cwerve

Member
Joined
Feb 1, 2013
Messages
11
Location
Flordia
Corvette
1974, red 454, convertible
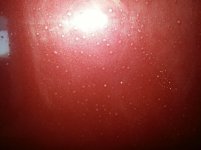
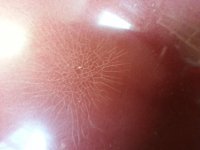
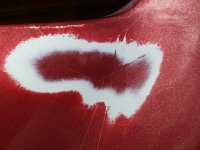
I am restoring a 74 BB convertable. It will be a driver not a show car. I have two issues with the hood that I am looking for advice on. Someone with experience with fiberglass/paint should be able to help. I will post 2 pictures. 1) a spider looking spot located directly above the carburator center rod. So I am guessing that in the past life someone closed the hood with sonething in the way. On the bottom of the hood at this location is a spot the size of a quarter that looks like bondo. Any advice on the proper repair? 2) A spot about 20 inchs wide covered with dots. Not sure what I am dealing with here. Did some discovery using 600 grit wet paper and the primer shows thru long before the dot is leveled out. Again any advice welcomed. Want proper repair prior to thinking about painting.
 

Attachments

  • dots2.jpg
    dots2.jpg
    123.3 KB · Views: 118
  • spyder crack2.jpg
    spyder crack2.jpg
    113.2 KB · Views: 119
For the carb stud mark, you could dig out the bondo and lay up a fiberglass patch.. That would be "correct." As long as the bondo is good, you could scuff sand it and shoot semiflat black over it to match the underside of the hood. That's "cheating," but it works.

I have not seen the bumps as shown in your first pic. If you can sand the color coat off the tops of these, my hunch is that they are in the primer. If that's the case, getting rid of them might be farther than you want to go if you want to keep the original paint.

Got a friend with a body shop? Let him/her take a look at it.

:thumb
 
Thanks for your reply Mike. I am sure paint is in the future. Just fitted the front & rear bumpers. Think the bumpers will be painted before the final install. Is the spider web in the hood most likly just the result of the stress cracking the old paint due to the puncture from below the hood? Do a fiberglass patch on the bottom make it look smooth flat black paint and then address the top as normal prep? Same for the dots it would be just normal paint prep? Sand, prime, seal & paint? I have done some paint work but only a doors or fender and no fiber glass. As for the dots ?? result of some previous bad paint prep?

I am looking for a paint shop to work with. Don't have one yet. I would like to do the prep, most likly with some direction then have them shoot the major car parts. Might try the bumpers and hood myself and see if I can live with that. Thinking the Color match might be a problem.
 
In the first photo, the paint damage is what is called solvent pop. It is caused by either inadequate ventilation air flow during the painting process in the paint booth or by top coating before the previous coat has dried properly. In other words, poor painting technique on the part of the painter. It will just need to be sanded out to remove the pops and refinished properly. In the second picture, that is a classic spider crack in the body panel. Spider cracks can be difficult to repair. The cracked area is going to need to be ground out and filled with resin & fiberglass mat. Any bondo or plastic filler will need to be removed for a proper repair, as it will fail sooner or later. If the spider crack is in a factory body panel, you will need to use an epoxy based resin suitable for use on SMC body panels. Polyester based resins won't stick properly to SMC and will fail sooner or later. Lord Fusor, 3M or Evercoat are three brands that make proper materials for repairing SMC and should be available thru any well stocked autobody supply store. Good luck with your project.
 
What an awesome answer. It has a name "solvent pop". Thanks, knowing what you are dealing with is half the battle. This also may confirm my suspicion that there was a repint somewhere in the 40 year histroy of this car. Will also address the spider crack. I can get a small piece of fiberglass and experiment with repair before I tackling the hood. I am retired with time , energy and some skills.

One follow up questions which I suspect will be hard to answer. The color code on the car is medium red 1974. It looks like the color in the books. On close inspection of the paint you can see tiny golden flakes in the paint. Is this part of the orginal paint? Is there any chance that a paint match is possible for the hood & bumpers? The paint on the rest of the car actually looks pretty good and I am happy with the color.
 
I'm not familiar with the '74 red, so take this for what it's worth. With the solvent pops, we know the car has been top coated at some point in time.The color in the photo to me appears to be a metallic maroon. If the original color was a metallic color, your gold flakes could be silver metallic flakes in a red tinted base. With the repaint, a PO could have went with the original color or a similar different color. Or the repaint could have been a candy type job over a gold base. Hard to tell by a photo. What I would suggest is to examine the car for clues of what the original shade looked like. You can pull back the weather stripping or remove the door sill plates to look for the original paint. If the top coat isn't the original color, a paint supplier using the 3M color match system should be able to closely match the existing color. Not exactly, but close. Hope this helps. Again, good luck with your project.
 
If you are going to go into the hood crack the product we use is Feather Fill by EVERCOAT. It is a 2 part sprayable polyester primer that does an excellent job of filling and stopping those kinds of cracks. Good for the ones around headlamp openings also.
 
Sorry but No, Feather Fill will not repair a star crack. Only resin & matt will if you want to fix it properly.
 
Doing restoration has an element of CSI in it. I did the repair on the carburetors stud penetration with the mat and resin process. Looks like acceptable results. In my practice pieces I found out less is better. Now on to the rest of the hood. Found a spot at the edge of the hood near the center bump and windscreen. It has little cracks in the paint. The attached picture makes it look big but is actually pretty small. I have removed the top layer of paint and the primer then then part of the second(original ) paint. I am happy to see the re spray was the exact same paint as the original paint color. Paint code 74. Now for the question. Best repair options? Continue the surface removal down to the original panel? I think the cracks are in the paint not the panel. The surface is complex curves. the feather coat product sound like it might be a fit here. Any suggestions.
 

Attachments

  • hood4.jpg
    hood4.jpg
    120.2 KB · Views: 94
If the cracks are in the paint and not the panel, then you need to sand the cracks out to remove them. If not removed, they will come back thru your new paint. If you sand them out, you will end up with a low spot and the Feather Fill will work fine to fill the low spot. Main thing is, any defects in the paint or the panel needs to be eliminated before top coating. You will need a primer gun with at least a 1.8 needle and air cap to spray the Feather Fill or most primer surfacers.
 

Corvette Forums

Not a member of the Corvette Action Center?  Join now!  It's free!

Help support the Corvette Action Center!

Supporting Vendors

Dealers:

MacMulkin Chevrolet - The Second Largest Corvette Dealer in the Country!

Advertise with the Corvette Action Center!

Double Your Chances!

Our Partners

Back
Top Bottom