Welcome to the Corvette Forums at the Corvette Action Center!

SYS light flashing - just replaced battery.

  • Thread starter Thread starter sexasomniac
  • Start date Start date
Jake, I found the SYS resistor fix. However, all of them were for pre-94 cars. I am going to print out the SB and the text of what they said to do and see if they match my wiring diagram, I don't see why not as my FSM says there's a SB for it. I guess it's the same one.

Will keep everyone interested informed.
 
Jake, here is a photo of my OBD plug. If the FSM is correct then I can jumper the pins and read out the codes. Tell me what you think about the plug. Also, notice that the metal tab is bent on the right side.

DSCN2073.JPG

The photo won't work. In order for it to work, on way is for it to be preceeded and followed by brackets and IMG.

Jake
 
[DSCN2073.JPG]

No it still doesn't work. Here's how I post pics: I got to Photobucket.com where I posted the pic. I then click on the "IMG" name of the pic, copy and paste it to the thread in the Forum. It'll look something like:

.

There are other ways to post pics; the different procedures are probably listed somewhere on this Forum.

Jake
 
Joined Photobucket.

Here is my first attempt.


Here's how I do it.

I joined Photobucket, then uploaded photos from my hard drive to the Photobucket site. Once they're uploaded, when you view the photo you'll see, below the photo, several links which identify the photo by name. The link to be copied and pasted to the Forum will begin with IMG.

I simply highlight that name, go up to EDIT at the top of your browser screen, click on COPY, then I go the the Forum, open a message and in the area where the message is to be typed I return to the top of my browser and, under EDIT, I click on PASTE. The photo will then appear the next time that thread is opened.

As I said before, there are other, and perhaps slightly easier, ways to post a photo on the Forum, but this is just the procedure I've been using.

Jake
 
But didn't the preceding post work? Did you see the photo when you clicked on the link? Or do you mean follow your instructions so the photo will show up IN the post? I would like that better. I will try your suggestion.


Anyway, today I bought the resistors at Radio Shack, and some "mushroom" splices. I plan on doing the mod when my wife and I don't have fifty million errands to run. I can hardly WAIT (sarcasm) to remove the console, the center air vent, the face plate (all according to the manual) and then remove the radio and do the mod. THEN I have to see if those guys at Best Buy messed up the chime plug going to the CCM. I have had intermittent chimes since they installed the stereo. Plus, when the mod is done all it will do is extinguish the SYS light and not dim the stereo. I dunno, maybe it will.

I read a WEALTH of information on this resistor mod last night and thanks for pointing me in the right direction. It seems a lot of people have had the same problem. I plan on taking a lot of detailed photos of the entire mod with particular attention paid to how to splice. I used to splice wires on planes daily so this is right up my alley.
 
Jake, HA HA, it works! I followed your directions and it worked! Thanks!
 
Yep, you nailed it. There's at least one other way of posting photos using less key strokes but I don't recall the exact procedure, so I just stick with what I know.

Where did you find other information on the resistor? I only know of what I once read on the corvette forum. I'd like to bookmark the site(s) for future reference and so I can pass it along to others having the same problem.

Thanks for the update.

Jake
 
Gosh, I don't know now Jake. I will enclose the text of what I found.

You will need (2) 1K-ohm 1/2 watt resistors.
Connect one end of one resistor to the grey/black wire behind radio.
Connect one end of the other resistor to the purple/white wire behind radio.
Then connect the other end of both resistors to switched 12 volts(red wire on after market radio).

This is not necessary in all situations. But on 1990-93 this is the solution. It is listed as a GM TSB. Bulletin # 93-86-9A.

1. Buy (2) 1 kilo-ohm 1/2 Watt resistors. [Radio Shack part # 271-023. They sell them as a 2-pack for 29 cents.]
2. Disconnect the negative battery cable.
3. Remove the receiver.
4. Connect one end of both resistors to ignition power. (Yellow wire in the car.)
5. Connect the other end of one resistor to the purple/white wire in the car.
6. Connect the other end of the second resistor to the grey/black wire in the car.
7. Cover all connections and completely cover the resistors.
8. Reconnect the negative battery cable.

I actually saw that someone scanned in the actual TSB with the wiring diagram. It may be on the forum here or here: forums.corvetteforum.com.
 
Curious lonely plug.

I found this when I was inspecting the engine today. Any idea where it goes? It is located on the passenger side of the air filter. Any help would be appreciated.

DSCN2081.jpg
 
Gosh, I don't know now Jake. I will enclose the text of what I found.

You will need (2) 1K-ohm 1/2 watt resistors.
Connect one end of one resistor to the grey/black wire behind radio.
Connect one end of the other resistor to the purple/white wire behind radio.
Then connect the other end of both resistors to switched 12 volts(red wire on after market radio).

This is not necessary in all situations. But on 1990-93 this is the solution. It is listed as a GM TSB. Bulletin # 93-86-9A.

1. Buy (2) 1 kilo-ohm 1/2 Watt resistors. [Radio Shack part # 271-023. They sell them as a 2-pack for 29 cents.]
2. Disconnect the negative battery cable.
3. Remove the receiver.
4. Connect one end of both resistors to ignition power. (Yellow wire in the car.)
5. Connect the other end of one resistor to the purple/white wire in the car.
6. Connect the other end of the second resistor to the grey/black wire in the car.
7. Cover all connections and completely cover the resistors.
8. Reconnect the negative battery cable.

I actually saw that someone scanned in the actual TSB with the wiring diagram. It may be on the forum here or here: forums.corvetteforum.com.

Thanks for that info, Paul. I made a doc file of it.

I'll take a look at my car when I go outside to see if I can locate where that passenger side plug goes.

Jake
 
Thanks Jake. I am right now about to upload the TSB with the wiring diagrams.
 
I finally did the mod with the resistors today and it works great. I had to pull apart half the car but thanks to the FSM it made my life easier.

Now when I do a diagnostics check I get a C 12 in the CCM and no other codes. This is great.

If anyone needs any help or advice on how to do the aftermarket stereo resistor Tech Service Bulletin for the SYS light let me know and I will be glad to help.

Paul 1994 LT1.

Glad to see it worked out well for you, Paul.

Jake
 
Hi Jake! How's things?

Man have I done a lot to my car. New upper A frame bushings, new rag joint, two new serpentine belt pulleys, new serpentine belt, new auto-dimming rear view mirror, new sun visors, new header garnish, new rear deck trim, painted the rear speaker grills, new Bilstein shocks, new lower ball joints, the resistors, and today I'm going to remove the right door panel because the power window switch looks like it was pried off and it may have broken the door where it mounts but I have some really good two-part epoxy that you knead by hand which should fix that. Then tomorrow or the next day I am going to remove the radiator and remove tons of garbage it has sucked up. I also have to replace the coolant sensor someone broke. It is a lot of work but it is getting better all the time.

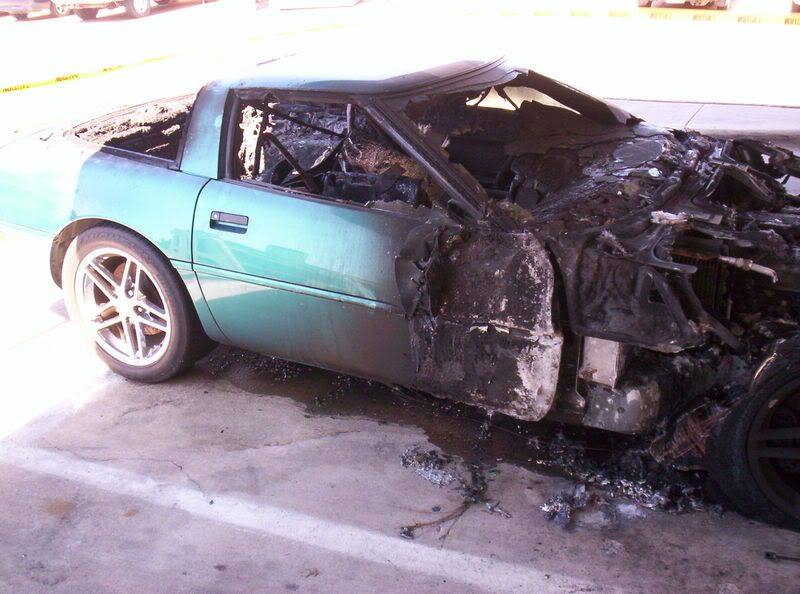
Well, since you asked how things are, one picture is worth a thousand words.

100_0550.jpg


Jake
 

Corvette Forums

Not a member of the Corvette Action Center?  Join now!  It's free!

Help support the Corvette Action Center!

Supporting Vendors

Dealers:

MacMulkin Chevrolet - The Second Largest Corvette Dealer in the Country!

Advertise with the Corvette Action Center!

Double Your Chances!

Our Partners

Back
Top Bottom