Shawn's 78
Well-known member
I recently finished up my stereo upgrade on my 78', and thought I'd share the final product.
First, thanks to everyone before me that posted notes and photos of their stereo/speaker/amp install. They were very helpful and instrumental in designing what I consider a very well rounded audio system for a late C3 78-82 Vette.
IN THE BEGINING....
The original system when I acquired my Vette (13 years ago) was an aftermarket cassette player (from the 90's) and stock 4x6 dash speakers. About 4 years later, I upgraded to a Pioneer 50w CD player, and Pioneer 4x6 dash and 6.5" rear speakers. The following year I purchased a used flat-panel Kenwood Subwoofer off Craigslist. Overall, at best it was "OK", but a marked improvement from the system I inherited.
FAST FORWARD TO 2013….Unable to hear the stereo with the T-tops off (and oh yea, I have chambered exhaust!), I desired some cruising music. My buddy and his newly restored (frame-off) Daytona Yellow 69, installed a system that I drew my inspiration to start the process of researching and purchasing parts. Now on my quest to see what has been done, I researched the forums and began to compile my notes from others before me. I must have had 50-60 pages of printed photos, comments, install advice etc.
WELCOME TO 2015!
Well over a year (plus) in the making, the final results are in and in my opinion I created a system that encompasses a balance of style and modern performance (without breaking the bank).
Here's the list of components:
Stereo - Pioneer MVH-X560BT
Amp - JL Audio XD400/4 (400w)
Speakers Front - Infinity Kappa 50.11cs (components) 5.25"
Speakers Rear - Infinity Kappa 62.11i 6.5"
Speaker Subwoofer - Sound Ordnance B-8PTD 8" (integrated amp 125w) with remote level control
Wiring - Amp 4 gauge direct wired to the battery / Subwoofer 8 gauge direct wired to the battery / Stereo wired to an open "keyed" location on the fuse panel.
WHERE DOES THIS WIRE GO???
My initial install was done over the course of 9 months. It started with one speaker, which lead to a speaker wire, then remove the console… well you get the picture.
I completely gutted the majority of the interior (you'll see when you check out the photos, and that’s another post in of itself!). That actually was a blessing as it gave me unrestricted access to design and test fit components before final fitment.
BACK TO FRONT...
REAR SPEAKERS – I used the stock location and installed 6.5" speakers that fit nicely. I used the same press-board as used for the console side-skirts. I made a template out of cardboard, and then transferred to the pressboard where the hole was cut and overlaid with carpet. The (rear) speakers have tweeters that are adjustable (rotate to different angles) and this was a nice feature when it came time to tuning the sound. (I’m sure a 6x9 would work just fine if you wanted “more” speaker. And maybe I’ll give that a try at a later date. But since I’m using a subwoofer, I felt larger speakers wouldn’t be used to their full potential as I would remove a good portion of the bass that those speakers would normally be set for).
FRONT SPEAKERS- This took a bit more finesse, but the results were well worth it. Because I was using components (separate woofers & tweeters), I was able to achieve a more rounded and full sound from driver/passenger seat. The woofers mounted in the kick panels required endless measuring to ensure the cut was done right the first time. Because I chose not to cut into the metal frame, there was no room for error when cutting the kick-panel. I used a dremol like tool (Sear’s version), to make the rounded cut in the kick-panel. This was important as I needed a perfect hole and I didn’t want to break/crack the fragile plastic. *note – not all speakers are created equal. When fitting, rotate your speaker to give you the most depth possible.
The woofers were mounted on the outside of the kick panel and speaker grilles over the top. The back side of the kick panel was lined with Thermo-Tech Cool-It insulation to keep any vibrations at bay. The tweeters were mounted in the existing 4x6 location. Because there was no mounting plate that fit that opening, I used the supplied bracket and epoxied the tweeter to the underside of the factory speaker cover. As for the crossovers, those were mounted in two separate locations. The driver’s side was mounted inside an opening I cut in the kick panel (almost seems it was meant to go there). The passenger side started at the kick panel, but due to the heater ducting, it would not fit. So I installed it on the heater box housing. Both have fairly easy access to turn on/off the 3db button.
STEREO & AMP – I wanted power in a small package and since my buddy installed this same amp in his 69 (different location), it gave me an idea that in the end worked out great! Now, this will only work if you use a head unit that does not include a CD/DVD player. And in 2014, Pioneer came out with a unit that eliminated the CD player, which reduced the mounting depth to half of normal. This allowed me to mount the amp on the tunnel directly behind the stereo without interference. And there enough open air space to dissipate heat. Also an added bonus was all the wiring was contained in a condensed location. Because the dash and all the surrounding components were removed, it gave me unrestricted access to route the wires in sequence with the car’s wiring harness. Though I spent more than anyone would on the wiring (which no one will ever see), I was able to cleanly install and map out what goes where (and that they had good connections).
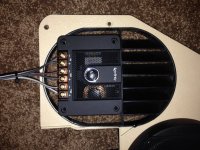
SUBWOOFER – The Subwoofer was mounted to the rear vertical deck using the supplied screws and (purchased separately) speed nuts on the back side (you need to crawl under the car to attach them to the screws). The Sound Ordnance replaced the Kenwood I originally started with. All the wiring was strung along the same wiring routed for the antenna. The subwoofer ground was attached to the driver’s side body bolt.
Originally I kept the Kenwood 50w flat panel (if you could call it that) all in one subwoofer. It was “ok” at best until the speaker just wore out (the foam disintegrated) and that was a blessing!
After much research, I purchase an 8” Sound Ordinance speaker. (I did try a 10”, but it was too big for the space.). The subwoofer has a remote level control that I installed it in the armrest of the emergency brake cover. This gives me complete control of the subwoofer at fingers touch. Reading reviews on a whole host of self-powered, flat-paneled subs, all are plagued with the same problem; out of the box they sound well…. disappointing. But, what I learned is you need to ‘tweak’ the entire system in order to get the best overall sound for your car. So…
ADJUSTMENTS AND MORE ADJUSTMENTS... Honestly it took me almost two weeks to dial it in. Be prepared for this process. If you think your system will sound great out of the box, you’ll be disappointed no matter what components you purchase. Use the head unit’s EQ function and select the “custom” option.
Dial in the front and rear speakers first. Then move to the subwoofer. It is a constant back and forth trial and error process. And just when you think you have it set, you’ll listen to it the next day and wonder “what was I listening too?”. Use a host of different music tracks, and go back again and again. This requires patience and time, but the payoff is well worth it! (When tuning your system, be sure that your battery is charged and/or run your car for a short period of time. I ran into an issue where the sound kept getting worse and it was because I drained my battery.)
The pictures should help to answer any questions to the install that I may have left out. I hope this helps someone who wants to build a better stereo, and do it on their own. And if you have any questions, please ask.
Happy Cruising!
Shawn’s 78
PS - Since I can only upload 8 photos at time, I'll add extras in additional posts.


First, thanks to everyone before me that posted notes and photos of their stereo/speaker/amp install. They were very helpful and instrumental in designing what I consider a very well rounded audio system for a late C3 78-82 Vette.
IN THE BEGINING....
The original system when I acquired my Vette (13 years ago) was an aftermarket cassette player (from the 90's) and stock 4x6 dash speakers. About 4 years later, I upgraded to a Pioneer 50w CD player, and Pioneer 4x6 dash and 6.5" rear speakers. The following year I purchased a used flat-panel Kenwood Subwoofer off Craigslist. Overall, at best it was "OK", but a marked improvement from the system I inherited.
FAST FORWARD TO 2013….Unable to hear the stereo with the T-tops off (and oh yea, I have chambered exhaust!), I desired some cruising music. My buddy and his newly restored (frame-off) Daytona Yellow 69, installed a system that I drew my inspiration to start the process of researching and purchasing parts. Now on my quest to see what has been done, I researched the forums and began to compile my notes from others before me. I must have had 50-60 pages of printed photos, comments, install advice etc.
WELCOME TO 2015!
Well over a year (plus) in the making, the final results are in and in my opinion I created a system that encompasses a balance of style and modern performance (without breaking the bank).
Here's the list of components:
Stereo - Pioneer MVH-X560BT
Amp - JL Audio XD400/4 (400w)
Speakers Front - Infinity Kappa 50.11cs (components) 5.25"
Speakers Rear - Infinity Kappa 62.11i 6.5"
Speaker Subwoofer - Sound Ordnance B-8PTD 8" (integrated amp 125w) with remote level control
Wiring - Amp 4 gauge direct wired to the battery / Subwoofer 8 gauge direct wired to the battery / Stereo wired to an open "keyed" location on the fuse panel.
WHERE DOES THIS WIRE GO???
My initial install was done over the course of 9 months. It started with one speaker, which lead to a speaker wire, then remove the console… well you get the picture.
I completely gutted the majority of the interior (you'll see when you check out the photos, and that’s another post in of itself!). That actually was a blessing as it gave me unrestricted access to design and test fit components before final fitment.
BACK TO FRONT...
REAR SPEAKERS – I used the stock location and installed 6.5" speakers that fit nicely. I used the same press-board as used for the console side-skirts. I made a template out of cardboard, and then transferred to the pressboard where the hole was cut and overlaid with carpet. The (rear) speakers have tweeters that are adjustable (rotate to different angles) and this was a nice feature when it came time to tuning the sound. (I’m sure a 6x9 would work just fine if you wanted “more” speaker. And maybe I’ll give that a try at a later date. But since I’m using a subwoofer, I felt larger speakers wouldn’t be used to their full potential as I would remove a good portion of the bass that those speakers would normally be set for).
FRONT SPEAKERS- This took a bit more finesse, but the results were well worth it. Because I was using components (separate woofers & tweeters), I was able to achieve a more rounded and full sound from driver/passenger seat. The woofers mounted in the kick panels required endless measuring to ensure the cut was done right the first time. Because I chose not to cut into the metal frame, there was no room for error when cutting the kick-panel. I used a dremol like tool (Sear’s version), to make the rounded cut in the kick-panel. This was important as I needed a perfect hole and I didn’t want to break/crack the fragile plastic. *note – not all speakers are created equal. When fitting, rotate your speaker to give you the most depth possible.
The woofers were mounted on the outside of the kick panel and speaker grilles over the top. The back side of the kick panel was lined with Thermo-Tech Cool-It insulation to keep any vibrations at bay. The tweeters were mounted in the existing 4x6 location. Because there was no mounting plate that fit that opening, I used the supplied bracket and epoxied the tweeter to the underside of the factory speaker cover. As for the crossovers, those were mounted in two separate locations. The driver’s side was mounted inside an opening I cut in the kick panel (almost seems it was meant to go there). The passenger side started at the kick panel, but due to the heater ducting, it would not fit. So I installed it on the heater box housing. Both have fairly easy access to turn on/off the 3db button.
STEREO & AMP – I wanted power in a small package and since my buddy installed this same amp in his 69 (different location), it gave me an idea that in the end worked out great! Now, this will only work if you use a head unit that does not include a CD/DVD player. And in 2014, Pioneer came out with a unit that eliminated the CD player, which reduced the mounting depth to half of normal. This allowed me to mount the amp on the tunnel directly behind the stereo without interference. And there enough open air space to dissipate heat. Also an added bonus was all the wiring was contained in a condensed location. Because the dash and all the surrounding components were removed, it gave me unrestricted access to route the wires in sequence with the car’s wiring harness. Though I spent more than anyone would on the wiring (which no one will ever see), I was able to cleanly install and map out what goes where (and that they had good connections).
SUBWOOFER – The Subwoofer was mounted to the rear vertical deck using the supplied screws and (purchased separately) speed nuts on the back side (you need to crawl under the car to attach them to the screws). The Sound Ordnance replaced the Kenwood I originally started with. All the wiring was strung along the same wiring routed for the antenna. The subwoofer ground was attached to the driver’s side body bolt.
Originally I kept the Kenwood 50w flat panel (if you could call it that) all in one subwoofer. It was “ok” at best until the speaker just wore out (the foam disintegrated) and that was a blessing!
After much research, I purchase an 8” Sound Ordinance speaker. (I did try a 10”, but it was too big for the space.). The subwoofer has a remote level control that I installed it in the armrest of the emergency brake cover. This gives me complete control of the subwoofer at fingers touch. Reading reviews on a whole host of self-powered, flat-paneled subs, all are plagued with the same problem; out of the box they sound well…. disappointing. But, what I learned is you need to ‘tweak’ the entire system in order to get the best overall sound for your car. So…
ADJUSTMENTS AND MORE ADJUSTMENTS... Honestly it took me almost two weeks to dial it in. Be prepared for this process. If you think your system will sound great out of the box, you’ll be disappointed no matter what components you purchase. Use the head unit’s EQ function and select the “custom” option.
Dial in the front and rear speakers first. Then move to the subwoofer. It is a constant back and forth trial and error process. And just when you think you have it set, you’ll listen to it the next day and wonder “what was I listening too?”. Use a host of different music tracks, and go back again and again. This requires patience and time, but the payoff is well worth it! (When tuning your system, be sure that your battery is charged and/or run your car for a short period of time. I ran into an issue where the sound kept getting worse and it was because I drained my battery.)
The pictures should help to answer any questions to the install that I may have left out. I hope this helps someone who wants to build a better stereo, and do it on their own. And if you have any questions, please ask.
Happy Cruising!
Shawn’s 78
PS - Since I can only upload 8 photos at time, I'll add extras in additional posts.