I'm sorry you've had difficulties finding my thread on another forum. Here's the procedure that worked for me. I'm very happy with the results, even though it was a lot of work!
Don't use any RTV, as they aren't permanent fixes. I did this procedure several years ago, and I've had no problems!
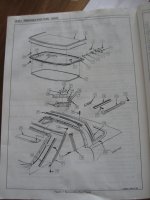
I used Dow Betaseal U-418, which is a professional urethane adhesive used for new car glue-in windshields. To remove the acrylic top from the frame, force a narrow putty knife thru the bond area to separate the top from the frame. Clean off the old adhesive with a single edged razor blade. Install the frame onto the car, and carefully place the acrylic top in place, and adjust for the best position (no adhesive). Place masking tape at several locations on the bottom of the acrylic top to orient the top to the frame. Small alignment blocks clamped to the acrylic top at several locations will help with the alignment. Turn the top upside down on a table and review the alignment of the frame to the top. Don't do the bonding on the car, because the bond line will not be as thin as what you want! Work with the top upside down on a table. Apply the adhesive, set the frame in place, and very lightly clamp the frame to the top.
You may want to adjust the height of the four corner mounting brackets in the car, which are located under the header trim, because your new top may fit tighter than old top! Be careful of the front fit, because if you'll notice, as you tighten the front bolts, you're pulling hard on the acrylic top against the front weatherstrip. If this is too tight, you'll be stressing the bond more than neccessary. You should be able to tighten the bolts all the way, without overstressing the bond line, or cracking the top!!
Remember to tighten the rear bolts before the front bolts to assure the best fit and the least stress to the installation.