Ya, definitely interested. Would love to have you do that
Thanks
Ok, as requested.
The process starts with paint stripper. Use common sense ! The stuff is toxic but it eats paint off the wheels in 15 minutes. wash it off somewhere safe.
You can also sandblast the wheels.
Whats Required:
1/2" angle grinder/polisher
7" rubber backing pads, 2
7" sanding disk 220 320 400
7.5" wool pads, 3
Blue string abrasive wheel.
high speed drill
three 4" sewn buffs/w shank for the drill
sandpaper: 3 grits emory strips, 400 paper, 600,800, 1000, 1500 and 2000
small random sander
spray bottle
dish soap
various rags & used scrubbing pad
Use a respirator when grinding/sanding/polishing with power tools. The aluminum dust can be toxic. Wear gloves so the aluminum dust when wet is not absorbed thru the skin. Its hell to wash off too..
once free of paint, get the 1/2" grinder and a 7" pad with some 180 to 220 grit paper disk. Velcro disk work great.
Notice the porous surface of the aluminum where it was painted.The rough cast surface is what we have to sand smooth and eventually polish to a mirror reflective finish. . Its like skin, tiny pits, holes, bumps. Hidden under the paint. Sand away....Don't gouge or dig in. Any scars will have to be sanded out with finer paper.
Do not dig in, but sand the metal smooth,. be aggressive at first, then as the sand pads get lighter, nearing 400 grit, go softer and work on sanding out any scratches from the rough paper disk. Keep sanding with the course grits until the metals pores are removed. Its more challenging that you'd think...
After power grinding /sanding with disk up to 400, its time to go to the random or 1/4 sheet sander. They are $25 at Walmart. Wash the wheel now to get all the course grit off. Washing the grits off as you progress is the single most important step in the process.
Get the small square sander with 400 gt and a spray bottle and start wet sanding all the scratches out. Whatever that sander can reach. On sawblades, the disc, and the curve part of the blades. Keep going and stay wet. When the black mud gets too heavy, wash off and do some more.
Wash real well and move to 600 gt paper. Repeat process. Sand away any scratches left by the previous grt paper.
About now get the high speed drill with a BLUE string wheel,.abrasive wheel, and use that to sand deep in the edges and curves of the sawblades. As long as the pits are visable there is more sanding to do. You can also use some strips of various emory cloth grits to get in the tight places. Nows the time for patience.
Now go back over the area done with the drill & wheel, and use a finer paper by hand to make it smooth. wash between paper, and work to 800gt paper.
Now the whole wheel should be done well in 800grt. if so and no pits are seen and its all smooth, wash it very well with dish soap and wipe dry.
Now go to 1000 grt paper in the sander. work very hard on any scratches. They show up when washed....
after a couple hours with 1000, wash the wheel and go to 1500. Same thing. Use your hand to work in the deep folds of the blades. Wash and repeat with 2000.....
Do a soapy wash after the1000, 1500 and 2000gt paper. Now your moving to the grinder with a 7" backing pad and a 7.5" wool cutting pad and some EMORY rough polish.(black)
spin the pad on n off and apply the emory stick against the pad lightly...do not bury or pak it in the pad.
Apply pad to aluminum and start cutting. Cut the pattern circular around the wheel, then cross cut by using the edge of the pad to cut across the circle. Whichever way you cut, cross that at least once.
The emory will remove most of the remaining scratches.
Wash the wheel by hand with lots of soap. The wheel will be caked with emory grit and it has to be sterile clean to proceed.
Some folks use thinner or acetone to cut the wax buildup.
Now get a new fresh 7"pad to use the Tripoli polish. Use a new pad for each different polish.Just dedicate one pad to the tripoli another to white and one to the emory. Plastic bags keep them seperated and the polish sticks with them. Mixing them up will ruin your day...After you use the 7" pad, use a 4" sewn wheel in the corners to get the finish consistant. Same method, apply the polish stick to the wheel as it spins. The 4" buff wheels work well on the bead and in the deep corners and in the lug nut area.
Once clean, go to Brown Tripoli polish. same deal....polish into the metal, and cross that pattern. Do this at least 3 times circle and across. This way there are no long lines. Wash and see how it looks. If there are still micro lines, do the brown triloli again. and wash again.You may have to put some ass into it this time to make the buff pad really dig into the metal to fold it over and close the surface. It takes a little work. You;re trying to close the metals pores to seal the surface. this makes it very shiney and it also protects it. Remmber, if you go back and use 400 or 600 you have to do the whole wheel so it will have an even finish and you have to go thru ALL the different grits again washing between.
If you see ANY pitting in the metal, or obvious scratches, now is when you go back and get the 400 paper to rub that out and go back up one step at a time from there. The first sanding is very important to get right, and remove the scratches and pits before you get to wet sanding with 1500 paper.
If the Brown Tripoli got a decent finish, semi shiney but cloudy,wash and use tripoli one more time aggressively. After washing all the trip off the metal, now we use the white rouge/polish. And you MUST use soap to wash. A rinse with a water hose does nothing...it takes soap and some scrubbing.
Use a clean buff pad for each of the 3 grades of polish. A dirty pad ruins the job and sets you back several steps.
get the aluminum wheel very clean, and apply the white stick to the new buff wheel on the grinder. work around cutting and crossing, polishing off any wax buildup by crossing,. apply more stick to the pad often but lightly. wax buildup is a sign that you're using too much too soon,.
With practice you will see how well the white brings up the shine and makes it nice and even.
When you're satisfied with the finish, wash the wheel completely and use a worn scotchbrite pad to scrub the black wax off when its covered with soap and water.Use the worn scotch brite on the wheel and to scrub out the cracks and edges. Just be gentle,,,the scrubbing pad CAN scratch the aluminum.
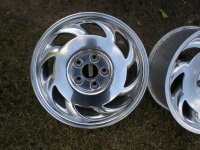
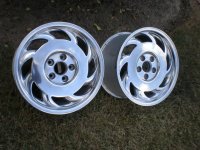
AT this point, you can mount the wheels or spray clear coat, if you choose to apply clear, wipe that wheel down with mineral spirits or some other thinner to get ALL the wax and oil off the metal. You do NOT have to clearcoat right away. If the finish is closed well enough it will stay for months. Once clear is applied, there is no more polishing until the clear is stripped off again. Plan on a full day per wheel. It IS a LOT of work, but the satisfaction makes it a worthwhile project.
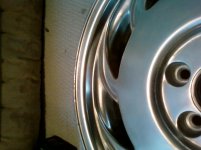
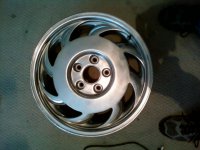
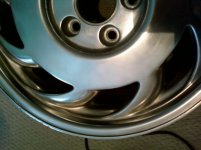
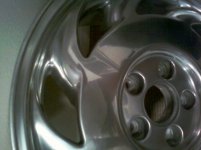
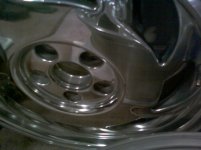
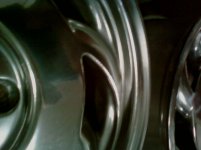
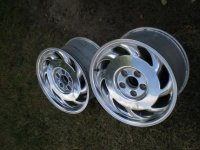
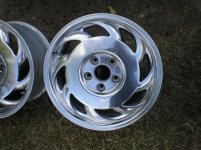
Below are some wheel pics during the process...
Original painted wheels....then sanded aluminum,.
![MVC-005F[1].jpg](/data/attachments/0/902-cf0e839ab1c766ca3878bc882e7713d8.jpg?hash=zw6DmrHHZs)