A couple of weeks ago, after the trip down to L.A. harbor to visit the USS Iowa, I upgraded the exhaust on the Blue Bullet II by retrofitting it with the system off a 2011 Z06.
The 2011 system has less restriction because it's the only Z06 exhaust with an X-pipe and two catalytic convertors. 2006-2010 Z06es have an H-pipe and two cats and 2012 and 2013s have an X-pipe and four cats. The switch to a four-cat system for the '12 model year was required by an obscure change in California emissions requirements which may also have been adopted in some other states with strict regulations. GM figured that it might as well make all the cars with four cats.
C5/C6 exhaust systems have four parts: exhaust manifolds, head-pipe and cat assemblies, mid-section and mufflers. On a '12 and '13 the second set of cats is where the main cats were on a C5, in the mid-section, housed the cavity at the head of the transmission tunnel. The X-pipe is behind them. On an '11 mid-section, the X-pipe is where the second set of cats is now located.
GM didn't make my retrofit project easy because it changed the design of the connection between the cats and the mid-section so, to make the change, you have to install both a set of 2011 cats and a 2011 mid-section. The most difficult part of the job is removing the headpipe/cat assemblies. Two of the eight fasteners which hold the cats to the exhaust manifolds are very difficult to reach and all eight of the nuts holding the cats are likely to be seized by thermal cycling.
To get those nuts loose, first, you must spray them with an penetrating oil and not just WD40 but an industrial strength penetrant such as Aerokroil. Spray the area at where the stud and nut meet generously, then let the penetrant work for 24 hours.
After a 24-hr. penetrant "soak," remove the two front outside nuts on each cat. They are the most difficult to remove because of restricted access. To get at them, you'll have remove both front wheels and lift the engine an inch or so. Remove the nuts on the two front powertrain mounting studs, then, using a 6x6 section of one-inch thick wood between the oil pan and a bottle jack, lift the engine until the cat outlets bottom on the tunnel close-out plate.
You need a 15-mm, 3/8-drive deep socket and a 3/8-drive breaker bar and the socket must not be longer than 3.5-inches. It's difficult to find a deep-but-not-too-deep 15-mm 3/8-drive socket so, you may have to cut or machine a longer deep socket. Once you have the not-so-deep, deep socket, put it on the breaker bar and stick the socket though the opening between the bottom of the frame and the top of the engine cradle. Get the socket on the nut then push hard. When the nut breaks loose, trade the breaker bar for a ratchet and take off the nut. The other three nuts on each side are much easier. They can be removed by any 15-mm, 1/2-drive deep socket, a long extension and a universal joint. You also can use an impact gun and impact socket/extension combination.
Once you get the manifold-to-cat nuts off, the rest of the job is pretty simple. Replace the manifold flange gaskets, if necessary. Replace the '12/'13 cats with the ’11 cats. Tighten the nuts. Blow the powertrain mount cavities clean with shop air. Lower the engine. Replace the powertrain mounting nuts and tighten. Install the 2011 mid-section. Tighten all connections. Reinstall the rear exhaust hanger bolts.
I took some extra steps when before I put the 2011 parts in place as part of my ongoing program to reduce the amount of exhaust heat that radiates into the interior. I wrapped the headpipe/cat assemblies aft of the cats and the mid-section with Design Engineering "Titanium Exhaust Wrap". In general, exhaust wrap products insulate the exhaust part to which they are applied such that less heat is radiated from the part and more heat is kept in the exhaust flow. The advantages of this are less heat where you don't want it (the interior) and slightly increased performance in some cases because of improved exhaust flow. Keeping exhaust gases hotter within the exhaust system mitigates increases in density due to the exhaust cooling and that increases gas flow. That can increase exhaust scavenging which may increase horsepower.
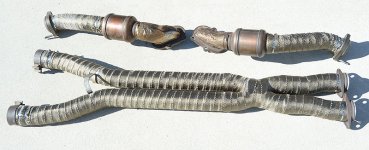
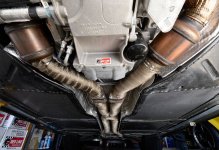 2011 system with wrap----------2011 system on the car
The beauty of DEI's Titanium Exhaust Wrap, compared to other exhaust wrap products, is it doesn't have to be soaked in water before application nor does it have to be sprayed with a preservative to get the best results. When you first start the engine on a car which has had exhaust wrap installed, the wrap will emit some smoke and a burning odor, but after a short period the smoking and stinking stops.
Lastly, I attached sections of another DEI thermal insulation product, Floor and Tunnel Shield, to certain parts in close proximity of the cats, over the brake pipes that run along the lower part of the driver side frame rail next to the headpipe/cat assembly and along the side of the trans tunnel below the tunnel close-out plate. Floor and Tunnel Shield is a heat reflecting, 10-mil aluminum film, bonded to layer of glass fiber insulation and backed with a high-temperature adhesive. It will withstand 1750° direct heat and the adhesive can withstand 450°F. Total thickness is 3/16-in and it can be easily shaped and trimmed.
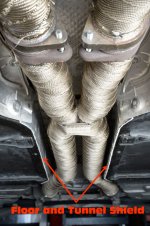
During my first road test, I noted the exhaust was just slightly louder and the engine felt different when it was at mid-range RPM.
On the 28th, I have a chassis dyno test scheduled. After that I'll know if the retrofit 2011 exhaust improved the car's performance.


 ad
ad


