Couple of random engine-rebuild questions
Things that have crossed my mind while ripping apart the engine...
Couple of random engine-rebuild questions I was ASKED
1. How do I tell if my harmonic balancer has slipped?
THE INTAKE , ON OR OFF HAS NO EFFECT, JUST BE SURE TO TAKE THE ENGINE OUT OF GEAR AND PUT THE PARKING BRAKE ON AND REMOVE THE ROCKER ARMS FROM CYLINDER #1 BEFORE STARTING SO YOU DON,T DAMAGE THE VALVES AND REMOVE THE PLUGS FROM THE OTHER CYLINDERS TO MAKE THE ENGINE EASY TO TURN WITH A BREAKER BAR AND DISCONNECT THE BATTERY SO NO ONE HITS THE STARTER AND DAMAGES A PISTON
www.jegs.com/cgi-bin/ncommerce3/ProductDisplay?prrfnbr=3316&prmenbr=361"
look closely you can easily build your own with a 7/16" tap and an old spark plug and a 7/16" bolt ok heres how you do it without spending much money, first get a majic marker and pull all your spark plugs. make a piston stop from an old spark plug and bolt.or buy a commercial piston stop like the one in the picture. remove the rocker arms from cylinder #1 install the piston stop and BY HAND NOT USEING THE STARTER rotate the engine slowly by hand with a breaker bar and socket untill the piston stops when it hits the piston stop as it almost reaches TDC, take the majic marker and draw a line on your DAMPER exactly even with the (0-TDC) timeing line on your on your timeing tab , now rotate the engine in the other direction untill it stops and again take the majic marker and draw a line on your DAMPER exactly even with the timeing (TDC)line on your TIMING TAB, the marks will be about 1'-1.5" apart depending on how far down the cylinder the piston stopped., TDC on the DAMPER is exactly in the center of the two marks,you made,(if the damper has not slipped and your useing the correct damper and timing tab,for your engine, that should be where the factory TDC was already marked on the damper, now remove the piston stop, rotate the damper to the CORRECT TDC location hopefullly its where the factory line says it should be)
the further you screw in the piston stop the lower in the cylinder the piston is stopped, and the further apart the two marks will be but TDC will still be centered between the two marks on the damper. of course if you stop the piston extremely low in the cylinder the marks will be so far apart that they are hard to find the center exactly, I try for stopping the piston about 1/8" down in the cylinder
http://www.2quicknovas.com/happyTDC.html
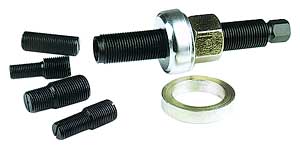

look at the picture carefully
the small 7/16 thread ,on the tool threads into the crank, the damper slips over the tool, the large washer style bearing slips over the tool followed by the solid washer followed by the large nut that threads on the tool, the back of the tool is normally a 9/16 or 5/8 hex this is held with a box end wrench to keep the engine from turning, the large nut is usually a 1 1/8" nut and it is tightened with an open end 1 1/8" wrench or a adjustable wrench against the two washers drawing the damper onto the crank snout! lube the threads on the tool, the inside of the damper and crank snout with oil before starting. the damper will normally slide on about 1/4 of the way bye hand then the tool is needed to draw the damper on the last 3/4 of the distance, don,t over tighten the tool the 7/16" thread will snap off in the crank after the damper bottoms out on the lower timing gear if you do!,
NEVER USE A HAMMER AND BLOCK OF WOOD TO DRIVE THE DAMPER ON, YES THOUSANDS OF GUYS THINK THEY DID IT WITHOUT ANY PROBLEMS BUT...
IT WILL DAMAGE THE THRUST BEARING CLEARANCES,
IT CAN BREAK THE ELASTOMER TORSION RING ON STOCK DAMPERS
IT CAN CAUSE THE INERTIAL RING ON FLUIDAMPER TO BECOME JAMMED INTERNALLY
IT CAN CAUSE THE DAMPER TO FAIL.
IF THE DAMPER FAILS THE CRANK WILL EVENTUALLY BE DAMMAGED
IT GREATLY STRESSES THE CRANK SHAFT
IT CAN DAMAGE THE CRANKS TRANSMISSION PILOT BEARING
IT CAN DAMAGE THE TRANSNSMISSION
ALMOST EVERY TYPE OF DAMAGE IS NOT SOMETHING THAT SHOWS UP RIGHT AWAY, BUT IT WILL DAMAGE THE PARTS LISTED AND THERES THOUSANDS OF GUYS THAT ARE WONDERING WHY THOSE PARTS FAILED 6-24 MONTHs LATER WITH NO CLUE AS TO THE CAUSE!
[bASK YOURSELF THIS QUESTION, IF CRANKSHAFTS THAT ARE A FEW THOUSANDS OUT OF LINE I.E. NOT PERFECTLY STRAIT ARE BENT/STRAITEND WITH A LEAD HAMMER BY CRANK MANUFACTURES (and yes thats how its done) AND CRANKS THAT ARE DROPPED ON A CONCRETE FLoOR SOMETIMES BEND SLIGHTLY ,(happens all the time) WHAT MAKES YOU THINK THAT BEATING ON THEM WITH A HAMMER AND A BLOCK OF WOOD WONT DAMMAGE THEM? AND WHILE WERE AT IT WHAT WOULD YOU DO TO SOME GUY YOU CAUGHT BEATING ON YOUR ENGINE BLOCK WITH A HAMMER? WELL WHAT DO YOU THINK THE CRANKS DOING TO YOUR MAIN CAPS WHEN YOU BEAT ON THE CRANK? PROPERLY USED THAT INSTALLATION TOOL CAN EXCERT OVER 15 TONS OF PRESSURE TO SLIDE THE DAMPER ON, IF IT WONT SLIDE ON, THERES A PROBLEM! FIND IT AND FIX IT .....DON,T BEAT ON THE DAMPER/CRANK
2. Permatex blue or black on the intake manifold? Apparently both have been used on my car at various times (as well as something clear).
both work, I prefer BLACK but use the O2 SAFE KIND, it also helps to,
USE THE CORRECT SIZE QUALITY INTAKE GASKETS, THROW AWAY THE END TABS, clean BOTH the lower intake pads and the block rails and the cylinder heads mateing surfaces around the ports with a flexable scraper/putty knife, then degrease with a rag damped with acetone,both the intake surfaces and block and heads with a acetone damp rag ,CAREFULLY LIGHTLY dimple both the block rails and lower manifold matching pads with a center punch several dozen times on each end and each surface, then degrease with the damp rag again , place a 1/4" thick bead on the lower intake surfaces (black RTV) then a 1/4" wide bead on BOTH the block rails ,run a THIN bead of black RTV around the water transfer ports on each end of the intake,gasket BOTH SIDES BOTH ENDS then carefully install the intake,useing a long phillips #2 screw driver to line the bolt holes helps as does having two guys lower the intake vertically so no sliding it back and fort is necessary, on the gaskets , line up the bolt holes in the intake with the gaskets, the two beads of black RTV will blend, let them dry inplace for at least 8hrs the little dimples add greatly to the holding ability of the RTV
3. Anything I can do to clean the lifter bores? Looks like crud is sitting at the top of them and not sure if anything has fallen down them while I was pulling the lifters out. Don't want to scratch the new ones.
a clean lint free cloth soaked in MARVEL MYSTERY OIL WORKS OK FOR THAT, DO an OIL /FILTER change ALSO
4. If I set my new cam at 4 degrees advanced by the timing gear, does that mean that a "factory" setting using a timing light would only be 2 degrees BTDC? So 6 degrees would really be 10? Am I making sense here?
YOUR CONFUSING CAM TIMING WITH IGNITION TIMING,
first lets get something strait, theres
two kinds of timing
cam timing, the relationship of when the valves open and close relative to the pistons location at TDC and BDC and
ignition timing which is the point at which the spark plugs fire in relation to the pistons position at TDC on the compression stroke.
cam timeing in the standard chevy V8 is set/locked in when the cam is installed and the relative timing of that cams lobe duration ,lift and LSA are set when the cam is ground/manufactured
ignition timing
http://www.centuryperformance.com/timing.htm
http://www.centuryperformance.com/vacuum.htm
http://www.boyleworks.com/ta400/psp/distcurve.html (pontiac but info the same for chevy)
http://www.73-87.com/garage/101s.htm]http://www.73-87.com/garage/101s.htm
http://www.73-87.com/garage/hei.htm
here read this also
www.victorylibrary.com/mopar/cam-tech-c.htm
www.victorylibrary.com/mopar/cam-tech-c.htm http://64.90.9.168/cranecams/pdf/276g.pdf http://www.msdignition.com/
how come the ignitions 180 degs out of phase after I installed that cam?
I get this question all the time, well heres something I see lots of guys don,t understand,ONCE YOUVE INSTALLED A CAM WITH THE TIMEING MARKS YOU MUST ROTATE THE CRANK 360 DEGRESS BEFORE DROPPING IN THE DISTRIBUTOR
... while its true that if the
timeing marks are possitioned so the crank is at 12 o,clock and the cam gear
is at 6 o,clock that the cam lobes will be in the possition that fires #6
cylinder that HAS NO EFFECT AT ALL (on finding TDC,) for aligning the degree wheel with TDC,or THE timeing tab pointer, for degreeing in the cam, the piston passes thru
TDC TWICE in every fireing cycle once on the fireing/power stroke and once
on the exhaust stroke, the cam rotates at exactly 1/2 the speed of the crank
so to make it easy to line up the marks they install it with the marks at
the closest point 6/12 for easy indexing, rotate the engine 360 degrees to
the #1 TDC power stroke and the crank gear will still be at 12 oclock 12/12
but the cam will be at 12 o,clock also, rotate another 360 degrees and your
back where you started. its simply easier to index the cam at the point
where the index marks align closely. look at how the cam lobes themselfs
open the valves when the cam is just installed the #1 cylinder valves are
slightly open and the #6 are closed
per "Lunati"
""YES YOU ARE RIGHT - WHEN CRANK IS AT TWELVE AND CAM IS AT SIX THEN #6 CYL IS FIRING
AFTER YOU LINE UP YOUR MARKS AND INSTALL GEAR THEN ROTATE YOUR CRANK ONE REVOLUTION AND THEN DROP THE DIST. IN - AT THAT POINT #1 IS FIRING""
cam timing
BR>Explanation of Crankshaft timing marks: <P>0 - Indicates standard cam timing A - Advances the cam timing 4° R - Retards the cam timing 4°
5. What normally would flow through the center passages on the heads that are blocked by plates on the intake manifold gaskets? They're full of carbon and crud; wondering if there was a leak or something. Is there a reason why they're there and not used for anything?
they were blocked to help keep the intake cooler, in theory increaseing performance,yes Id leave them blocked UNLESS!!! you live where it snows, where the extra heat tends to help the car run smoother
6. As a rule of thumb, which bolts should get teflon sealant on them, OTHER than the water-pump mounting bolts?
THE HEAD BOLTS REQUIRE the use of THREAD SEALANT ALSO
if your useing aluminum heads don,t forget you need to use OILED steel washers under the bolt heads or on the studs under the nuts to get the correct torque readings
On small blocks I normally run the bolt tq up in stages
55lbs
then re-torque in sequence to 60lbs
then re-torque in sequence to 65 lbs
BUT FOLLOW THE CYLINDER HEAD MANUFACTURERS ADVICE ON TQ SETTINGS AND REMEMBER TO DIP THE BOTTOM 3/4ths of the threads into permatex thread sealer
if its permatex thread sealer in white can with a dabber in the cap, looks like molasses with a black color /slightly redish tint on white paper your useing the correct sealer
what are the part numbers on those one piece synthetic oil pan gaskets?
OS 34509T chevrolet small block V-8 1957-1974
OS 34510T chevrolet small block V-8 1975-1985
os 30061T chevrolet big block V-8 1965-1990


