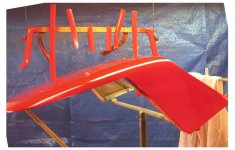
A little more to the story, we put the stretchy material in because it was the only cloth with his collage logo on it, just a bit harder to work with. We did do it by tucking it in the seams, saves breaking some hidden catch or plastic part. Plus it was one of those after the game type efforts. Sprayed adhesive in the center staying away from the "tucking" edges about 2". Holding the 4 corners we lowered the center adhesive coated cloth down to center the logo. Folded it back on itself and did one side at a time by laying the cloth out and marking the seam with the back of a blade. We could then lift the marked edge out and trim about 1/8 away from our mark to allow for tucking material. By masking the top trim and tucking edges we sprayed the last adhesive on the un-coated surfaces. With a mixing spatula we tucked the edges in and let it cure.
He only had the C4 for another 2 or 3 years but it always looked good and was quite a conversation piece along with his bath room and his carpet in the pool room.
Dad, Hib,
I just did the same thing.

My liner fell down so I pulled it out of the edges and left the foam backing pad in place.
Last yr I re-covered my dash pad with a faux leather (thin stuff) from the fabric store that the ladies use to make tight skirts and jackets...nice leather grain, not too deep or course. Thin, light and soft. With fabric backing and the women at the store are very helpful...

(they love to assist a man that has no idea of what he's doing there)
The dash pad was an absolute success so I decided to apply this to the headliner to match.
Laid the panel on a blanket, bought the GOOD spray adheasive..$20 a can,, 3M super 90 hi-strength.
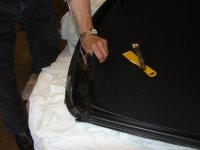
Anyway, laid the fabric in approx place, sprayed an area (8" sq at a time well coated with spray, lite spray on fabric) and just litely pressed the fabric ON the glue, not In the glue. Left the edges for later when I could concentrate on trimming to fit. As Dad describes, worked from the center outward.
Once the majority was in place I trimmed an edge with good sissors to get its shape to fit it with a <1/2" edge overlap that could be stuffed into the edge of the pad. I applied the glue and used a brush-on contact cement on the edges so as not to over-spray the trim. Tucked the fabric in place with bondo spreaders and worked my way around. Nice thing with this fabric is that there is no pattern (random grain) to worry about having a perfect fitment or edges that don;t match. After 3 months on Houston heat and humidity its still there. Matches the dash and I'm considering doing some other interior pieces with the same stuff...maybe the bread box, dash bezels...door panels if I can figure out what to do with the edges...maybe? I'm just bored with vinyl so I'll try anything. I think this material would be best in a non-wear area, so thats a consideration. I used the charcoal black...or smokey black. Nice shade of black whatever they call it.
No trim had to be removed in the roof panel.