Welcome to the Corvette Forums at the Corvette Action Center!

Headlight switch rod is H-O-T Hot

nashville68bird

Well-known member
Joined
Jun 6, 2016
Messages
47
Location
Nashville
Corvette
1982 Collector
This past Saturday evening we drove for an hour or so, and while pulling back in to the garage I reached to push IN the headlight switch....my fingers passed over the round switch itself and momentarily touched the actual pull-pull rod....was TOO HOT to touch for more than a millisecond! What would cause that rod to get so darn hot? It was a 90 degree evening for sure and everything under the hood was hot as usual, but I was surprised that the rod was too hot to touch. Thoughts?
 
What Antz81 stated, with the possibility of melted wire plug/harness connectors at the switch. I would do a visual asap.
 
Mikey, you may have nailed this one for me......the rheostat on the headlight switch turns and clicks as it should (mechanically) but does not actually turn the interior lights on or off or affect the dash lights, nor does it brighten/dim them when turning the rheostat left and right. The interior lights stay off unless a door is opened. Sounds like I need to replace the entire light switch assembly.
 
That could all be the result of the excessive heat. Make sure your check the connector when replacing the switch.
 
Mikey, you may have nailed this one for me......the rheostat on the headlight switch turns and clicks as it should (mechanically) but does not actually turn the interior lights on or off or affect the dash lights, nor does it brighten/dim them when turning the rheostat left and right. The interior lights stay off unless a door is opened. Sounds like I need to replace the entire light switch assembly.


If the rheostat has no affect on the dash lights, then it is making no heat and is not your issue, plus the dash lights only have a 3-5A fuse and would only create a small amount of heat even if the rheostat did work properly. A lot of heat as described in your first post indicates a headlight circuit which can draw over 10A with a good circuit. You do need to examine your headlight switch and look for damage, check your dimmer switch too as it carries the same amount of current.
 
Headlight switch assembly arrived today. Will swap out the old one tonight and see how things go.
 
Folks, started this project last evening but quickly got bogged down trying to remove the drivers side vent assembly. The duct going to it is easy to get out of the way, but the vent assembly itself appears to be held to the back of the dash by
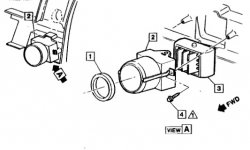
two screws (?) that can only be accessed from the back. Any thoughts or tricks to remove that? Looks like they could be small bolts instead of cross-tip screws. Cannot access the switch assembly with that in the way. 1978-1982-corvette-dash-vent-deflector.jpg
 
Folks, started this project last evening but quickly got bogged down trying to remove the drivers side vent assembly. The duct going to it is easy to get out of the way, but the vent assembly itself appears to be held to the back of the dash by
two screws (?) that can only be accessed from the back. Any thoughts or tricks to remove that? Looks like they could be small bolts instead of cross-tip screws. Cannot access the switch assembly with that in the way.View attachment 23397
If it's like my 72 the dash should just pull out of the duct tube enough to change the switch ( no screws to remove ) . The drivers side dash can be tough to pull back due to wiring harness etc.
 
The illustration is correct. There are 2 hex head screws that hold the A/C outlet in place. I just took a look at mine and the inside screw closest to the steering column looks like an easy access but the outer one may take some creative vocabulary and Band Aids to accomplish. There isn't much room for hands or fingers back in there. I'd use a 1/4 inch drive socket and extension or maybe a socket screwdriver. You may need to use a longer extension or extension and u-joint combo and snake it through the other stuff to get to that outer screw. I think it is likely to be easier to remove that screw than to put it back in. Good luck.

Tom
 
OK, knocked this task out last night and all is well. New switch assembly works fine, rheostat properly increases and decreases brightness for instruments and courtesy lights, Headlights pop up and down correctly. I found that it was much easier for me to approach the removal of the old switch from the left side of the dash assembly (where dash meets door jam). Removing those screws allowed me to access the switch easily from the left side, but you MUST remove the instrument panel and clear plastic instrument cover assembly first. Not doing so would cause you to put unwanted stress on those plastic pieces and possibly crack one or the other. With them easily removed the job went very smoothly. There are some obvious high-heat indications on the ceramic portion of the old switch, but not sure what caused it to fail. Maybe because its a 34-year old part? ;) Thanks all for the help on this one.
 
OK, knocked this task out last night and all is well. New switch assembly works fine, rheostat properly increases and decreases brightness for instruments and courtesy lights, Headlights pop up and down correctly. I found that it was much easier for me to approach the removal of the old switch from the left side of the dash assembly (where dash meets door jam). Removing those screws allowed me to access the switch easily from the left side, but you MUST remove the instrument panel and clear plastic instrument cover assembly first. Not doing so would cause you to put unwanted stress on those plastic pieces and possibly crack one or the other. With them easily removed the job went very smoothly. There are some obvious high-heat indications on the ceramic portion of the old switch, but not sure what caused it to fail. Maybe because its a 34-year old part? ;) Thanks all for the help on this one.


Yeah, it's an old part with carboned/dirty contacts most likely. When current (amperage, pushed by voltage) jumps a bad contact it creates heat.
 
I'm glad it's working right again. Working under the dash is never fun.

Tom
 
Yep guys, I said a great deal of bad words last evening but it all worked out. Also replaced the Turn Signal Indicator Bulbs in the Instrument Panel using the infamous "Rubber-Hose-Suction" method described by a fellow member here. Worked like a charm and now I know when I've forgotten to turn off my Right-Turn signal.... ;)
 

Corvette Forums

Not a member of the Corvette Action Center?  Join now!  It's free!

Help support the Corvette Action Center!

Supporting Vendors

Dealers:

MacMulkin Chevrolet - The Second Largest Corvette Dealer in the Country!

Advertise with the Corvette Action Center!

Double Your Chances!

Our Partners

Back
Top Bottom