B
Bounty Hunter 6
Guest
I posted this "elsewhere" a few weeks ago, I just want to help you guys/gals out, especially those of you who are afraid to use those new cameras. Good luck, be safe....
Everyone gets excited when they get their baby all polished up. After a long day of polishing and buffing, all you want to do is rush in and snap a few pictures to share with your family here on the CAC!! That’s completely understandable, but SLOW DOWN cowboy (or cowgirl)!! That excitement can turn to dismay when you post your washed out, or too-dark-to-tell-it’s-a-car pictures for all to see. After all that hard work you put into keeping your prize clean, it’s time to apply some very simple basic rules to taking pictures. There will be several topics I discuss in this tutorial, and important notes will be in all caps:
1) Quick lesson on your camera!
2) Pictures of the engine bay or close-up pictures
3) Night time photos (not as hard as it sounds!)
4) Whole-Car photos
5) Pictures of you, your significant other or friends by their cars
You won’t be Ansel Adams by the end of this tutorial, but I hope that this will teach you something you may not have known before and make the picture taking portion of posting your pictures more enjoyable.
1) With the age of digital cameras, point-and-shoot has been the way to go! I’m telling you right now: STOP using the “auto” mode on your camera and take control of your digital pictures! A trend I see on most posts is blurry or just out-of-focus pictures. This detracts from your beautiful car and just doesn’t make picture posting very fun.
THE HALF-PRESS: The #1 reason most peoples digital photos come out blurry is simply a lack of understanding of the process of taking a basic picture. Some of you simply may not know that YOU MUST PRESS THE SHUTTER BUTTON HALFWAY DOWN BEFORE TAKING THE PICTURE. Many people just point the camera and jam the button down until they hear the noise indicating a picture was taken. This will lead to a blurry picture most of the time.
When you want to take a picture, center what you want to take a picture of in the viewfinder and depress the shutter button HALFWAY down. This allows the camera to focus first. After about a half a second, you can press the button all the way down and the camera will correctly process the photo. The half-press is CRUCIAL to proper picture taking!!
WHAT MODE TO USE: Move away from the “auto” mode and use the following two modes for about 99% of your photos. “Still” mode and “Sport” mode.
A majority of cameras (even cheaper ones) have a “still” mode depicted on your dial or switch by a flower or profile of a person. Without getting into technical data, this generally sets your camera up for the type of pictures most people take: your car sitting in a parking lot or in front of a beautiful backdrop. This mode will set the shutter speed and aperture to the proper settings for a good “still” photo.
“Sport” mode is usually depicted on your dial by a little stick-figure runner. This is the mode to use when there is any movement involved in your picture. It increases the shutter speed to catch the object without blurring, and compensates for any movement of the camera while trying to capture a moving object. Great for use at the track or for fly-bys! You CAN use this for all of your pictures, but the shutter speed and aperture settings aren’t ideal for “stills.”
FILL FLASH: Fill flash is the most ignored feature on everyone’s digital camera. This is the little flash that comes with your camera that either pops up or is fixed to the front of it. This little flash is KEY to about 99% of pictures you will take. A misconception of flash is that you only need it when it’s dark. On the contrary, the brighter it is outside, the more you should use your fill flash. When the sun is shining, there are inevitably shadows. These shadows end up under eyes and chins on people, and in the wheel wells and under the car. The fill flash will equalize your photo by ridding it of the shadows. People’s faces will come out much cleaner and colorful than without the flash because the dark shadows are off of their faces. (See Lesson #5 for examples of this!)
2) Pictures of the engine bay or close-up pictures.
WHEN FOCUSING ON A PARTICULAR PART, IT IS ALWAYS BETTER TO PHYSICALLY GET CLOSER TO IT THAN TO “ZOOM” THE CAMERA IN ON IT. Your zoomed in shots are prone to be blurry unless you are using a tripod or other stable platform. The more you zoom, the shakier your picture. Your pictures will be much clearer if you just walk in closer. If you take pictures of the entire bay or let’s say the wheel well, don’t forget that other parts will be showing up in your picture, too, so you might as well make the whole picture look good! This is what I mean:
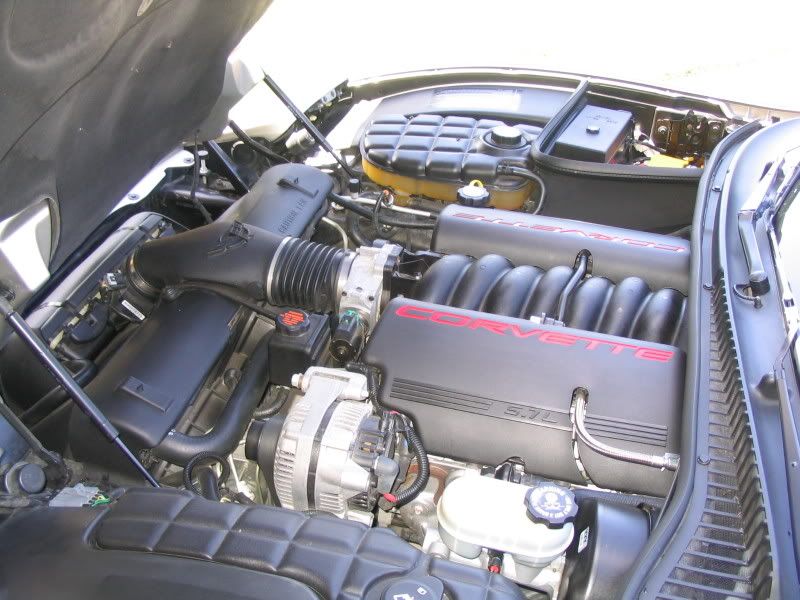
Here’s a picture of the engine bay, but notice how the background is all “washed-out” and it is generally too bright.
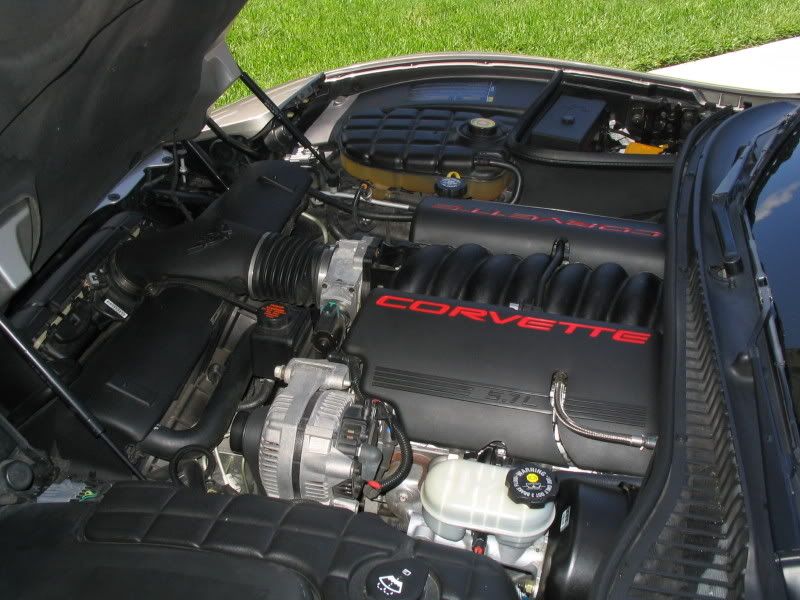
Here is a properly taken picture. Notice the deeper colors.
This is an easy fix in your photos. Most cameras automatically adjust to the light levels present (even when you’re in “still” or “sport” mode). You can test this by pointing the camera to the darkest spot in the room and holding the shutter button down halfway. Watch the display lighten the picture. This is because the camera is trying to compensate for all that darkness and opening the lens up to receive more light. Conversely, point the camera at the brightest spot and the camera darkens the screen up more as the lens closes a little to adjust to the bright source of light. Knowing this, can help you take better pictures. This works great inside the house, too, especially if you have your subject in front of a window or door.
When you take a picture of a subject that is in a darker area than surrounding area, the lens automatically adjusts to allow more light in. This results in the brighter areas becoming even brighter! That’s what occurred in the first picture of the engine bay. With this in mind, all you have to do is first focus the camera on the brighter spot, allowing the camera to adjust to the bright light. Next, while you are pointing at the bright area, hold the shutter button down halfway and HOLD IT. While holding the button halfway down, point the camera back to the area you want to take a picture of (which will look very dark in your viewer, and then ensuring your flash is on snap the picture. This will allow your camera to keep the proper balance of colors and brightness as shown in the second engine bay picture.
3) Night-time photos!
Have you ever seen the big pictures of a night city skyline, with all the city lights all bright and pretty? How do they DO that?? This one could be trickier for those of you without a certain option on your camera. The option I’m talking about is specifically for night-time photos and is generally depicted by a little icon that looks like moon and stars. If you do not have this option, another way to take night pictures is to manually adjust your shutter speed. You’ll need to read your owner’s manual for that, it is different for every camera, and you can experiment with how much you need to slow it down to get the results you want. The key to night photos is to make sure the camera is getting enough light! Generally, a shutter speed of 1/10 will work just fine for your night shots.
How can I do that at night, you ask? Well, we’re back to talking about your camera receiving light. Your shutter speed is what determines how much light is coming into your camera. If it takes a picture really fast, very light comes in the camera, but if you keep the shutter open longer, it allows the camera to capture more of the ambient light. Anytime you slow down the shutter speed though, you also are at greater risk of having blurry photos. IT IS HIGHLY RECOMMENDED TO USE A TRIPOD FOR ANY NIGHT PHOTOS TO AVOID BLURRY PICTURES. Back to the picture of the city skyline: if you look closely, you’ll see that the streets have red streaks down them. Those are the cars going up and down the street. In order to get all of the lights in the picture, the photographer must slow down the shutter speed. Depending on how slow the shutter speed is, the cars could be traveling quite some distance before the shutter closes, and this causes the blurred, red streaks on the streets. This is why you must use a tripod for night pictures. If the camera moves even the slightest bit, you will get a blurry photo.
Another tip for night time photos is to use the “timer” option if you have one available. This will keep you from shaking the camera even the slightest bit when pressing the shutter button on a tripod.
If you can’t slow your shutter speed down at all, stick the mode in “still” and use a tripod. Aim for the darkest area in your photo, which will lighten the entire picture, and snap away. It won’t be great, but the best you will do with your camera.
As a side note, if you are going to have people in the picture, you will want to use the fill flash. The flash will go off to illuminate the people, and then the shutter will remain open to get the rest of the ambient light.
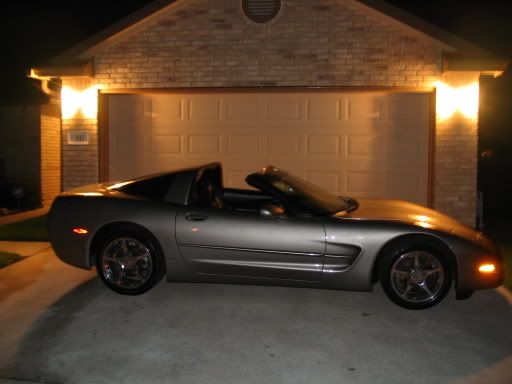
Here’s a picture without a tripod, and holding as still as I can. Notice there is SOME blur.
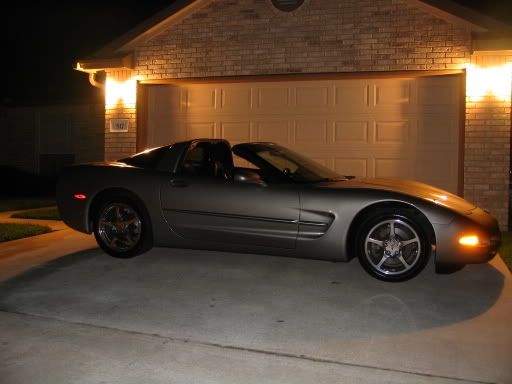
Here’s a picture using the tripod.
4) Whole Car Photos:
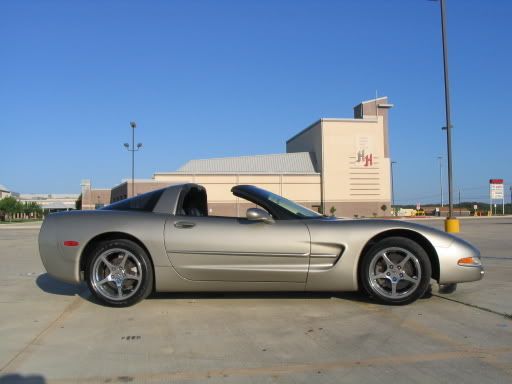
This is by far the easiest. You can usually use any mode you want, because the farther away you are from the subject of your photo, the less your shutter speed and aperture are going to wreak havoc on it (except when you’re using sport mode). I still will use a “still” mode for stationary objects, as the settings are still good. DON’T BOTHER USING FILL FLASH WHEN YOU’RE MORE THAN 20 FEET AWAY as the reach is not generally that far, and it will just make your blinkers and reflectors light up unnaturally in the photo.
Picture with fill flash (notice the blinkers)

Picture without fill flash
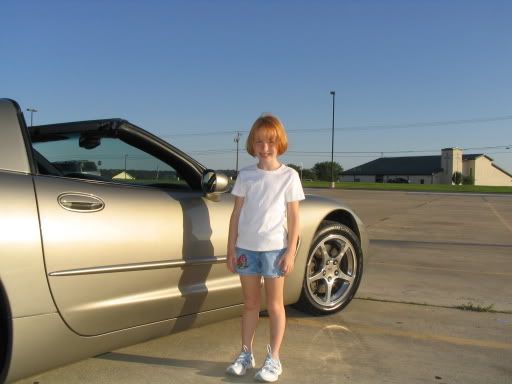
5) Pictures of you, your significant other or friends by their cars
These are some of the best pictures, whether they are of your little ones enjoying a ride in the car, or your hot significant other (or yourself!) showing off in front of the car. These are also the pictures that most people mess up, and the easiest to remedy. If you read back in section #1 about the fill flash, you’ll remember that fill flash is KEY to success in sunlight situations. Here is a perfect example of this, using my daughter Katie as a somewhat willing model:
Picture without using fill-flash
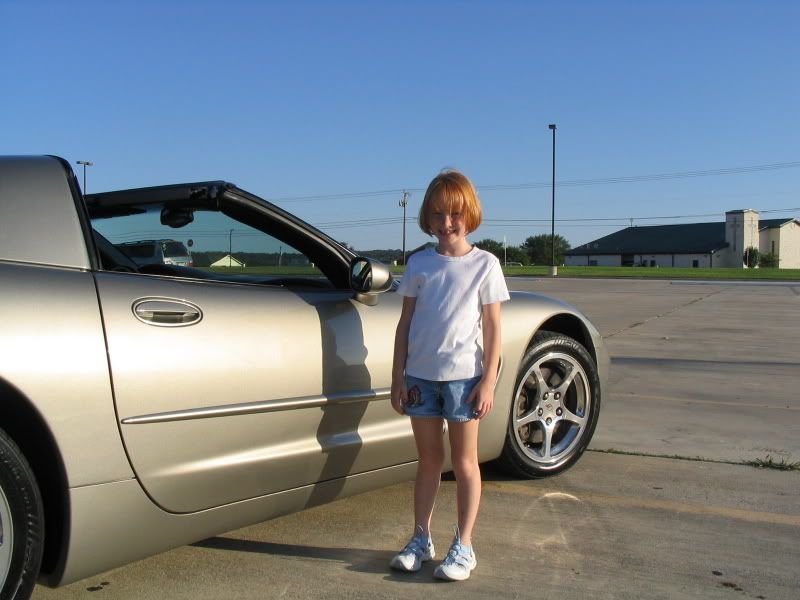
Picture using fill-flash (notice the shadows on her face are gone!)
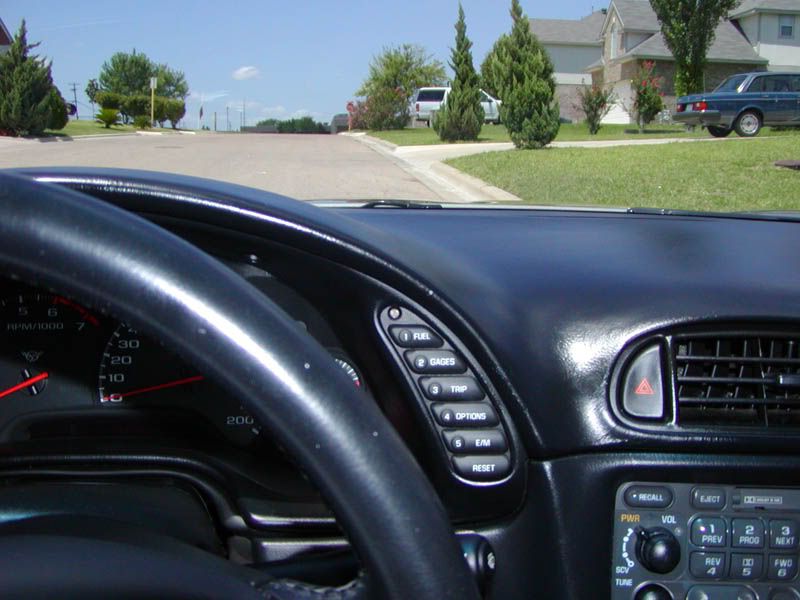
Here’s another example showing the importance of focusing first on the brightest part of the picture, pressing halfway down and then readjusting to where you want to take the picture. In the first picture I just snapped away in “auto” mode, but in the second, I focused outside first, so that I had the sky nice and blue and the grass nice and green, and THEN while holding the shutter button halfway down pointed the camera where I wanted to take the picture. The fill flash “filled” out the rest of the photo, illuminating the dash and everything close in.
Auto Mode
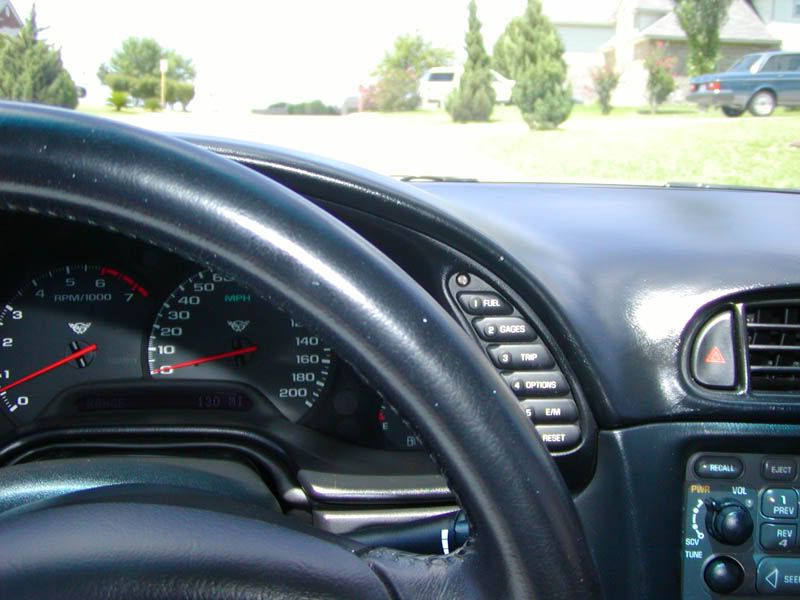
The right way
What most people screw up about these kinds of pictures is simply that they take them too far away. Get as close as you possibly can while retaining as much of what you want to take a picture of. Also, as painful as it is, ALWAYS take the picture with the sun on YOUR back. This will make the persons face and the background more true to color and will come out much better.
Closing Thoughts:
The best time to take pictures, in order to get the best use of color and light, is half an hour before to a half an hour after sunrise and half an hour before and half an hour after sunset. These give you the BEST warm colors for pictures. If you absolutely must take a picture during the rest of the hours, always keep the sun on YOUR back. This prevents “washed out” pictures because of the camera lens receiving too much light from the sun. This will also prevent a lot of the glare you will get off of your highly shined car.
Last point is to not get too wrapped up about megapixels! It’s amazing what a war the camera manufacturers have started with this whole deal. Don’t confuse MPs with resolution, they are related, but different. You want a camera that offers a better resolution (like 2048 x 1536 or greater) more than you want to worry about whether it is 4 or 5 MPs. The average photographer will never need more than what a 3 megapixel camera offers. The only time MPs come into play are when you are printing out poster size prints or you are cropping a small part of a large picture and blowing it up. For instance, if you had a picture of the whole car from the front but wanted to just crop the emblem on the front and blow it up. You can blow up any picture you take with a 3 mp camera to 8 x 10 with no problem at all, and it will come out just fine. For most people, the pictures usually never get printed out and at best only enjoy time as a computer wallpaper, in which case a 2 mp camera will do you just fine. I’m not saying you can’t go wrong with a 5 mp camera, I’m just saying that it offers a lot more than the average photographer will ever need.
I hope that this tutorial has at least helped one person here! I enjoyed writing it, even though I had no intention of it originally being this long. I don’t have the technical knowledge to help you install your cam or headers, but if I can make ONE picture on the forum come out better, I’ll feel like at least I contributed something. Have a great week, family of mine, and always remember to “Save the Wave!!”
Everyone gets excited when they get their baby all polished up. After a long day of polishing and buffing, all you want to do is rush in and snap a few pictures to share with your family here on the CAC!! That’s completely understandable, but SLOW DOWN cowboy (or cowgirl)!! That excitement can turn to dismay when you post your washed out, or too-dark-to-tell-it’s-a-car pictures for all to see. After all that hard work you put into keeping your prize clean, it’s time to apply some very simple basic rules to taking pictures. There will be several topics I discuss in this tutorial, and important notes will be in all caps:
1) Quick lesson on your camera!
2) Pictures of the engine bay or close-up pictures
3) Night time photos (not as hard as it sounds!)
4) Whole-Car photos
5) Pictures of you, your significant other or friends by their cars
You won’t be Ansel Adams by the end of this tutorial, but I hope that this will teach you something you may not have known before and make the picture taking portion of posting your pictures more enjoyable.
1) With the age of digital cameras, point-and-shoot has been the way to go! I’m telling you right now: STOP using the “auto” mode on your camera and take control of your digital pictures! A trend I see on most posts is blurry or just out-of-focus pictures. This detracts from your beautiful car and just doesn’t make picture posting very fun.
THE HALF-PRESS: The #1 reason most peoples digital photos come out blurry is simply a lack of understanding of the process of taking a basic picture. Some of you simply may not know that YOU MUST PRESS THE SHUTTER BUTTON HALFWAY DOWN BEFORE TAKING THE PICTURE. Many people just point the camera and jam the button down until they hear the noise indicating a picture was taken. This will lead to a blurry picture most of the time.
When you want to take a picture, center what you want to take a picture of in the viewfinder and depress the shutter button HALFWAY down. This allows the camera to focus first. After about a half a second, you can press the button all the way down and the camera will correctly process the photo. The half-press is CRUCIAL to proper picture taking!!
WHAT MODE TO USE: Move away from the “auto” mode and use the following two modes for about 99% of your photos. “Still” mode and “Sport” mode.
A majority of cameras (even cheaper ones) have a “still” mode depicted on your dial or switch by a flower or profile of a person. Without getting into technical data, this generally sets your camera up for the type of pictures most people take: your car sitting in a parking lot or in front of a beautiful backdrop. This mode will set the shutter speed and aperture to the proper settings for a good “still” photo.
“Sport” mode is usually depicted on your dial by a little stick-figure runner. This is the mode to use when there is any movement involved in your picture. It increases the shutter speed to catch the object without blurring, and compensates for any movement of the camera while trying to capture a moving object. Great for use at the track or for fly-bys! You CAN use this for all of your pictures, but the shutter speed and aperture settings aren’t ideal for “stills.”
FILL FLASH: Fill flash is the most ignored feature on everyone’s digital camera. This is the little flash that comes with your camera that either pops up or is fixed to the front of it. This little flash is KEY to about 99% of pictures you will take. A misconception of flash is that you only need it when it’s dark. On the contrary, the brighter it is outside, the more you should use your fill flash. When the sun is shining, there are inevitably shadows. These shadows end up under eyes and chins on people, and in the wheel wells and under the car. The fill flash will equalize your photo by ridding it of the shadows. People’s faces will come out much cleaner and colorful than without the flash because the dark shadows are off of their faces. (See Lesson #5 for examples of this!)
2) Pictures of the engine bay or close-up pictures.
WHEN FOCUSING ON A PARTICULAR PART, IT IS ALWAYS BETTER TO PHYSICALLY GET CLOSER TO IT THAN TO “ZOOM” THE CAMERA IN ON IT. Your zoomed in shots are prone to be blurry unless you are using a tripod or other stable platform. The more you zoom, the shakier your picture. Your pictures will be much clearer if you just walk in closer. If you take pictures of the entire bay or let’s say the wheel well, don’t forget that other parts will be showing up in your picture, too, so you might as well make the whole picture look good! This is what I mean:
Here’s a picture of the engine bay, but notice how the background is all “washed-out” and it is generally too bright.
Here is a properly taken picture. Notice the deeper colors.
This is an easy fix in your photos. Most cameras automatically adjust to the light levels present (even when you’re in “still” or “sport” mode). You can test this by pointing the camera to the darkest spot in the room and holding the shutter button down halfway. Watch the display lighten the picture. This is because the camera is trying to compensate for all that darkness and opening the lens up to receive more light. Conversely, point the camera at the brightest spot and the camera darkens the screen up more as the lens closes a little to adjust to the bright source of light. Knowing this, can help you take better pictures. This works great inside the house, too, especially if you have your subject in front of a window or door.
When you take a picture of a subject that is in a darker area than surrounding area, the lens automatically adjusts to allow more light in. This results in the brighter areas becoming even brighter! That’s what occurred in the first picture of the engine bay. With this in mind, all you have to do is first focus the camera on the brighter spot, allowing the camera to adjust to the bright light. Next, while you are pointing at the bright area, hold the shutter button down halfway and HOLD IT. While holding the button halfway down, point the camera back to the area you want to take a picture of (which will look very dark in your viewer, and then ensuring your flash is on snap the picture. This will allow your camera to keep the proper balance of colors and brightness as shown in the second engine bay picture.
3) Night-time photos!
Have you ever seen the big pictures of a night city skyline, with all the city lights all bright and pretty? How do they DO that?? This one could be trickier for those of you without a certain option on your camera. The option I’m talking about is specifically for night-time photos and is generally depicted by a little icon that looks like moon and stars. If you do not have this option, another way to take night pictures is to manually adjust your shutter speed. You’ll need to read your owner’s manual for that, it is different for every camera, and you can experiment with how much you need to slow it down to get the results you want. The key to night photos is to make sure the camera is getting enough light! Generally, a shutter speed of 1/10 will work just fine for your night shots.
How can I do that at night, you ask? Well, we’re back to talking about your camera receiving light. Your shutter speed is what determines how much light is coming into your camera. If it takes a picture really fast, very light comes in the camera, but if you keep the shutter open longer, it allows the camera to capture more of the ambient light. Anytime you slow down the shutter speed though, you also are at greater risk of having blurry photos. IT IS HIGHLY RECOMMENDED TO USE A TRIPOD FOR ANY NIGHT PHOTOS TO AVOID BLURRY PICTURES. Back to the picture of the city skyline: if you look closely, you’ll see that the streets have red streaks down them. Those are the cars going up and down the street. In order to get all of the lights in the picture, the photographer must slow down the shutter speed. Depending on how slow the shutter speed is, the cars could be traveling quite some distance before the shutter closes, and this causes the blurred, red streaks on the streets. This is why you must use a tripod for night pictures. If the camera moves even the slightest bit, you will get a blurry photo.
Another tip for night time photos is to use the “timer” option if you have one available. This will keep you from shaking the camera even the slightest bit when pressing the shutter button on a tripod.
If you can’t slow your shutter speed down at all, stick the mode in “still” and use a tripod. Aim for the darkest area in your photo, which will lighten the entire picture, and snap away. It won’t be great, but the best you will do with your camera.
As a side note, if you are going to have people in the picture, you will want to use the fill flash. The flash will go off to illuminate the people, and then the shutter will remain open to get the rest of the ambient light.
Here’s a picture without a tripod, and holding as still as I can. Notice there is SOME blur.
Here’s a picture using the tripod.
4) Whole Car Photos:
This is by far the easiest. You can usually use any mode you want, because the farther away you are from the subject of your photo, the less your shutter speed and aperture are going to wreak havoc on it (except when you’re using sport mode). I still will use a “still” mode for stationary objects, as the settings are still good. DON’T BOTHER USING FILL FLASH WHEN YOU’RE MORE THAN 20 FEET AWAY as the reach is not generally that far, and it will just make your blinkers and reflectors light up unnaturally in the photo.
Picture with fill flash (notice the blinkers)
Picture without fill flash
5) Pictures of you, your significant other or friends by their cars
These are some of the best pictures, whether they are of your little ones enjoying a ride in the car, or your hot significant other (or yourself!) showing off in front of the car. These are also the pictures that most people mess up, and the easiest to remedy. If you read back in section #1 about the fill flash, you’ll remember that fill flash is KEY to success in sunlight situations. Here is a perfect example of this, using my daughter Katie as a somewhat willing model:
Picture without using fill-flash
Picture using fill-flash (notice the shadows on her face are gone!)
Here’s another example showing the importance of focusing first on the brightest part of the picture, pressing halfway down and then readjusting to where you want to take the picture. In the first picture I just snapped away in “auto” mode, but in the second, I focused outside first, so that I had the sky nice and blue and the grass nice and green, and THEN while holding the shutter button halfway down pointed the camera where I wanted to take the picture. The fill flash “filled” out the rest of the photo, illuminating the dash and everything close in.
Auto Mode
The right way
What most people screw up about these kinds of pictures is simply that they take them too far away. Get as close as you possibly can while retaining as much of what you want to take a picture of. Also, as painful as it is, ALWAYS take the picture with the sun on YOUR back. This will make the persons face and the background more true to color and will come out much better.
Closing Thoughts:
The best time to take pictures, in order to get the best use of color and light, is half an hour before to a half an hour after sunrise and half an hour before and half an hour after sunset. These give you the BEST warm colors for pictures. If you absolutely must take a picture during the rest of the hours, always keep the sun on YOUR back. This prevents “washed out” pictures because of the camera lens receiving too much light from the sun. This will also prevent a lot of the glare you will get off of your highly shined car.
Last point is to not get too wrapped up about megapixels! It’s amazing what a war the camera manufacturers have started with this whole deal. Don’t confuse MPs with resolution, they are related, but different. You want a camera that offers a better resolution (like 2048 x 1536 or greater) more than you want to worry about whether it is 4 or 5 MPs. The average photographer will never need more than what a 3 megapixel camera offers. The only time MPs come into play are when you are printing out poster size prints or you are cropping a small part of a large picture and blowing it up. For instance, if you had a picture of the whole car from the front but wanted to just crop the emblem on the front and blow it up. You can blow up any picture you take with a 3 mp camera to 8 x 10 with no problem at all, and it will come out just fine. For most people, the pictures usually never get printed out and at best only enjoy time as a computer wallpaper, in which case a 2 mp camera will do you just fine. I’m not saying you can’t go wrong with a 5 mp camera, I’m just saying that it offers a lot more than the average photographer will ever need.
I hope that this tutorial has at least helped one person here! I enjoyed writing it, even though I had no intention of it originally being this long. I don’t have the technical knowledge to help you install your cam or headers, but if I can make ONE picture on the forum come out better, I’ll feel like at least I contributed something. Have a great week, family of mine, and always remember to “Save the Wave!!”


")


