Welcome to the Corvette Forums at the Corvette Action Center!

Trailing arm, diff and rear spring removal..

youwish2bme

Well-known member
Joined
Feb 17, 2003
Messages
471
Location
Clayton,NC.
Corvette
White 66 vert
I plan on removing everything back there this week before Xmas... Do you guys have any lessons learned from past experience? I've been spraying pb blaster on the trailing arm bolts, the diff mounts and the crossmember cushions. I forsee a sawsaw in my future for the trailing arm bolts.. I have read that I will need to have the spring supported so that I can remove the spring to t/a bolt. Also I'm of the understanding that the only way to remove the lower shock mount is with the special tool.. Beyond that I don't know what to expect... It seems pretty straight forward after the R&R I did on the motor/tranny and frontend this past winter.. Thanks guys.. Dave..
 
Mine went easey. the most important thing to remember is the spring is under alot of tention.You must compress it in order to remove the bolts to the trailing arm.then slowley realise the tention.


Becarefull how do you plan to have axcess to the bottom of the car are you using a lift?
 
Just rebuilt my trailing arms and half shafts on my 65 (Pumpkin was done just before I bought the car). Get the maintenance manual and read the process on how to deal with that spring using a chain over the cross member and a jack. Do exactly what it says (including the C clamp) and taking the tension off the the spring is a walk in the park. Don't do it and let that bad boy spring free? Have one set of extra underwear nearby and someone with 911 in their cell phone just in case it taps you on the way down.
 
Guess the spring is the most dangerous thing to remove...but it is described already in a good way.

The lower shock bolts will probably the toughest.....I have seen one on a C3 that was rusted all the way through...and took us about 2 hours to remove. So you better spray the lower shock mounts for several days until they are really soaked. The special tool can be made easily....just take one of the castle nuts, weld a piece of thick pipe to the top....so that you can push it hard with a hammer....and I mean HARD.

That should work. Have to do the work again in spring as one of my Konis is leaking.....whilst restoring the car I assumed that they are ok.
 
I've found that an air hammer ("burp gun") works better than a hammer to remove the lower shock mounts; lots less physical effort, and much less likely to damage or break the arms on the support. PB Blaster still required :)
 
Thanks guys, I got it mostly apart today. The spring came out very uneventful. I was very surprised that the trailing arms cam out with no problems.. I thought I was going to get away with not using any of the ten 24 tpi blades that I bought.. Well then I got to the Snubber bolt.. The nut was rusted solid to the bolt. First bolt or nut that I have found on the car that I could not break free.. Out came the sawzaw and down one bolt and nut..after breaking 6 blades... I tried to free the crossmember cushions from the sombero hats... I need a bigger pry bar... I'm letting the PB blaster do it's work I sprayed it to from the top down and up thru the bolt hole. I hope that stuff will work it's magic... Any other suggestions are always welcome..

On a side note who would you send you TA to? I was thinking Bair's or VanSteel is one better than the other? I think Bair's is a little bit more expensive by about 70 a side..

Okay well two extra questions.. I promise.. hA.. Does anyone know where I might be able to get my hands on a new Eaton series 3 posi carrier? It seems that no one has one of these bad boys.. Thanks.. Dave..
 
Did you get the bolts loose holding the rear crossmember up into the sombrerros? or is that what you are calling the snubbers?

When I did mine I put longer bolts back into the sombrero's and let the weight of the cross member and the 3rd members weight work with me ,this way when you brake it loose(belive me you will) it only dropped down till the bolt caught it.

We actually used a plastic wedge (like the ones that come with a chain saw so the blade doesnt bind) and slightly drove them in evenly on both sides.If you wedge one side down too much you may bind it up. Good luck.I still have to re do all of this to my 66 I have a set of rebuilt trailing arms and a rebuilt 3rd member I have to install when I get the time
 
The snubber bolt is the one that connects the front of the diff to the frame, btw what is the correct name for this? That one is the one I had to cut. I got the bolts out of the crossmember and put a 3" bolt in each of those so it won't fall once I get it loose. Currently the crossmember cushions to the sombero are the hold up.. I didn't think about using wedges to break that bad boy free.. Thanks for the idea I'm going to pick some up tomorrow..

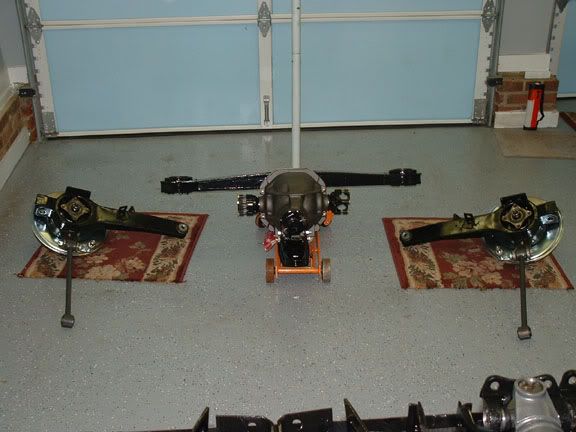
rearcomplete.jpg


Diffreadytocomeout.jpg

ta.jpg
 
"I need a bigger pry bar"

ahhh, sounds like the project is going perfectly normal . . . :D


suprised you didn't report back on how heavy that diff unit was, suprised me when I dropped it how heavy it all was . . ..
 
Oh it's heavy? I still gotta get my lazy butt out of this chair and go look for a pry bar.. I hope to find out how heavy that bad boy is today..

And of course.. Situation Normal here... AFU.... Dave..
 
youwish2bme said:
The snubber bolt is the one that connects the front of the diff to the frame, btw what is the correct name for this?
It's called "bracket, differential carrier mounting" :)

Snubber2650.jpg

:beer
 
Yep that's it... Thanks John..

Dave.
 
John, Is the AIM wrong on the differential front bracket? The reason that I ask is I'm now putting it all back together and I looked at the AIM and I am confused. The AIM shows the front bolt as the one with the cotter pin and is inserted from L to R and the back bolt as the normal bolt inserted from R to L. The reason that I ask is based on the picture you posted above.. The new bolt kit that I got from one of the parts houses also only has one Lock washer where the AIM shows three used. 3 weeks of work are coming down to a day of installation..

Readytogo.jpg


partscomplete.jpg


Framepaintedandbuildnumber.jpg
 
Dave,

How did you achieve that natural finish on your halfshafts? That looks great.

Gary
 
Gary it's just rattle can paint that I found at Auto Zone the manufacter is Dupli-Color, Cast Coat Iron DE1651. It is an engine enamel that will take some abuse. I'm glad you like the color it's a good color and since my car is far from correct ie gloss black vs semi-flat....
 
I agree, the natural look in the halfshafts will look great against the gloss black of the rest of the componets

Barry
 
I'll get back to you in a couple of days - I'm in Florida for the NCRS Winter Regional and don't have my references available.

:beer
 

Corvette Forums

Not a member of the Corvette Action Center?  Join now!  It's free!

Help support the Corvette Action Center!

Supporting Vendors

Dealers:

MacMulkin Chevrolet - The Second Largest Corvette Dealer in the Country!

Advertise with the Corvette Action Center!

Double Your Chances!

Our Partners

Back
Top Bottom