Welcome to the Corvette Forums at the Corvette Action Center!

Shinoda start

WhalePirot

Well-known member
Joined
May 9, 2002
Messages
2,945
Location
SoCA
Corvette
1984 White Z-51/ZF6-40/Shinoda body
Shinoda body: installing now

I just couldn't wait any longer... :)

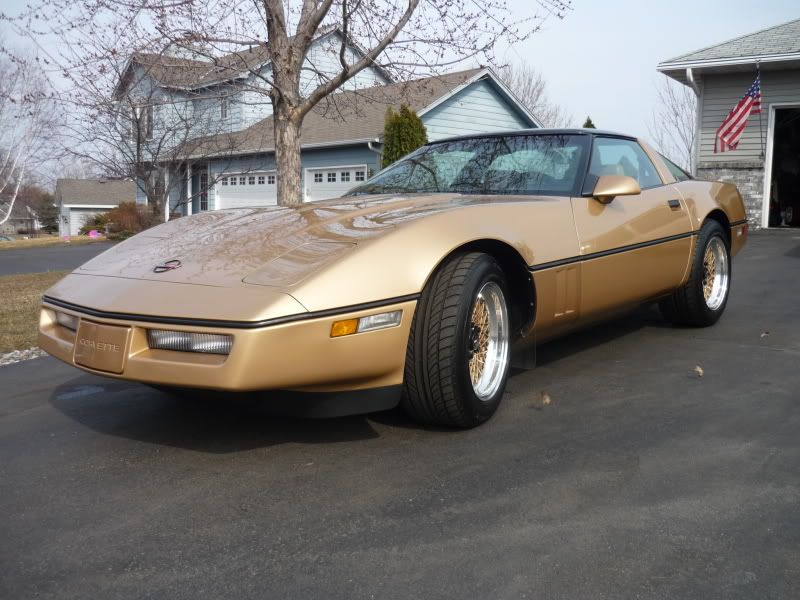
Having bought the body panel kit months ago, after a long search, I'd been disciplined in keeping to one project: my '55 F100 sitting on full 1984 Corvette suspension, with a stroked L83 (from my '84 Vette) w/ 700R4.

So, I drove the Vette to grab a burger and the driver's window ribbon broke again with rain forecast. I dug out the conversion parts and went to work changing to the new design and fixing all the other little problems in/around that door. Then I solved the whine in the new stereo and some other minor dash issues while doing some paint nick touch-up.

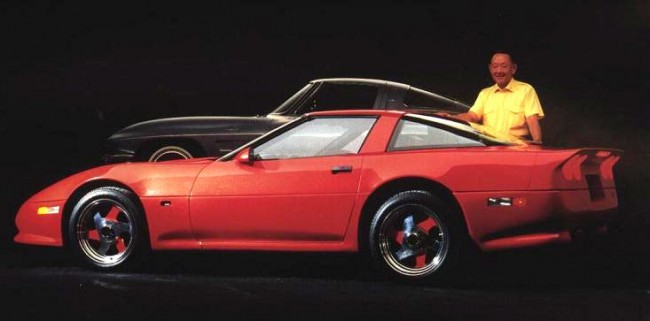
The lower body panels taking the brunt of road rash, I opted to start the Shinoda panel install instead; fearful of the huge time commitment I'd read about for this, further delaying my truck target finish date.

With only the right side on, I am so excited about this, thinking the Shinoda/Mears kit has the best lines of any non-factory body I've seen. I'll get a pic or two tomorrow, when the light is better....IF I can sleep tonight.
 
So post up the pix when possible - I'd like to see them!

:wJane Ann
 
Anyone recall Karen Carpenter singing, We've Only Just Begun?

ShinodaRtStarted.jpg
 
Re-restart

I found the measurements for the door bracket placement in the instruction book to be off, such that the panel alignment fore and aft was way off. Removed rivets and remounted as I thought it should have been done; an improvement. I hate redoing things, but how's one supposed to know?

I learned as a boy to follow model car instructions and be patient or get lousy results. I expect to have the pax side on later today, finally.

I am really liking this, especially in the stealthy flat black. A close Alaska buddy did his drag rail and his drag bike in flat black, with gloss black flames. I thought he was nuts, but no longer. Hey, I'm guy when it comes to colors, NOT a florist.
 
Is this the Kit (With Mr. Shinoda)?

ShinodaMearsC4-650x321.jpg


I hope you are taking pics. :)

:w
-Stefan
 
Is this the Kit (With Mr. Shinoda)?
Yes, it is; the later model rear lights is the only part I would have chosen differently. I have that poster framed in my man-cave, signed by him. Those wheels are VERY rare, I think.
I hope you are taking pics. -Stefan
Yes I am.. well, some. The manual is quite good, within limits, and the parts I bought included extra door brackets, door clips and other hardware. A previous kit owner had mounted the driver door panel.

I remounted that whole side to get the best alignment I could manage. I made a double curved shim, which was glued in place under, and to get the narrow piece behind the door to line up with the door. Now I see that placing the door panels first saves remounting of the adjacent pieces.

I also chose to drill pilot holes for self tapping screws into the frame's flange, for a more solid attachment of the rocker pieces versus using the stock screw-into-nylon. That should payoff over time (and over 100). :eek:hnoes

It looks quite good, at least in flat black, such that I kept going.

When I test fit the left door panel, I thought it was actually a right door piece, the fit was poor; NOT what I wanted to see after drilling all those holes in my car! While that fitment is just starting, I think I have figured out how to make it work and look good, while unsure why the lousy lower front curvature mismatch occurred.

The car had been hit rather hard by a redlight-runner many years ago, and the USAA insurance guaranteed shop sucked as did their supposed lifetime warranty. :mad I suspect that, like much of the rest of the shoddy repair (redone elsewhere) their 'skill' is the issue. How else could 1/2" of difference exist in modern production? Yes, 1/2"!
At least Prestige Collision:puke in Mission Viejo cost me a new engine (my expense, as I could not prove it) with their practice of hot rodding customers' cars when moving them. So much for trust and integrity, once found in USAA but long absent from my former insurer.

I modified the metal bracket for the 'gill' piece and it looks as though the crevice with the door will be fine, albeit the inner wheel well needs adjustment, too.
LftDoorFrntBrackets.jpg

Left to right here, you see the electric hydroboost needed with this low-vacuum 409. barely visible is a half-hoop that holds and shapes the new gill. A long, wide piece of 3M double-sided, industrial strength tape holds them together and there is in/out adjustment, top and bottom. The front bracket on the door is taped/riveted in place. The door piece was tri-screwed to this bracket, similar to the aft on each door.
:w mike
 
Please keep us up to date on your progress!

The Shinoda/Rick Mears kit is an incredibly tasteful design. Even after all of these years, the overall design and proportions of the kit still look good. Not overdone and not to subtle, it’s a beautifully balanced product.

B17Crew
:w
 
Please keep us up to date on your progress!
"OK. Will do my best" he says, irritated by the fiberglass in his arms and fingers.
The Shinoda/Rick Mears kit is an incredibly tasteful design. Even after all of these years, the overall design and proportions of the kit still look good. Not overdone and not to subtle, it’s a beautifully balanced product.:w
VERY well said. I feel fortunate to have found this kit and thank Jeff Leon for selling it to me with so many parts and at a reasonable price. I hope I can install it suitably, as a Shinoda deserves.
RtFinished.jpg


I got the both sides finished, now and have started to remove the tail, finding more missing parts by Prestige Auto Collision, courtesy of USAA. Damn them.

The gaps on the left side are not too uniform, so I may go with a dark color.
 
Brackets moved

This is how much lower the long bracket was moved from where the manual specified.
RtDoorMovedLwrBracket.jpg

That is about 1/2"!

All brackets fit to and hold the poly panels best, when placed about .125" from the edge; the panel thickness. There are pre-drilled holes on three sides of each door panel for attachment to these brackets. I found the front and rear panel holes should dictate placement of the respective brackets.


It is also easier to temporarily fit each door panel using a partially broken clip in the center and the two threaded studs at each end; tightened. Marking the door edge as shown with grease pencil allows proper alignment for the the segments where the screws attach, with no measuring. I eyeballed the 1/8", knowing that the segmented tabs can be bent and/or ground to fit more precisely.

Using my method: 1) prevented extra holes in the door, 2) is easier, shorter and quicker than the manual's method, and 3) yields a better result. DOH! Ya know: K.I.S.S.?
 
I feel fortunate to have found this kit and thank Jeff Leon for selling it to me with so many parts and at a reasonable price. I hope I can install it suitably, as a Shinoda deserves.
.

Thanks for putting up pics, these kits have to rare and valuable.

Great to see Mr. Shinoda’s touches applied to the C4. The man was an incredible designer. I remember seeing his drawings of a C2 body applied to a C5 chassis, nicely executed. It was in Corvette Fever many years ago. I think the prints were for sale, sure wish I would've bought one!

B17Crew
:w
 
Cant wait to see your kit installed! Larry was a GREAT designer whose work was elegant and underappreciated by the masses. Perhaps its poor marketing on his part but his work is YEARS ahead of Greenwood and similar tacky body kits and I wish there was more of it around. When Larry saw the c5 he disliked it immediately and designed his own vision of what the c5 should have looked like! His design was right on for the then growing retro market craze at the time! Even if not strictly copied, elements could easily have been utilized in the c5 rather than make it look like an elephent sat on it.
RIP Larry! You are surely missed!:w

ShinodaC5.gif

THAT’S IT!!! It’s been years since I’ve seen those drawings, thanks for posting! (prints were available at one time). Really like the 3/4 rear view.

B17Crew
:w
 
Rear goes on

Cant wait to see your kit installed! :w
Getting there. Thanks for the energy and posting that, which I had not seen. (ya got ole B17 cranked up.. :L)

The rear bumper and cover is about 85% on, and slightly beyond what these photos show. I have the backup lights and RR tail and side marker lights in and working.

Removing the original bumper and cover is hard on the hands and arms and I have done the bleeding and swearing. With the extension on the Shinoda there is so much more room, it's a pleasure by comparison.

In removing the rear honeycomb 'energy bar', I had a hell off a time finding the right socket, trying both English and Metric; then saw that the mounts were plastic push-ins that popped off and broke. The new bumper uses only one existing hole, which gets enlarged slightly plus requiring 3 more drilled.
RearbumperMounts.jpg


I had to loosen my muffler mounts to fit the bumper to the mounts.
Rearbumper.jpg


The trial fit was disappointing as the innermost upper corner bracket bolts were off by nearly 1/2"! Look closely and the curvature of the kit's piece is not quite the same as my car's. Or don't look closely.. thanks. I lengthened each of the inner holes (4) and tugged the tail on, using fender washers and sequential tightening to pull it tight. I used my jack, a long steel flat and a wooden pad to hold the second-to-be-tightened side up into better position; then tightened all ten bolts.
RearCoverInitialMount.jpg

I actually got the backup lights reinstalled and connected, plus the right rear finished, including the inner wheel well and the wheel and tire remounted. The ambient light failed so pics will come later.
RtRearCoverInitialMount.jpg
 
Nice project updates ! :thumb


I give you credit for drilling into your Vette's body. I probably couldnt take the screaming. :eek


:w
-Stefan
 

Corvette Forums

Not a member of the Corvette Action Center?  Join now!  It's free!

Help support the Corvette Action Center!

Supporting Vendors

Dealers:

MacMulkin Chevrolet - The Second Largest Corvette Dealer in the Country!

Advertise with the Corvette Action Center!

Double Your Chances!

Our Partners

Back
Top Bottom