vettebob
Well-known member
Hi,
Time to repay a bit for all the help I have received from the forums about my 1987 Corvette!!
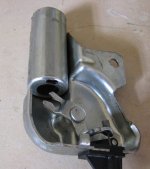
My electric rear hatch would not open, and I priced a new solenoid at over 140 bucks. Ridiculous. So I decided to take it apart and see if I could fix it. This post assumes that you have good 12v power to the solenoid when you hit one of the hatch switches, and that you have a good ground.
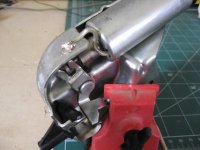
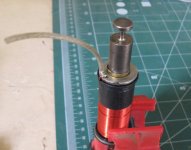
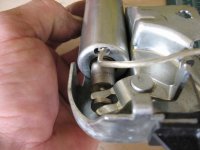
Take the two nuts off and remove the hatch latching assembly. Then remove the one bolt holding the solenoid itself to the latch. Then with either a hacksaw, or a Dremel tool with a cutoff wheel, carefully cut off the crimped portion of the solenoid. Be very careful not to go too deep; try to cut just the metal itself. It's ok if you get into the plastic right below a bit, but go any deeper than that and you will do damage.
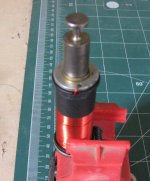
Once the cut is complete you can remove the plastic plug where the connector goes. Then you can disengage the linkage at the other end, and slide the solenoid coil out. You will see that the ground for the solenoid is nothing more than a wrap of the solenoid coil wire that touches the outer housing when the coil is in place. Do a continuity check from this ground point to the spade connector. If your solenoid coil checks good, (and it most likely will), then it probably wasn't working due to this ground not making good contact with the housing shell anymore. That was the case with mine. (It's a really poor setup for that ground.)
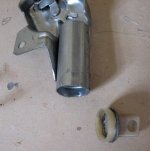
I drilled two holes in my housing outer shell right where that ground wire would touch, and used a small round file to create a slot out of the holes. I then soldered a wire to the solenoid coil at the exposed ground connection. I then put the solenoid coil back into the housing, leading the new wire through the slot I had created in the housing. I then soldered the wire to the housing at a convenient point. (This will take a really good hot soldering iron to do. If in doubt, just put a crimp connector on the wire and run it to the solenoid to latch mounting bolt.) Glue the plastic cap end of the housing back in place with epoxy, and maybe wrap the end with tape for good measure. Test the solenoid with a good 12 volt source and connection, and then re-assemble everything with some lube at strategic points. Done deal, and 140 bucks saved.
The pics will explain it all...
Thanks,
vettebob
Time to repay a bit for all the help I have received from the forums about my 1987 Corvette!!
My electric rear hatch would not open, and I priced a new solenoid at over 140 bucks. Ridiculous. So I decided to take it apart and see if I could fix it. This post assumes that you have good 12v power to the solenoid when you hit one of the hatch switches, and that you have a good ground.
Take the two nuts off and remove the hatch latching assembly. Then remove the one bolt holding the solenoid itself to the latch. Then with either a hacksaw, or a Dremel tool with a cutoff wheel, carefully cut off the crimped portion of the solenoid. Be very careful not to go too deep; try to cut just the metal itself. It's ok if you get into the plastic right below a bit, but go any deeper than that and you will do damage.
Once the cut is complete you can remove the plastic plug where the connector goes. Then you can disengage the linkage at the other end, and slide the solenoid coil out. You will see that the ground for the solenoid is nothing more than a wrap of the solenoid coil wire that touches the outer housing when the coil is in place. Do a continuity check from this ground point to the spade connector. If your solenoid coil checks good, (and it most likely will), then it probably wasn't working due to this ground not making good contact with the housing shell anymore. That was the case with mine. (It's a really poor setup for that ground.)
I drilled two holes in my housing outer shell right where that ground wire would touch, and used a small round file to create a slot out of the holes. I then soldered a wire to the solenoid coil at the exposed ground connection. I then put the solenoid coil back into the housing, leading the new wire through the slot I had created in the housing. I then soldered the wire to the housing at a convenient point. (This will take a really good hot soldering iron to do. If in doubt, just put a crimp connector on the wire and run it to the solenoid to latch mounting bolt.) Glue the plastic cap end of the housing back in place with epoxy, and maybe wrap the end with tape for good measure. Test the solenoid with a good 12 volt source and connection, and then re-assemble everything with some lube at strategic points. Done deal, and 140 bucks saved.
The pics will explain it all...
Thanks,
vettebob

 I'd go there too, before downloading anything over a C-bill for a switch.


