Welcome to the Corvette Forums at the Corvette Action Center!

72 Coupe - 28 Years and Counting

Sounds like you have it on the run Bob :cool!: Wish I had half your energy, seems as I am going to have to retire to get anything done here lately, just get a good start and time to go back to work :ugh, retirement is on my horizon though :happyanim:

Bill :w
Bill,
Many of my friends refuse to retire -- what would they do if they didn't work. A lot of people suffer stress-related disorders when they retire but I'm not one of them. Just make sure you have a project ready to go when you retire. At the beginning, treat it like a job. I didn't disappear into the garage for 8-hours a day when I first retired. Seeing me wandering around 'her' space during the workday was too much for her.

I retired at 50 when IBM offered me a buyout. Wife sent me back to work after 7 months (I think the set of knives I ordered from QVC triggered that). Four years commuting between Florida and Washington DC every other week changed her mind but she made me promise to spend my time in the garage and not invading her space.

We found our dream home 3 bedroom, 2 bath with pool and large yard in a downtown neighborhood (I visit her 1700 square feet and she checks to be sure I'm OK in my 900 square feet). I had to repair some termite damage in the garage so insulation and AC became part of the repair. Upgraded the 3 garage doors to meet hurricane code and insulated them at the same time. The garage is equipped with a few amenities, like a surround sound system, deep sink, refrigerator, freezer, ice maker, microwave, coffee bar and a new hybrid water heater. In addition to the $500 energy credit, I saved $300 by installing the water heater myself. The savings justified replacing the old 27" CRT TV with a 32" LCD high def flat screen. Added a blue-ray player with wireless internet so I can watch basic cable TV, blue-ray disks or Netflix. Most of the time I just listen to CDs -- a 400 CD changer is part of the sound system. Wife lets me use the second bathroom (as long as I keep it clean).

One of the bedrooms is my former office so four computers are networked in there and the laptop resides in the master bedroom (hooked up to the 'big' screen to make it easier to keep my wife supplied with horror movies on Netflix).
 
Bill,
Many of my friends refuse to retire -- what would they do if they didn't work.

I used to say the same thing, back when we had a real economy and business was good. But in the past 3 yrs all of that changed, and I found myself with something I had never had before - time on my hands...lots and lots of time. As I was not ready (financially, thanks to our pals in DC) to retire, for a few months I wanderend aimlessly, looking for an "opportunity", that I was sure was right in front of me, if I would just open my eyes to see it.

Well, that didn't happen but as time went along I noticed more and more "projects" of all types that I had either post-poned in past years or had started and never got around to finishing up. One morning I woke early and as I was waiting for daylight to come, I started ticking off in my mind the things I needed to get done in the near future, then went to the things that I wanted to start in that same time frame. I suddenly came to the conclusion that, while I really did need to find some income producing activity, I just didn't see where I would find the time. I decided this must be what retirement was supposed to be like.

Maybe I could handle it after all....Tell your friends there is life in the big "R" after all, if they're man enough to deal with it;)

Now, if I could just hit the lottery - just one time.....
 
DP,
Long before I retired I eliminated all my debt. Paid off the mortgage, paid cash for my cars and paid the credit cards off each month. I also started saving for retirement when I was young. I put away 25% of my gross income for a couple of decades.

I paid a contractor $6,000 to repair one wall in my garage (framing, sheathing and stucco). In retirement, I repaired the opposite wall myself for $600. I rebuilt the TH400 transmission in the 72 for $200. I wasn't happy with the way it came out it so I bought a TCI unit for another $500. At the busiest time in my last job I paid a place $2,800 to rebuild the 700R4 and they broke the speedo housing and included a leaking pan gasket for no extra charge. I could have bought two transmissions for that price.

I prefer cutting my spending instead of increasing my income. I also prefer paying my own way instead of charging my luxuries on my kids' credit cards.
 
Now, if I could just hit the lottery - just one time.....
My son's 401k plan. He tells me you have to buy some kind of ticket to win -- what's that all about. I've already had more and better luck than I deserve so I don't push it with gambling. My record for losing a roll of quarters in a slot machine is 2.25 minutes.
 
Remedial Fabrication

As part of the front suspension upgrade, I wanted to replace the 39-year-old springs and 30-year-old shocks. I also want to eventually replace the iron cylinder heads with aluminum (along with a hydraulic roller cam). That means the ride height will be up for grabs. Forgetting air bags, the obvious solution is an adjustable coilover setup. Already replaced the upper control arms with lightweight tubular pieces. I did that for the extra caster to go with the rack & pinion setup. QA-1 sells a coilover conversion that bolts right on the stock suspension so that's what I chose. Took the lower control arms off and removed the ball joints and bushings. Cleaned, sandblasted and did some grinding on them so when the coilovers arrived I thought I was ready to go.

Coilover.jpg


It looks like a simple bolt on. All you have to do is remove the welded nuts from the shock mount locations and enlarge the holes to accept the QA-1 mount. I’m a belt and suspenders kind of guy so the mounting location looked a little flimsy to me. That just doesn’t look like adequate support for the weight of one corner of the car..
CoiloverMount1.jpg


The QA-1 kit comes with fine-thread mounting bolts and nyloc nuts. I didn't want to use that hardware until the actual install so I used a couple of coarse-thread 3/8" bolts for mock-up. Even from the bottom, this just looks like trouble.
CoiloverMount2.jpg


I bought a few pieces of steel angle and square tubing from Home Depot many months ago. Started wiith a couple of pieces of 1" angle but it just didn't look any stronger. Bending a piece of flat stock looked even worse. Finally, looking at the 1" square tubing, I thought I might be able to fabricate a bridge to strengthen the mount.
I cut a 3.5” piece and removed 45-degree wedges from each end. Hacksawed a little clearance for the shock from the center and drilled two holes. Top is where it started and bottom is the finished bridge. My vast background in fabrication :chuckle 
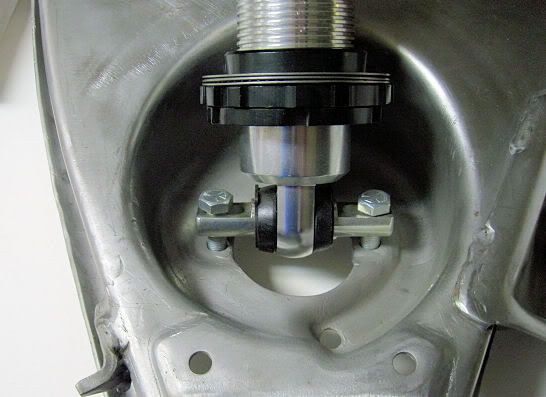
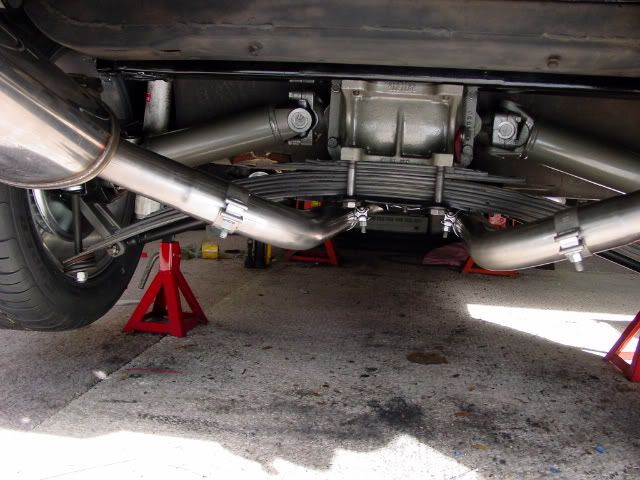
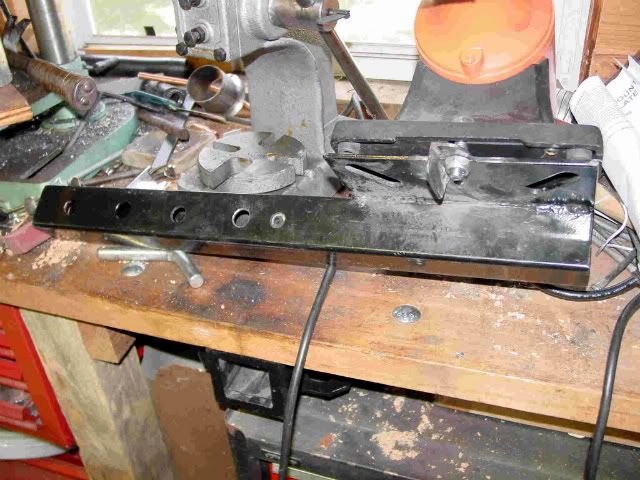
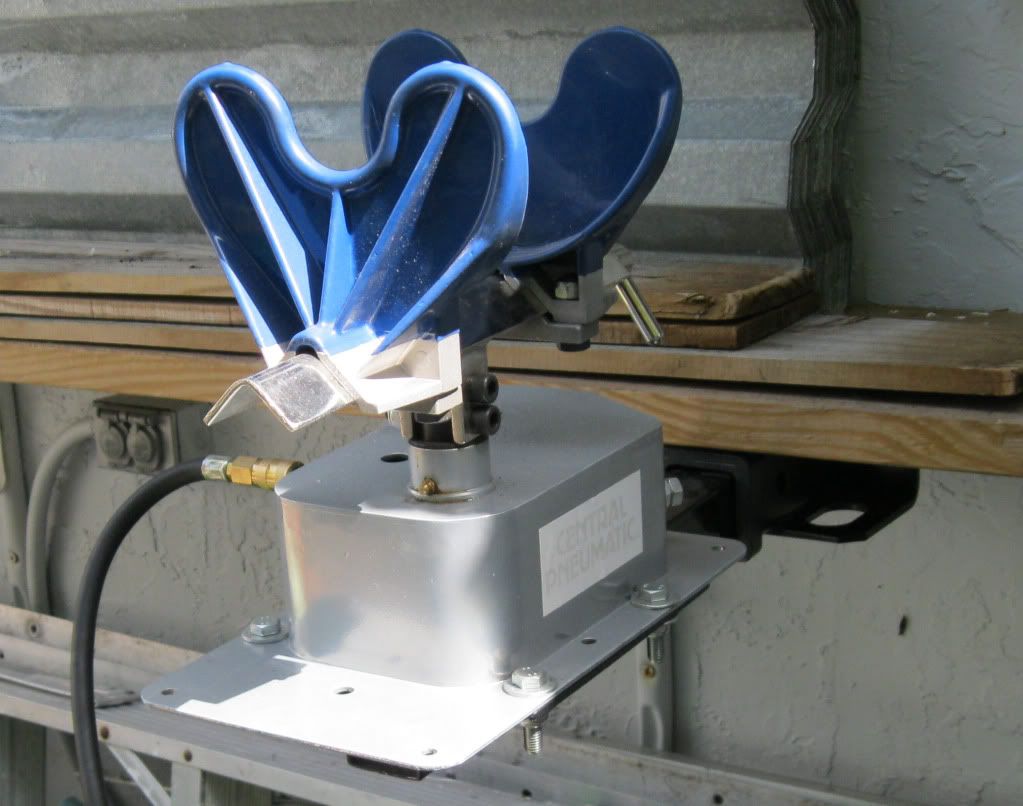
enabled me to get one of these done in less than three hours. Let's see, measure four times, double check, measure again, make one cut – repeat process for each additional cut and then go to work with grinders, files and sanding wheels. Measure and mark holes, drill a pilot hole and then use a step drill to enlarge for 3/8" bolt -- followed by a little more filing.
CoiloverBraceStarttoFinish.jpg


Looks like it may help strengthen the mounting point.
CoiloverMount3.jpg


Now I just have to make one for the other side.:D
 
I just completed the aluminum head & roller cam (along with side pipes) you were thinking about. It did raise my ride height about a quarter inch. I am enjoying this thread,please keep it coming.
 
I just completed the aluminum head & roller cam (along with side pipes) you were thinking about. It did raise my ride height about a quarter inch. I am enjoying this thread,please keep it coming.

Sharkcar,

I'm interested in your experience with the aluminum heads. Also, what cam did you choose?

I have no plans to get back into competition with this two-bolt main engine but I would like to replace the heads. When we rebuilt the big block in the early 80s my friend with the machine shop discovered a small crack in one combustion chamber. He found another head, checked the combustion chambers and it was crack free. Prepped the head and swapped all the new parts. Got it all re-assembled and did a pressure check on the cooling system. Crack in one of the water passages was seeping. We pulled the head and made a setup to pressurize the cooling passages. Another club member worked in commercial fire systems and had access to a high-tech leak sealing compound. It fixed the leak but it's just one of those little nagging things you know will bite you someday.
 
Unfinished Projects

As far back as I can remember, I have had difficulty finishing projects. I reach a point where one or two details would complete it but they take me forever. The Corvette is no exception. I often begin an upgrade or repair and get it 90% complete. I run into a problem and without fail, my first solution turns into a setback. The more focus I put into solving the problem the bigger the setback grows. If I abandon the problem and move on to something else, the problem kinda festers in the back of my mind. The solution arrives in an unrelated magazine article, forum post or something I see while out shopping at a home center or tool store. It would be a horrible way to run a business or to make a living but I seem to eventually find solutions long after a problem arises.

Drives my wife crazy but her "why don't you just hot-glue it?" advice isn't always helpful.

This is just my way of warning you that none of what I've shown is really 'finished.' The universals are installed and torqued but the tabs on the french locks haven't been bent over. The steering column has been disassembled and the wearing parts installed but I haven't put it back together -- a couple of pieces need to be epoxy-primed but I don't want to mix up a quarter pint of paint so it waits for a couple more parts needing paint.
 
Hi Bob, I went with AFR 195 heads and a Comp cam XE276 HR. It has 224/230 duration at .050 and 502/510 lift.
Long story short, I always wanted Hooker side pipes ever since I bought my car. My PO installed a mild GMPP crate motor(after he dropped a valve in the numbers matching motor) and I thought the side pipes wouldn't sound good with that mild cam. Then I determined that a performance cam wouldn't work with those weak heads. I was telling one of my drag racing friends about my plans and he says that he has a set of AFR's sitting on the shelf with less than 20 runs on them and I could have them without springs for $600.00.:happyanim: I was going to go with the XE268 cam but comp and another member here at the CAC talked me into the XE276,Glad I listened.
 
You hit the nail on the head. . . . . . . . Right-on brother!

After reading your posts, I think you're just joshin' us about only having one arm....from what you've gotten done I'm thinkin you've got at least 3... keep it and keep posting. Reading yours is a lot more fun than working on mine.
Oh so true, I think when I retire I can finally get those things done that I feel like starting late Sunday afternoon after working all week. A friend of mine retired a year ago and he tells me it is like having 7 Saturdays in a row :happyanim: Also I think when work starts to feel just like that; WORK it more than likely is time to pull the trigger, and I'm about there, thinking another year for me and I really am clearing things up to make that happen :beer 
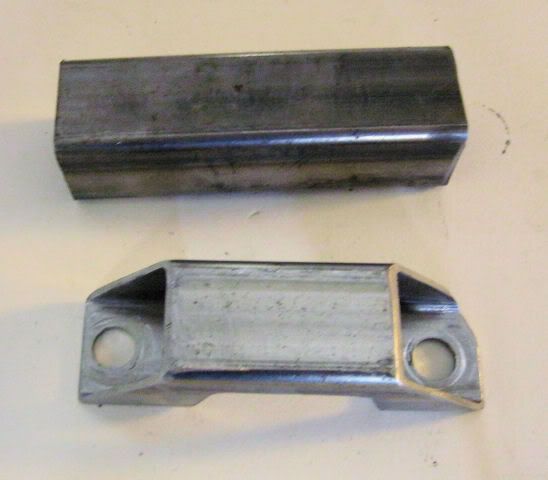
Because of work or being drained all week because of it I have not even had the C-5 on the road yet this year and that is a :crying shame.

Bill :w
 
Welcome Aboard. . . . . . . .

I am loving this thread! Thank you for sharing!!!

Did we welcome you to Corvette Action Center, didn't think I did and we want you to feel welcome. So if I missed the chance to do that :welcome

Bill :w
 
Great pictures and narrative. I am definitely hooked! Please continue to update, I really want to see how it all finished out. I'm hoping to begin my own trail of tears on an early C3 soon.

Sounds a lot like we are about the same age, of the same era.

Keep up the great work, you now have a fan club.

:werd:
 
Hi Bob, I went with AFR 195 heads and a Comp cam XE276 HR. It has 224/230 duration at .050 and 502/510 lift.
Long story short, I always wanted Hooker side pipes ever since I bought my car. My PO installed a mild GMPP crate motor(after he dropped a valve in the numbers matching motor) and I thought the side pipes wouldn't sound good with that mild cam. Then I determined that a performance cam wouldn't work with those weak heads. I was telling one of my drag racing friends about my plans and he says that he has a set of AFR's sitting on the shelf with less than 20 runs on them and I could have them without springs for $600.00.:happyanim: I was going to go with the XE268 cam but comp and another member here at the CAC talked me into the XE276,Glad I listened.
Nice deal!

Small-block Chevy engines are for sane people. Tons of horsepower for very little money and they fit in a Corvette engine bay with room to spare. Big-block Chevy engines are for slightly off people. Tons of torque but most go-fast parts are more expensive and they overflow a Corvette engine bay (even a low rise manifold requires a special hood). Jegs sells a pair of small block AFR heads for $1,400; big block AFR heads for $2,800. I'll be happy with Skip White heads for a grand. I may do the roller cam upgrade with the stock heads to start. The radiator is coming out again anyway so this would be the right time for a cam swap. I'll have to check the springs for coil bind before I order the cam, lifters and pushrods -- the one I want has 0.568/0.576 lift.
 
Brief Career in Gauges

Like any car in South Florida, my Corvette has some sun fading. One place it showed up was in the gauge clusters. I took the center gauge cluster apart and cleaned it up a bit. The clock didn't work so I bought a quartz movement kit and got it working. Managed to break off the tail of the second hand putting it back together but otherwise uneventful little project. Cleaning the gauges turned into a minor problem -- some of the white lines and letters had turned powdery and wiped off the gauge faces. The red (orange?) warning line on the temperature gauge was only a hint of color so I got out my finest sable brush and tried to touch up the gauges. During my model-making years as a child I was pretty good at painting silver trim (and all the little bolt heads on the undercarriage). Don't know if I'm more critical in my old age or I've just lost the rock steady brush strokes I had as a kid. In any case, I'm not real happy with the result.
CenterCluster-1.jpg


I found a place that sells decals to bring your gauges back to life. It isn't restoration quality but you can get the original look. I figured I'd go the extra step and change from the black background to white. The company is White Gauges .com and they offer the decals in all kinds of backgrounds, like brushed chrome, wood, carbon fiber and a bunch of different colors. I put the decals on all the gauges and was pleased with the results.
PICT0122.jpg


When I finished the speedometer and I noticed there were two decals for the tach but neither had the right orange and redline. I contacted them and asked about the tach and they had a correct one out to me within two days. I don't actually rely on the tach redline but it was nice to have the right one.
Speedo-TachCluster.jpg


Believing I was on a roll, I attacked the center console bezel. Twenty-five years ago a friend gave me a Blaupunkt cassette player head and I modified the bezel to make it fit like it was original. I decided to used a Sony cassette deck and CD changer head from my 87 Corvette so I picked up a tube of plastic aluminum and made the bezel fit a DIN-1 head. Over the course of a few months, I managed to get it all back together. Well, almost... the gauge lenses needed some TLC so I sat down and started polishing them. I set the center bezel lens down on the workbench and started looking for the polish. My garage workbench is actually a cheap faux butcher-block mica countertop sitting on cheap kitchen cabinets. Above the counter I have more cheap kitchen cabinets. I opened the cabinet directly above the lens and something fell out when I tried to check the contents for the polish. Murphy's law is in force 24/7 in my life so the thing that fell out of the cabinet landed right on the lens. It could have broken a corner off the lens but of course it did this:
CrackedLens.jpg


Ordered the new lens and put it all back together. It doesn't look too bad.
CenterCluster.jpg


This should be the end of the gauge story but of course, my desire to have another unfinished project overrides common sense. I keep reading posts about dimming lights and all sorts of electrical problems from people who have added electrical stuff to their car. Stuff like dual electric fans, high-power stereo systems and bigger blowers on the air conditioning systems. Solution is to replace the whimpy alternator with a more powerful unit. Those same posters tell me that the battery gauge in the console is a problem when you upgrade because it measures amperes rather than volts. 'Everyone' recommends switching to a voltmeter, In my quiet sheep-like way, I order a volt gauge and when it arrives I immediately realize I have another problem. Beyond needing to drill an extra mounting hole in the panel but the face of the gauge is different. The original gauges have a white ring and the 77-78 gauges just have a plain face.
20101127_0419.jpg


Contacted White Gauges .com to see about a modified decal that would match the old gauge with the -40 0 +40 replaced with 0 13 18 but it would be too much money for this one-off decal.
Ammeter.jpg


I quit work on the gauges and started working on another project. Had one of those a-ha! moments and ordered a set of decals for a 77-78 Corvette. Now I can peel off all the decals on the small gauge cluster and replace them with these plainer 78 gauge faces (the ones with no words--with the exception of the 'unleaded fuel only' one (the circled ones). The decal set was only $19.95 delivered to the door so total cost of the modification was about the price of a single gauge.
78Faces.jpg


Well, the volt gauge is done. I just have to take the center console gauges back apart and re-do them.
Voltmeter.jpg
 
Look forward to the next class. . . . . . . Corvette 101

This is very interesting and appears to be a lot of work but very rewarding. I find myself looking forward to the next chapter in this class. Also makes me want to more and more restore that Classic 1972 LT-1 that I have dreamed of for a number of years :cool!:

Bill :w
 
Tires and Rims

When I bought the car, it had aftermarket rims. The rims were aluminum and very dull. The fronts were 15x8 and the rear were 15x10. The tires were Gillette Sprint GT bias ply. Size G60-15 up front and L50-15 rear. The rear tires stuck out from the fenders so far I thought they were dangerous.
72CorvetteDayOne.jpg


I took the rear wheels off and found one-inch spacers bolted to the hubs. When I took the front tires off, I found spring boosters wedged into the coils. I removed the boosters from the front and the spacers from the rear. When I re-installed the rear tires, they rubbed but 1/4-inch spacers were adequate. The rear tires were pretty worn and I didn't want to repeat the disaster of my first Vette. Bought BFG Radial T/As (235/60R15 front and 295/50R15 rear). The BFG tires didn't need even the small spacers and at the time I didn't think it looked bad. The big tires in the rear helped a lot with wheelspin but the car really plowed in autocross events. I couldn't figure out why the rear sat so high but I eventually corrected that with some longer spring bolts.
aspurchased2.jpg


After way too many embarrassing autocross events, I wanted to change to the same size rims front and rear. NCCC rules put me into an open class because of the tires and I was competing against turbo Mini-Coopers and race prepped Austin Healey bugeye Sprites (my Fiat X1/9 eventually fixed the problem). I wanted to buy a set of nice lightweight Centerlines but they were too spendy for my family budget (over $200 each). In 1984, when the C4 Corvette came out with 16-inch rims, I thought that would be the way to go. My speed equipment supplier at the time, JC Whitney, had 16x8 chrome Cragar mags for $50 each and Pro Trac 265/50-16 bias ply tires for $50 each as well. Ad said they fit Chevy bolt pattern so I ordered a set. From the picture, they looked a lot like the Centerlines.
CragarMags.jpg


Good news is that they fit the bolt pattern. Bad news is that they are uni-lug and they aren't hub centric. Beyond that, the rims and tires are heavy (68 pounds each). The center section is a massive chunk of aluminum and the rim is steel with some kind of steel wedge embedded in the aluminum so the dissimilar metals can be securely (?) welded together. In addition, the backspacing and tire size causes the sidewall to rub on the e-brake cable. Made a bracket to hold the cable back but still had to use 5/8" spacers (I did manage to solve the problem when I overhauled the trailing arms but the fronts rub as well so the spacers have to stay). So, sketchy lug pattern, spacers and weight make these wheels less than ideal. The tires are so far past their useful life that chunks are coming off the tread even though there are no miles on them.

I know I should just forget about tires and rims until the car is finished. Only problem is that quite a few things depend on the tire and rim selection. Sooo, I bought a set of 17-inch aluminum Torque-Thrust II knockoffs with Federal 225/55R17 fronts and 255/50R17 rears. Delivered to the house for $1,100. They have the right bolt pattern, are hub-centric and weigh 52 pounds. Not exactly lightweight but that's 64 fewer pounds of unsprung weight.
PICT0073.jpg


As promised, the rims fit perfectly. The front tire clears just fine, with no rubbing on the frame or fender. The rear tires also fit fine. Well, almost fine. Because I dropped the rear ride height with the longer bolts, the stock spring touches the tire. The rear sway bar is also touching but I am certain the rear alignment is way off.
DSC00710.jpg


Noonie offered a solution. He removed some leaves from his stock spring and replaced them with a spacer. He also replaced the main leaf with a shorter one from Guldstrand. This shorter leaf is a little stiffer so removing a couple of leaves allows use of the stock-length spring bolt. I think you can see it will clear the rim if I use a shorter bolt. The anti-sway bar may be another visit to Van Steel -- they have a shorter one available but it requires offset trailing arms. Like the ones included in a Van Steel rear coilover setup. For the time being I'll just wait until the rear has been aligned and is sitting at ride height.
 
This is a lot of work and I think I need a nap now :z
 
Bubba Gets a Buffa

This is a lot of work and I think I need a nap now
sleeping.gif
I needed one as well. I closed my eyes and woke up a month later. Actually I've been working on lots of stuff besides the car so the progress has been minimal.

Many years ago I admired the chrome engine goodies on show cars and thought I'd like to add some to mine. More than most things, chrome plating has gotten more and more expensive and fewer and fewer local places are still in business. I had my custom bumpers chromed for $450 and had a couple of brackets chromed for another $80. Figured I might save money by going to the Corvette suppliers. I found chrome vacuum canister covers for $40, radiator brackets for $170 and chrome hood hinges for $280. I'd rather buy my wife a $490 piece of jewelry so the chrome is not gonna happen. I decided to just polish and clear-coat the parts.

For years I've used an 8-inch buffing wheel on one side of my 1/2-horsepower bench grinder. It and a smaller 6-inch grinder with a stone and wire wheel are mounted on a narrow section of the bench in my dirty workshop (as opposed to my dirty garage). The guards on the grinders and their location on the bench limited my ability to buff stuff.

Jack Olsen, a Garage Journal guru, had a cool solution. Mount tools on trailer hitches and mount receivers under the work bench. This setup has several benefits. When I want to use the space where the tool mounts, I can unhitch the tool. I can also mount other tools on hitches and use them in the same receiver.
ViceMountModified.jpg


Eastwood sells a 1 hp 10-inch buffer for $200 but it's hard for me to control the buffing process on the 1/2 hp grinder so I passed on the option to double the power -- and the risk of injury. I opted for a small 6-inch Harbor Freight 6-inch buffer for $40.
BufferMount.jpg
<br>

I mounted a second receiver on a 2 x 12 shelf on the garage wall outside. My pneumatic paint shaker is now on a hitch so I can make sure my paint is thoroughly mixed without hand-stirring for 20 minutes. It's also outside so when the disaster happens, the mess will be outside. The air coupler is a few feet to the right and the electrical outlet is just to the left of the receiver. This is a handy but not a frequently used tool that takes up a lot of bench space. Now that it's attached to a hitch, I can put it away when I'm not using it.
OutsideBenchMount.jpg


Went to work polishing a few parts. I'm going to spray a coat of clear on the steel and brass (after a final buff and thorough cleaning). Still have to work on the radiator brackets but I figure these buffed pieces save me more than $500 for chrome counterparts. Only shows my car will see will be at my house and the judges will be my grand-kids -- they're tough but inexperienced.
Shinybits.jpg
 
Cool idea for sure

Bill :w
 

Corvette Forums

Not a member of the Corvette Action Center?  Join now!  It's free!

Help support the Corvette Action Center!

Supporting Vendors

Dealers:

MacMulkin Chevrolet - The Second Largest Corvette Dealer in the Country!

Advertise with the Corvette Action Center!

Double Your Chances!

Our Partners

Back
Top Bottom