Welcome to the Corvette Forums at the Corvette Action Center!

Caution lots of pics..today was a good day....C1 with Myers and Tremec!!!

firstgear

Well-known member
Joined
Oct 11, 2003
Messages
1,895
Location
Norwalk, Ohio
Corvette
15 Z06, 01 Vert, 63 SWC & 60 ALL RED
Had a little detour today, but once some friends on here helped me sort out that there was a plug in the end of my TKO600, everything was smooth sailing again....need some comments on drive shaft angle...I think I have some adjustment by tightening up the lower bars on each side of the 4 links....I could take out some of the angle at the rear diff by doing that...what do you think?
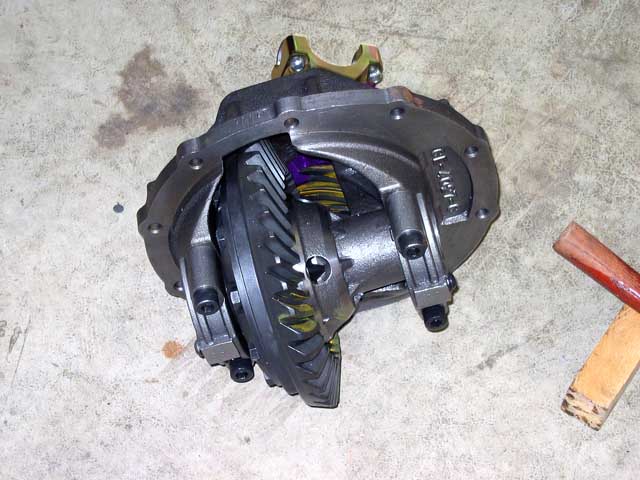
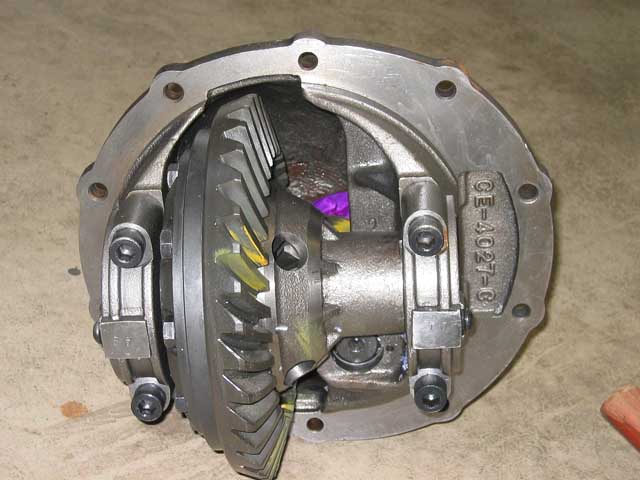
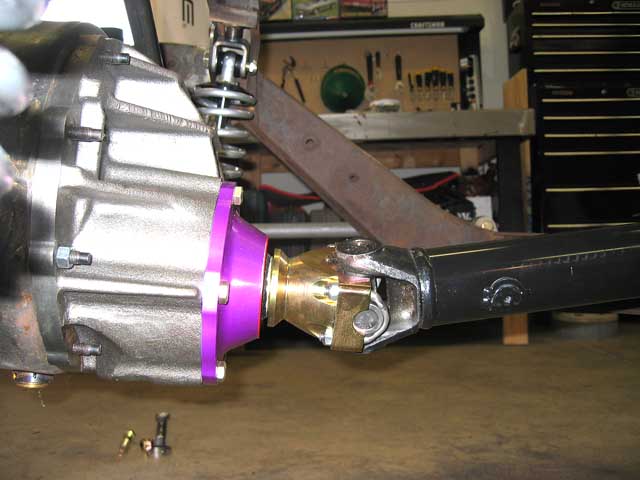
Here is my nodular iron carrier....it is HEAVY to say the least....but is supposed to take a beating and not let go....cost extra to upgrade to that...but when I drop the hammer :lou , I won't worry about anything....the gears are 3.55 with posi....

IMG_5018s-vi.jpg


IMG_5020s-vi.jpg


IMG_5021s-vi.jpg


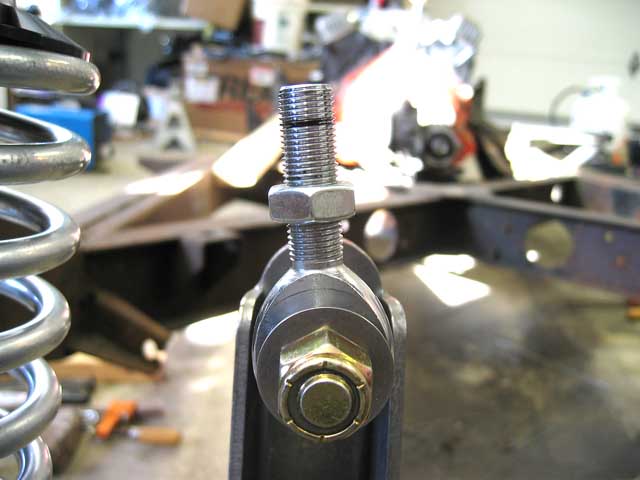
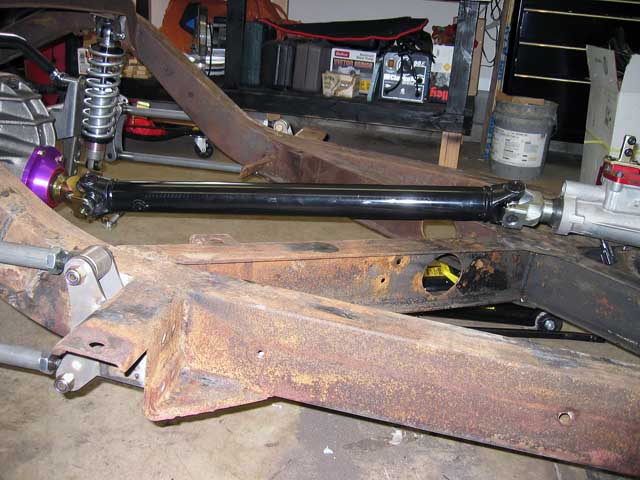
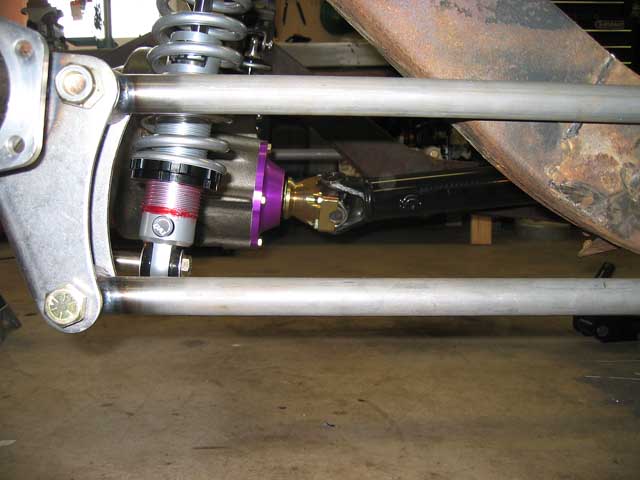
also sorted out the panhard....you will notice the plywood is gone...got each side to with 1/32 of each other....no problem with tacking on the bracket as is...BUT, I am not comfortable with the amount of thread engagement I have at the heims end on the housing....

IMG_5031s-vi.jpg


I marked with a sharpie the amount of engagement I had...it is about 1/8" short of being one diameter worth of engagement....so I am back to thinking that I should add about 1/4" to 3/8" onto the bracket to "shim it out", that will give me more than a diameter worth of engagement....

IMG_5007s-vi.jpg


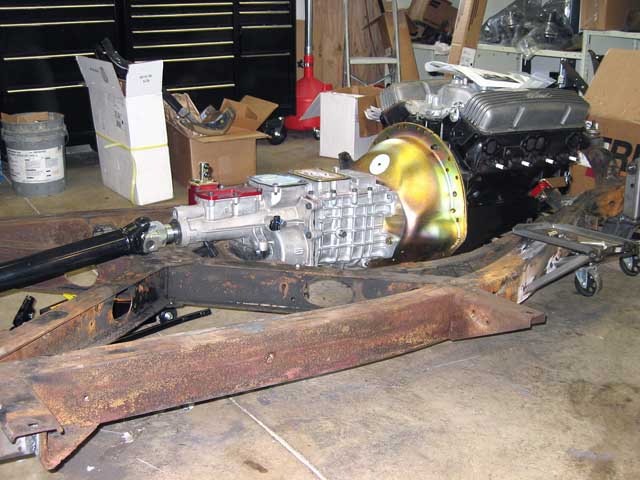
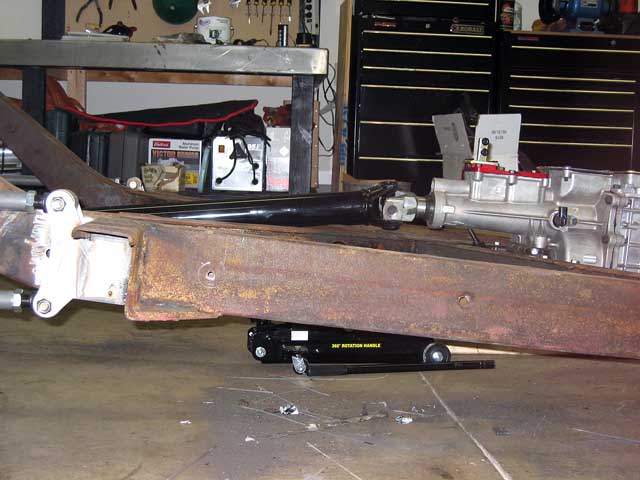
I fitted up the McLeod scattershield and Classic Chevy 5 Speed Tremec TKO600 with McLeod shifter to check to make sure everything was fitting ok...in order to clear the tunnel in the car, CC5Speed in the installation manual recommends dropping the rear tranny bracket 3/8"...I didn't have any spacers that were 3/8", so I found some 3/8" bolts and stuck them in there for spacing for the time being, I will get the fab shop to make me up some 3/8 spacers.

IMG_5048s-vi.jpg


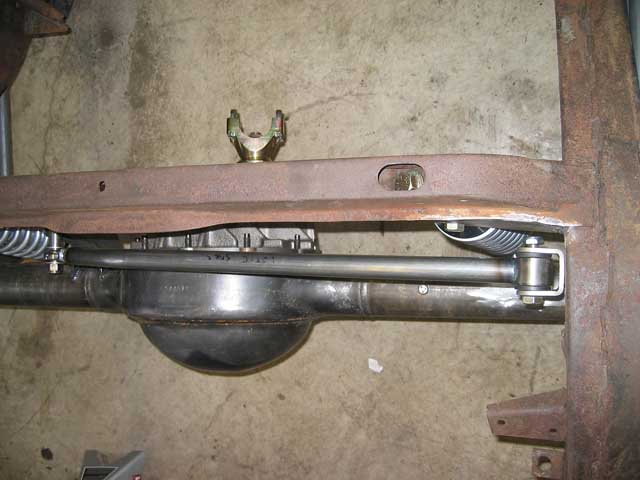
Here are some photos that show drive shaft angle...I need some help here...what is too much in these cars? I know from seeing other rolling chasis photos that there is a lot anyways...I would like to minimize as much as possible...when the hammer drops :lou , I don't want the drive shaft tearing out...thoughts and comments?

IMG_5040s-vi.jpg


IMG_5037s-vi.jpg


IMG_5038s-vi.jpg


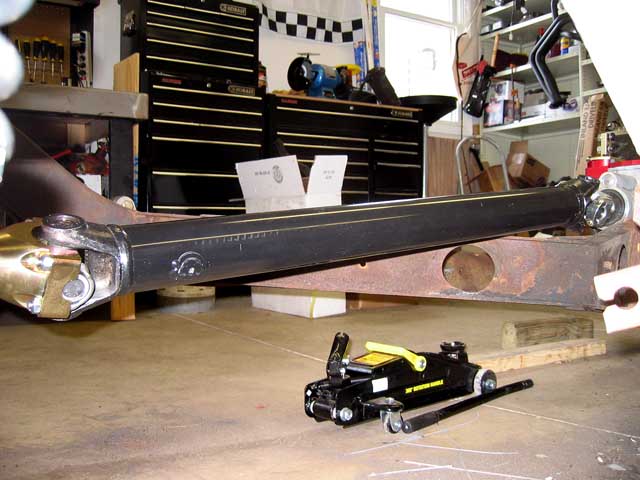
in the photo below I can "roll" the rear housing by tightening up the lower link of the link if need be....thoughts?
IMG_5039s-vi.jpg


IMG_5043s-vi.jpg


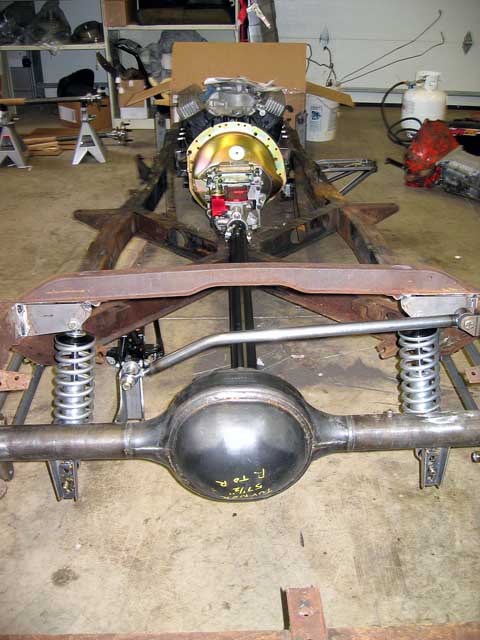
realize that the rear end is higher than the front end by at least 15 inches in these photos, so the angle looks worse than it is...you need to see where the front of the shaft is and the rear to get a good idea...
IMG_5049s-vi.jpg


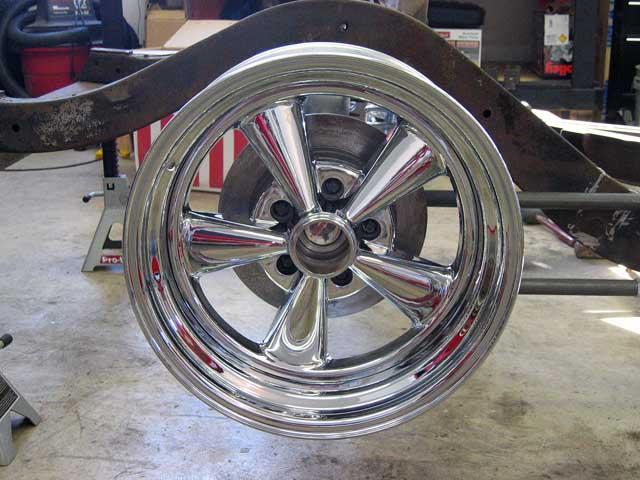
of course I had to put the rear wheel on to see what it looked like....also put on the rear disc...the rear discs also fit a Ford Explorer...go figure, guess Ford Racing has put together a kit for rear discs, all the rear brake stuff came in a Ford Racing box complete...go figure!
IMG_5016s-vi.jpg


That is it for me today...next weekend I will drop the body back on to check for wheel clearance and and any other issues I might find...then body back off and dis-assembly to get the frame over to the fab shop for welding....thats it for today!!! thanks to all that provided me some assitance through out the day!!
Again, let me know about that drive shaft angle.....
regards, Herb
 
Herb,
Awsome job.I'm impressed w/your progress.Once the weather breaks I want to drive the 67 out to see your car.
If you get to the point where you need some help,let me know. Jim
 
jims427400 said:
Herb,
Awsome job.I'm impressed w/your progress.Once the weather breaks I want to drive the 67 out to see your car.
If you get to the point where you need some help,let me know. Jim
next weekend might be the best time......I want to put the body back on the frame and see what kind of clearance issues I might have before I take everything off.....if it is ok, then the plan would be to strip everything off the frame so I can get it to the fabricators.....we have plans for Saturday evening...but starting in the morning and working until mid-late afternoon....what ever I don't get done on Saturday will get pushed to Sunday...
 
Herb,
I should have checkrd w/the fam before I posted.We're heading to yhe lake this weekend to get everything we'll need for spring break in 3 weeks.
I'll keep trying,and I havent given up on my lift yet.
keep you posted..Jim
 
jims427400 said:
Herb,
I should have checkrd w/the fam before I posted.We're heading to yhe lake this weekend to get everything we'll need for spring break in 3 weeks.
I'll keep trying,and I havent given up on my lift yet.
keep you posted..Jim
no problem......when it comes time to sand blast I figure that it will still be cold out....so that means that I am going to make a tent with a tarp and hang it over the lift....tape down the edges and make a hole to the side window....hook up a fan to blow out the window and see if I can't get a little draft going in the tent....that is the plan...now will it work???? who knows....but I need to keep this moving if I want to have a rolling chasis by summer.....

Herb
 
Herb it looks great. Lots of progress. Maybe before you go to the fabricators you could have someone who is familiar with your setup take a good look at it and just double check everything for you. A second pair of eyes is good insurance before you commit to the fab shop. Keep up the great progress.
 
Wow

this is some cool stuff, I would definatley say from your photos that the pinion is facing down and needs to be horizontal

I think you should pm henny a link to this to see what he thinks, I know nothing of proper geometry on this stuff, look like alot of fun though
 
IH2LOSE said:
Wow

this is some cool stuff, I would definatley say from your photos that the pinion is facing down and needs to be horizontal

I think you should pm henny a link to this to see what he thinks, I know nothing of proper geometry on this stuff, look like alot of fun though
I sent him a PM...thanks
 
studiog said:
Herb it looks great. Lots of progress. Maybe before you go to the fabricators you could have someone who is familiar with your setup take a good look at it and just double check everything for you. A second pair of eyes is good insurance before you commit to the fab shop. Keep up the great progress.
hmmmm.....not sure who....will have to find someone...good suggestion....anyone got ideas?
 
chassis

Hello Herb
I just accidentally erased my last message...s__t !
You want at least the bolt dia of engagement on the Heim end. I would actually go for 1.5 X bolt dia
It looks like you are going to run paralell bars, but you still have your coil overs extended
Measure your spring overall length( take off and measure freee length, unless you already know that) Measure the distance between the coils with a caliper accurately and multiply this distance by the number of spaces in the spring. That gives you the available amount of travel you have. Mulitiply this by .6 and that should tell you how much your spring should be compressed( free length minus that number)
You can get muffler tubing and cut it to that length to simulate your spring compressed and install that in your coil overs, then set the car down to see where you are. ( two pcs cut evenly and the same to each other)
(I imagine your rear springs are in the150 -180 ib range) You won't be able to have your spring compress properly w/o having the body on and all the stuff to go with it, including driver, but you want it to be at this ride ht, or get the proper spring
The bottom 4 link bar should be paralell to the ground at ride ht or on a slight downward angle( both if bars are paralell with each other)
The angle of the driveshaft with tranny and rear end could be less than your pics show, but you will have to get the car @ ride ht first, to see how it is. Have your coil over adj nut in the middle of it's travel also, so you have room to play with later
I will look at you pics again and see if I missed something here, but if not then you have to do the spring thing first. 2.5 inch muffler tubing will work as a spacer for the shock
I am impressed with your progress and I will follow the CAC closer than I have been recently...........sorry about that
take care
Tom
 
thanks Tom....since I need to take this all apart to get final welding, sand blasting and powder coating....the list of tasks that you specified, can those wait for final assembly? I basically put everything together to check for fit and potential problems...I would rather do this fussing one time, at final assembly. My plan is to get the rolling chassis by summer.....when that is going together is when my final assembly and adjustments will be.....your thoughts on this approach?
 
Picture #9 is the only one that troubles me. I agree with IH2LOSE. I'd try to get a little more horizontal. BTW, you are having way too much fun! :Twist
 
Looks to me that you'll need to tilt the rear end upwards and the transmission/engine downwards??? :confused

Other than that looks like a helluwa fun project you got there going! :beer
 
Vette66AirCoupe said:
you are having way too much fun! :Twist
yes I am!!!!
 
Herb

when are you moving here to my neighborhood so you can help me with my cars?
in fact, there is a house for sale not too many houses down from mine......
:)
 
BarryK said:
Herb

when are you moving here to my neighborhood so you can help me with my cars?
in fact, there is a house for sale not too many houses down from mine......
:)
I could do that....but I need to sell the other house we aren't living in first.....perhaps you would like it...it has about a 9 car attached garage....pool and sauna in the basement.....on a pond....about 1.5 acres....then of course there is he need to sell the house we are in now....sigh....don't hold dinner for me....
 
forget it! I'll take the 9-car garage house on 1.5 acres.
i only have a 2-car garage on 3/4 acres.
we will have our stuff packed and be there by dinner time tomorrow night. What are you cooking for dinner? :D
 
chassis

Hello Herb
The reference I made to about the installed spring ht and installing the muffler tube at that dimension is an easy task to do.
Once you have done that you will see how much the rear end comes up and your driveshaft angle will greatly improve
I would do this before sending it out to the fab shop. Once everything is welded solid, you are stuck, especially when it is painted
All you have to do is to put a jack under the differential to support it and remove the shocks. If you can do that, then e-mail me the dimensions and I will tell you what lenght to cut the spacer tubes( muffler)
Then you can reinstall the coil overs and they will then simulate ride ht.
I would need to know the free length of the spring , the space between the coils and the number of spaces
Then you can level the middle of the frame to the floor with a large level and you will have a better idea of how it looks
If you have vernier/calipers to measure the spring openings( just one) and then a chop saw to cut the muffler tube, as long as both are the same( muffler tube). 1/8 in difference on the muffler tube won't matter for ride ht
let me know
Take care
Tom
 
chassis

Hello Herb
Another way you could try if you don't want to get into all of that is:
Do you know what your shock travel is? The extended lenght is where you are at now in your pics. If you know the compressed length, then subtract the distances and muliply that distance by .6,
If you had 17 inch shocks eye to eye and compressed you had 12 in, then you have 5 inches of travel. Your shock at ride ht should be the compressed dimension plus 3. inches
That way you could put a 2 inch block on toip of the rear end and use a string to see the driveshaft angle at ride ht
You may have 5 inch travel shocks or they could be 7 inches, depending on your shock........any part numbers or catalog numbers?
( 7 inch shocks would be 4.2 inches up from the bottom position, or 2.8 inches down from where you are now in the pics....3 inches is close enough)
I will send you a PM as well
take care
Tom
 

Corvette Forums

Not a member of the Corvette Action Center?  Join now!  It's free!

Help support the Corvette Action Center!

Supporting Vendors

Dealers:

MacMulkin Chevrolet - The Second Largest Corvette Dealer in the Country!

Advertise with the Corvette Action Center!

Double Your Chances!

Our Partners

Back
Top Bottom