Welcome to the Corvette Forums at the Corvette Action Center!

Intake and distributor reinstall questions..

jims427400

Well-known member
Joined
Jun 7, 2005
Messages
763
Location
Temperance Michigan
Corvette
67 427 tripower,68 427 tripower,04 Z16, 62 340hp
It's time to install the intake and distributor on the 68. I've never installed either one of these before, and would like to know any pearls for both.
-silicone on ends of intake ?
-sequence of things in order to install distributor in proper orientation ?

Thanks.
Jims68restorationproject118.jpg
 
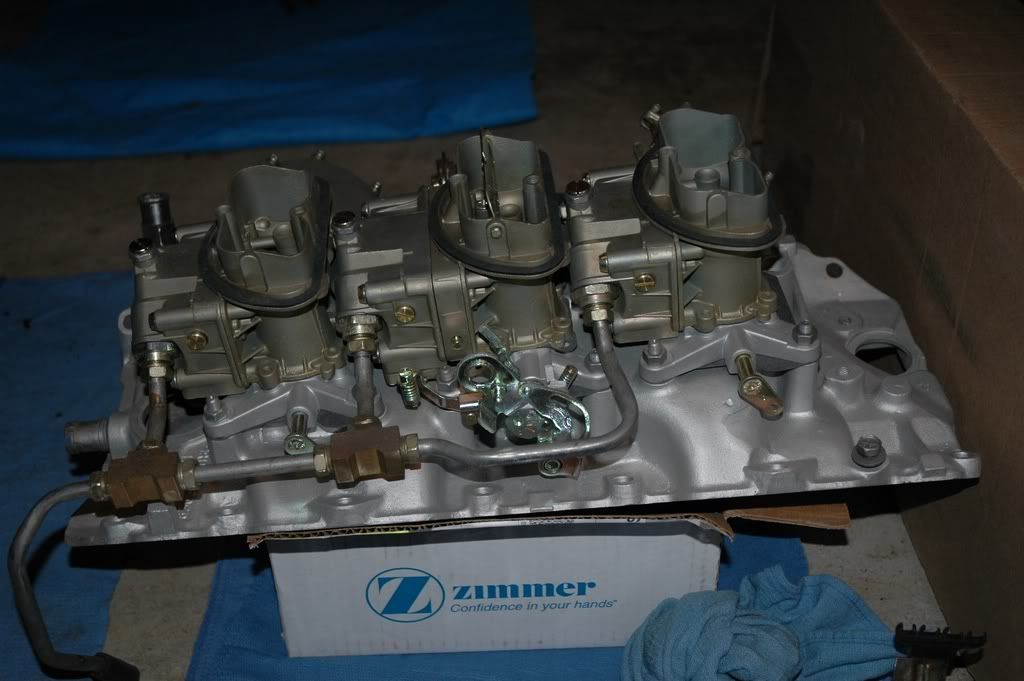
Oh, that's a work of art! I always liked the tri-powers.

For the manifold:

Dry-fit your gaskets to establish orientation, and throw away the rubber seals for the front and back. You will need to get some "Great Stuff" Silicone gasket from the parts store.
Using silicone sealant, run a small bead around the coolant passages for the intake manifold on both sides of the gaskets and smear it smooth with your finger, and put a blob under the tabs at the ends of the gaskets where the block and heads mate. Then place the gaskets on the heads and run a continuous bead about 3/8" diameter along the mating surfaces on the block, front and back, between the heads to replace the rubber seals.
Then carefully lower the intake manifold in place, using a bolt on opposite corners as a guide to make sure the manifold locates squarely. Then put all your bolts in and hand tighten.
Then, following the assembly manual, torque the manifold bolts according to the torquing sequence to the proper torque.
It's important to do the assembly as quickly as possible to avoid skinning over the silicone sealant, but take your time and be careful not to pull the manifold up once it's placed, because the silicone should be compressed in a smooth motion to avoid voiding. Work careful, and take a beer break after the bolts are torqued.:)

Now the distributor:

Turn the crankshaft to TDC on the compression stroke so that both valves are closed on the #1 cylinder. The look at your distributor cap and determine where the #1 plug wire is. There are numbers on the retainer for the wire boots to help

Put a new gasket on the distributor.

The gear on the distributor shaft will engage the gear on the camshaft when you lower the distrubutor into the manifold as you get it about 1-1/2" from bottoming out. And the oil pump shaft will mate with the end of the distributor shaft.
Now, you ask, how do I get these to line up? Trial and error is the way it works.
When you drop the distributor in, the gear will cause it to rotate about 18 degrees, so the idea is to get it to point directly at the #1 plug tower on the cap when it is all the way down, so you have to estimate how many teeth to rotate it initially to have it end up there when it's all the way down on the manifold. Try it, and re-adjust if it overshoots or undershoots.
If it does not drop down even with the manifold surface, the oil pump shaft needs to be rotated a little so that the slot lines up with the distributor shaft. Once again it's a trial and error process. Use a long wide bladed screwdriver to rotate the oil pump shaft a little at a time until everything mates up.

So when you are finished, the rotor on the distributor will be pointing at the #1 plug wire tower with the cap on, and the distributor will be setting down all the way onto the manifold. Then install the holddown clamp and bolt to hold the distributor down but leave it loose enough for the distributor to turn for timing purposes.

Let everything set overnight to let the silicone cure in place. It will be ready to refill with coolant in the morning.

Have fun!:w
 
Pete,
Great information, I'll be attempting this soon as I get the silicone and thread sealer.
When I pulled the distributor I didnt mark any locations but took digital photo of rotation. I've been dreading this part of the restoration,just not familiar w/ these jobs. And no good mechanics in the family.
Anyway, thanks again for your step by steps.
Keep you posted..

Jim
 
Ahhh, thread sealer... I knew I forgot something.;LOL

It's not a hard job to do, actually pretty easy once you get the hang of it.
The joy of it is once you do it, you can pass it on to others.;)
 
Distributor and manifold have stake marks for alignment. Set #1 on TDC of the compression stroke, lower distributor, and line up the stake mark on the distributor housing with the mark on the intake. Should get timing close enough to fire and run.

AIM shows a diagram of the tricarb installation in the options sections, including the stake mark trick.

:)
 
Also....remember to make sure the driven shaft of the oil pump is lined up with the slot on the bottom of the dist. shaft. It just a=has to be close to fall into place.:)
 
After finding #1 TDC on the compression stroke, move the crank slightly so your desired timing (6*, 8*, or whatever you run) mark on the timing tab is opposite the index line on the damper. Once you get the distributor in as posted above, put a test light across the points and move the distributor clockwise (as viewed from above) until the test light is "on". Then move it counter-clockwise slowly until the light JUST goes out (#1 firing position), and tighten the hold-down bolt. It'll fire right up, and your timing will be within 1 degree when you put a timing light on it - works every time. Avoids having it start and run crappy due to retarded timing. :)

:beer
 
does the TI still have points? I believe Jim has TI in his car. Its been so long since I have seen a set of points I forget what they look like.;LOL
 
Your rite Craig, I have TI w/ no points..
Going to look into that stake mark. JohnZ, have you heard of that technique of stake marks as 6880 Mike described above.
Sounds like a plan.
 
Ahhh, thread sealer... I knew I forgot something.;LOL

It's not a hard job to do, actually pretty easy once you get the hang of it.
The joy of it is once you do it, you can pass it on to others.;)
Yes. Remember to coat each of the intake bolts with thread sealer prior to installation. Otherwise you'll end up with puddles of oil collecting on that currently very clean a beautiful part.
 
JohnZ's test light amounts to a static timing and it works. I have an old (very old) Hawk static timing light. Set timing on #1 where you want it, set static timing light in #1 hole on the distributor cap, plug the #1 plug wire into it, and turn until the strobe flashes. Works like a charm.

:)
 
Hi Jim

reinstall of the intake is very easy.

First make sure that both the head surfaces and the intake manifold surfaces are very clean and free from any of the old gasket material that may have stuck on etc. Use lacquer thinner or brake cleaner on the mating surfaces of the block (heads and end rails) and the intake mating surfaces to again make sure everything is clean and ready for installation. The lacquer thinner or brake cleaner leaves no residue behind after it dries.

Than use Gasgacinch or Permatex High Tack Gasket Sealant to attach the intake manifold gasket to the heads. This keeps them in place without shifting or moving while you install the intake.

Next, use Permatex RTV ( I like the Ultra Copper) to run a bead of RTV on both the front and rear rails of the block. Be sure to use a bit of extra RTV in the 4 corners where the rails meet the heads as these are areas prone to leaks. I also continue the bead of RTV up on the heads and around the water jacket ports as an extra safety precaution. Let the RTV set for about 5 or 10 minutes to "skin".
BTW, you want to lay down the RTV in one continuios bead on each side without breaks in it.
some people still use the rubber gaskets for the end rails but based on many recommendations by people much more experienced than me I use the RTV instead since the rubber gaskets can shift easily causing leaks.

Here is a pic of the '78 L82 when I was about to drop the intake down last year. You can see the gaskets on the heads and the RTV on the rails and around the water jacket ports. If you look carefully you may be able to also see that I put extra in the 4 corners also.
page152-1006-full.jpg


You are now ready to drop the intake down on the block. Try very hard NOT to move or shift it once it's down or you can bread the bead on the RTV. I use a cut-off wooden broom handle that I stick in the oil pump well and than slide the intake down the handle with the end coming thru the distributor hole - this aligns the intake nearly perfect with the block so it drops down perfectly straight and in alignment so there is no shifting it around after it's down to line up the bolt holes.

Use thread sealant on the intake bolts ( or you can use a dab of the same Permatex RTV on the bolt ends before installing the bolts. This keeps oil from wicking up the bolts and pooling on the intake afterwards while running the motor.

Torgue down the bolts properly and in the correct order as mentioned in your service manual and your intake install is done.

more details can be found on my website tech articles page in John Hinckley's tech article called: Intake Swap.PDF
http://lbfun.com/Corvette/Tech/vettetech.html

as for installing the distributor, JohnZ's advice is dead-on accurate as always but if you need more help than Lars has a very good article on distributor installation also on my tech articles page called: Distributor Installation.pdf.

Hope this helps
 
Your rite Craig, I have TI w/ no points..
Going to look into that stake mark. JohnZ, have you heard of that technique of stake marks as 6880 Mike described above.
Sounds like a plan.

Dunno about the T.I. - forgot you didn't have points. All engines got whacked with a chisel where the base of the distributor mates with the intake on the hot-test stand after they set the timing; intended to identify the original factory timing setting to help dealer mechanics.

:beer
 

Corvette Forums

Not a member of the Corvette Action Center?  Join now!  It's free!

Help support the Corvette Action Center!

Supporting Vendors

Dealers:

MacMulkin Chevrolet - The Second Largest Corvette Dealer in the Country!

Advertise with the Corvette Action Center!

Double Your Chances!

Our Partners

Back
Top Bottom