- Admin
- #1
The following is an article that I wrote with Steve Jasik, another ZR-1 owner regarding the procedure for removing the LT5 Plenum:
LT5 Engine Plenum Removal
- by Rob Loszewski and Steve Jasik
DIAGNOSIS:
To fix inoperative secondaries, starter motor, replace ignition wires, etc.
How many of you have experienced problems such as a no-start condition, a vacuum hose popped off under the plenum, or your secondary port throttle plates are sticking? You debate whether or not to do the work yourself, but you think back to all the rumors/stories you've heard about how back in early 1990, GM's policy to repair LT5 engines was to have the dealer pull it and ship it back to Mercury Marine, or "only a ZR-1 certified mechanic can work on this engine" (depending on the problem at hand). You cringe at the thought of bringing it to your local dealer or working on it yourself, but fear no more. Hopefully, after you've read this article, you will have learned some helpful tips on removing your plenum and conducting repairs underneath without fear.
The first thing you should do is call HELM Publishing (1-800-782-4356) and request a service manual for your model year. Make sure you get the 1990-1993 LT5 Service Manual Supplement (ST364-1990/93-LT5-Supp). Although not necessary but very helpful are additional manuals that you can order from STG Publications (1-800-393-4831). These are: Introduction to the LT5 (#56014.12-B1), LT5 Engine Mechanical (#56014.12-B2) and Corvette LT5 Fuel and Emissions (Course No. 16009.14-1). These additional manuals provide some excellent diagrams/pictures that the service manual does not. They also provide you with a good understanding of how various components of your LT5 operate where as the service manual does not.
SPECIAL TOOLS:
1) A set of Torx drivers (bits, ...), and in particlular:
A T-40 Torx driver with a 2" long bit that is 5/16" hex. While such a bit is part of the top removal wrench in the center console, one ZR-1 member claims that it may not be strong enough for the task. I kludged something together from a socket with a removable hex bit and a 2" long 5/16" hex 6 point socket (1/4" drive is all that was available at Sears, so you may also need a 1/4" to 3/8" and 3/8" to 1/2" adaptors for your torque wrench). Use some .003 Brass shim stock or a piece of scotch tape around the Torx bit to keep it from falling out of the socket. Too see why you need this tool , look at the 2 Torx bolts that are nestled between the runners on each side of the Plenum. The gap between the pairs of runners is about .5", not enough for a standard 3/8 socket to fit into. Make sure you have this tool before starting. Remember that the T-40 bolts in the Plenum have to be torqued to 20 ft-lbs, so whatever you use, you will have to fit it to the Torque wrench. Mac Tools has one with a 5" long bit for $20, also suitable for proctologists")
2) A vacuum pump is useful for tracking down leaks, ... cost is about $30 - $40 for a plastic version of the 'MityVac II'
3) A seal puller is useful for loosening some of the rubber hoses.
4) Also a short length of wood, 2" x 4" is useful to prop the Plenum up.
--Notes--
The GM manual is rather incomplete on the details of the vacuum hoses, talks about parts that don't seem to exist, etc. The complexity of the systems (ignition, starter, emission(s) , ...) under the plenum is such that you will never be able to track all the hoses to their final destination without completely disassembling the car, so don't get things mixed up. While there is a halfway decent line drawing of the under the plenum components on the driver side of the radiator, there is NO decent line drawing of the systems underneath the Plenum in the service manual. Treat it as a pack of lies that was probably done on a pre-production prototype. If you own a digital camera, taking pictures of both sides of the hoses coming out of the Plenum and labeling them will be useful when you go to put things back together.
Ditto for what is underneath the Plenum, and on the underside of it. The G.D. engine is like a European museum, with stuff on the floor, walls and ceiling of the plenum. One of my ME friends who used to race ZR-1's commented that the emissions stuff, ... was probably designed by some engineers just out of college. Again labeling things, taking your time and looking at the manual helps. While it is next to impossible not to connect many of the hoses and electrical connectors up to their mating part, it can be done. My father (an EE) used to say that is possible to make things fool proof, but not damm fool proof, and that there are just too many damm fools around.
PROCEDURES:
1) Coolant removal:
As an alternative to draining the entire cooling system (3.4 gallons) from the bottom of the radiator, I tried the following and it worked ( 0.7 gallons ): remove the two bolts on the radiator surge tank, pull it up so the rubber plug pops out from the hole underneath, unscrew the coolant recovery cap, loosen the lower hose clamp and remove the hose, then tip the whole tank over into a small bucket inside the wheel well and pour that coolant into the bucket. No loss of coolant at all.
2) The EGR hose (corrugated Steel hose, about .9" dia attaching to the passenger side, right behind the throttle ) is held in by two 6 mm bolts, they can be up to 20mm (3/4") long, and I ended up replacing the stock bolts with socket head cap screws 20 mm long. You may also want to Loctite them in.
3) Remove the air cleaner assembly.
4) To remove the throttle body extension loosen the 6 T-25 torx bolts; the two external bolts can be completely removed. Disconnect the ventilation breather hoses at one of the ends. Disconnect the vacuum hose from underneath the TB extension.
5) To remove the TB, remove the 5 T-40 torx bolts. Remove the screws retaining the cable hold down clamps to the plenum. Inspect the throttle plates for carbon buildup. Using a rag moistened with brake cleaner, clean any carbon deposits in the throttle body. You can use Q-tips soaked in brake cleaner to clean the primary throttle plate. As Graham Behan had mentioned in an email to the ZR-1 Net, there will be a black ring around the secondary port throttle plates. This is called DAG. Do not remove these rings. They are not carbon buildup.
6) To remove and clean the IAC valve, use a T-20 stardriver, or socket to remove the two torx bolts.
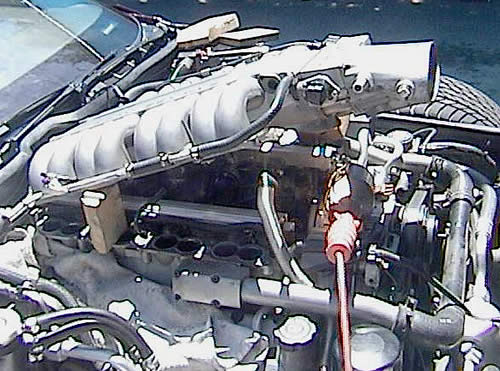
Plenum blocked up by a 2 x 4, note EEG hose on passenger side, not enough detail here to really see all the junk under the plenum.
7) To remove the plenum, follow the procedures in the service manual. You will need to use a T-40 torx socket to remove the plenum bolts. It is not necessary to drain the coolant as the manual suggests unless you're planning on removing the injector housings. I also didn't bother to remove the throttle cable assembly from the throttle body. It rested on the driver's side front wheel with out a problem.
Other Notes:
1. The last (under plenum - evaporative emissions ?) hose that you should put back are the 5/16" diameter hard plastic one with a loop in it. It goes to a nipple right under the throttle assembly on the driver side, and if it comes loose, your car will idle high (1200 RPM instead of 750) and you will have to pull the plenum again, ... I removed the whole assembly, cleaned out the rubber right angle connector, and took some 150 grit sandpaper to the ends of the hoses where they went into the rubber to increase the grip a bit.

I drew a red line through part of the EE hose that is a trouble maker, the connector on the right edge of the picture may pull off if you are not careful when you put everything back together.

I have circled the rubber right angle connecter here, note the yellow/white band around it.
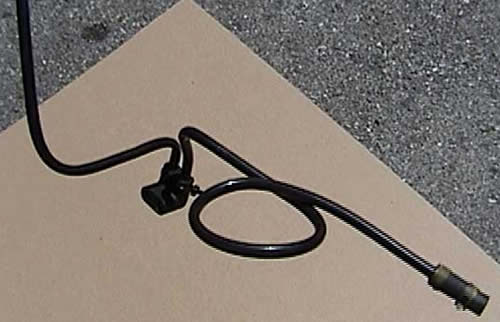
Here are the hoses (plastic tubing) and the rubber connector removed from the car. I replaced the cable tie with a black one. Roughing up the ends that go into the rubber with some 100 or 150 grit sandpaper might help keep them from pulling out.
2. The MAP sensor hose at the back of the plenum should be double checked at the END of assembly as if it is loose, then you will pull a code 33 and the car will stumble on acceleration, refuse to accelerate under load, ....
3. Check to see that the throttle plates are seating:
Press on the cruise control rubber bellows and then release. You should hear the throttle plates click when you release.
4. Seeing if there is a vacuum leak under the plenum into it:
Spray carb cleaner into the area under the plenum (between the runners), if there is a leak that leads into the plenum intake manifold, the RPM's will rise as the 'combustible fluid' in the carb cleaner is ingested.
Another way to check for a leak is to take a 2 foot length of plastic or rubber use and use it like a stethscope, one end to your ear, the other end to the area that you are checking for a leak for.
5. Hungry Engines:
If you are not sure of finger, then you may lose bolts or sockets in the bowels of the engine. Placing a rag or such below things the bolts attaching the EGR hose to the plenum, the IAC valve, the map sensor and other things may prevent frustrating searches for lost bolts. Luckily such lost parts are usually steel and can sometimes be recovered with a magnet.
6. GM part numbers for Secondary replacement (as of 8/01)
10168624 $47.24 Secondary hoses and a check valve, ...
10110989 $11.64 MAP hoses
10067563 $11.59 Reservoir
1996743 $32.81 Actuators (you need 2 of them)
1997222 $20.97 solenoid
1977796 $4.06 filter for solenoid
Plenum gaskets from Kurt White for $35 at 317-826-1974
Addendum
If you remove the evap emissions hoes and the rubber ELL,
then you should unscrew the solenoid, remove it,
insert the ELL into it (with some GM Assembly adhesive '1#12346141')
put the solenoid back and be very careful when re-installing the
plenum so the end of the hose with the loop in it doesn't come loose.
LT5 Engine Plenum Removal
- by Rob Loszewski and Steve Jasik
DIAGNOSIS:
To fix inoperative secondaries, starter motor, replace ignition wires, etc.
How many of you have experienced problems such as a no-start condition, a vacuum hose popped off under the plenum, or your secondary port throttle plates are sticking? You debate whether or not to do the work yourself, but you think back to all the rumors/stories you've heard about how back in early 1990, GM's policy to repair LT5 engines was to have the dealer pull it and ship it back to Mercury Marine, or "only a ZR-1 certified mechanic can work on this engine" (depending on the problem at hand). You cringe at the thought of bringing it to your local dealer or working on it yourself, but fear no more. Hopefully, after you've read this article, you will have learned some helpful tips on removing your plenum and conducting repairs underneath without fear.
The first thing you should do is call HELM Publishing (1-800-782-4356) and request a service manual for your model year. Make sure you get the 1990-1993 LT5 Service Manual Supplement (ST364-1990/93-LT5-Supp). Although not necessary but very helpful are additional manuals that you can order from STG Publications (1-800-393-4831). These are: Introduction to the LT5 (#56014.12-B1), LT5 Engine Mechanical (#56014.12-B2) and Corvette LT5 Fuel and Emissions (Course No. 16009.14-1). These additional manuals provide some excellent diagrams/pictures that the service manual does not. They also provide you with a good understanding of how various components of your LT5 operate where as the service manual does not.
SPECIAL TOOLS:
1) A set of Torx drivers (bits, ...), and in particlular:
A T-40 Torx driver with a 2" long bit that is 5/16" hex. While such a bit is part of the top removal wrench in the center console, one ZR-1 member claims that it may not be strong enough for the task. I kludged something together from a socket with a removable hex bit and a 2" long 5/16" hex 6 point socket (1/4" drive is all that was available at Sears, so you may also need a 1/4" to 3/8" and 3/8" to 1/2" adaptors for your torque wrench). Use some .003 Brass shim stock or a piece of scotch tape around the Torx bit to keep it from falling out of the socket. Too see why you need this tool , look at the 2 Torx bolts that are nestled between the runners on each side of the Plenum. The gap between the pairs of runners is about .5", not enough for a standard 3/8 socket to fit into. Make sure you have this tool before starting. Remember that the T-40 bolts in the Plenum have to be torqued to 20 ft-lbs, so whatever you use, you will have to fit it to the Torque wrench. Mac Tools has one with a 5" long bit for $20, also suitable for proctologists
2) A vacuum pump is useful for tracking down leaks, ... cost is about $30 - $40 for a plastic version of the 'MityVac II'
3) A seal puller is useful for loosening some of the rubber hoses.
4) Also a short length of wood, 2" x 4" is useful to prop the Plenum up.
--Notes--
The GM manual is rather incomplete on the details of the vacuum hoses, talks about parts that don't seem to exist, etc. The complexity of the systems (ignition, starter, emission(s) , ...) under the plenum is such that you will never be able to track all the hoses to their final destination without completely disassembling the car, so don't get things mixed up. While there is a halfway decent line drawing of the under the plenum components on the driver side of the radiator, there is NO decent line drawing of the systems underneath the Plenum in the service manual. Treat it as a pack of lies that was probably done on a pre-production prototype. If you own a digital camera, taking pictures of both sides of the hoses coming out of the Plenum and labeling them will be useful when you go to put things back together.
Ditto for what is underneath the Plenum, and on the underside of it. The G.D. engine is like a European museum, with stuff on the floor, walls and ceiling of the plenum. One of my ME friends who used to race ZR-1's commented that the emissions stuff, ... was probably designed by some engineers just out of college. Again labeling things, taking your time and looking at the manual helps. While it is next to impossible not to connect many of the hoses and electrical connectors up to their mating part, it can be done. My father (an EE) used to say that is possible to make things fool proof, but not damm fool proof, and that there are just too many damm fools around.
PROCEDURES:
1) Coolant removal:
As an alternative to draining the entire cooling system (3.4 gallons) from the bottom of the radiator, I tried the following and it worked ( 0.7 gallons ): remove the two bolts on the radiator surge tank, pull it up so the rubber plug pops out from the hole underneath, unscrew the coolant recovery cap, loosen the lower hose clamp and remove the hose, then tip the whole tank over into a small bucket inside the wheel well and pour that coolant into the bucket. No loss of coolant at all.
2) The EGR hose (corrugated Steel hose, about .9" dia attaching to the passenger side, right behind the throttle ) is held in by two 6 mm bolts, they can be up to 20mm (3/4") long, and I ended up replacing the stock bolts with socket head cap screws 20 mm long. You may also want to Loctite them in.
3) Remove the air cleaner assembly.
4) To remove the throttle body extension loosen the 6 T-25 torx bolts; the two external bolts can be completely removed. Disconnect the ventilation breather hoses at one of the ends. Disconnect the vacuum hose from underneath the TB extension.
5) To remove the TB, remove the 5 T-40 torx bolts. Remove the screws retaining the cable hold down clamps to the plenum. Inspect the throttle plates for carbon buildup. Using a rag moistened with brake cleaner, clean any carbon deposits in the throttle body. You can use Q-tips soaked in brake cleaner to clean the primary throttle plate. As Graham Behan had mentioned in an email to the ZR-1 Net, there will be a black ring around the secondary port throttle plates. This is called DAG. Do not remove these rings. They are not carbon buildup.
6) To remove and clean the IAC valve, use a T-20 stardriver, or socket to remove the two torx bolts.
Plenum blocked up by a 2 x 4, note EEG hose on passenger side, not enough detail here to really see all the junk under the plenum.
7) To remove the plenum, follow the procedures in the service manual. You will need to use a T-40 torx socket to remove the plenum bolts. It is not necessary to drain the coolant as the manual suggests unless you're planning on removing the injector housings. I also didn't bother to remove the throttle cable assembly from the throttle body. It rested on the driver's side front wheel with out a problem.
Other Notes:
1. The last (under plenum - evaporative emissions ?) hose that you should put back are the 5/16" diameter hard plastic one with a loop in it. It goes to a nipple right under the throttle assembly on the driver side, and if it comes loose, your car will idle high (1200 RPM instead of 750) and you will have to pull the plenum again, ... I removed the whole assembly, cleaned out the rubber right angle connector, and took some 150 grit sandpaper to the ends of the hoses where they went into the rubber to increase the grip a bit.
I drew a red line through part of the EE hose that is a trouble maker, the connector on the right edge of the picture may pull off if you are not careful when you put everything back together.
I have circled the rubber right angle connecter here, note the yellow/white band around it.
Here are the hoses (plastic tubing) and the rubber connector removed from the car. I replaced the cable tie with a black one. Roughing up the ends that go into the rubber with some 100 or 150 grit sandpaper might help keep them from pulling out.
2. The MAP sensor hose at the back of the plenum should be double checked at the END of assembly as if it is loose, then you will pull a code 33 and the car will stumble on acceleration, refuse to accelerate under load, ....
3. Check to see that the throttle plates are seating:
Press on the cruise control rubber bellows and then release. You should hear the throttle plates click when you release.
4. Seeing if there is a vacuum leak under the plenum into it:
Spray carb cleaner into the area under the plenum (between the runners), if there is a leak that leads into the plenum intake manifold, the RPM's will rise as the 'combustible fluid' in the carb cleaner is ingested.
Another way to check for a leak is to take a 2 foot length of plastic or rubber use and use it like a stethscope, one end to your ear, the other end to the area that you are checking for a leak for.
5. Hungry Engines:
If you are not sure of finger, then you may lose bolts or sockets in the bowels of the engine. Placing a rag or such below things the bolts attaching the EGR hose to the plenum, the IAC valve, the map sensor and other things may prevent frustrating searches for lost bolts. Luckily such lost parts are usually steel and can sometimes be recovered with a magnet.
6. GM part numbers for Secondary replacement (as of 8/01)
10168624 $47.24 Secondary hoses and a check valve, ...
10110989 $11.64 MAP hoses
10067563 $11.59 Reservoir
1996743 $32.81 Actuators (you need 2 of them)
1997222 $20.97 solenoid
1977796 $4.06 filter for solenoid
Plenum gaskets from Kurt White for $35 at 317-826-1974
Addendum
If you remove the evap emissions hoes and the rubber ELL,
then you should unscrew the solenoid, remove it,
insert the ELL into it (with some GM Assembly adhesive '1#12346141')
put the solenoid back and be very careful when re-installing the
plenum so the end of the hose with the loop in it doesn't come loose.


