Welcome to the Corvette Forums at the Corvette Action Center!

Original L81 engine pic's..

...If someone has picture's of a OEM L81 please post or email them so i can look for variable's between the two...

St. Louis, December 1980.

scan0018.jpg


scan0019.jpg


scan0028.jpg


:)
 
Whooow, thanks for the pictures Mike. These pictures just look great!! If you have more, don't hesitate to post them :)

Groeten Peter
 
...If you have more, don't hesitate to post them :)...

There are several more pix taken at St. Louis in December 1980. They are in the public domain and you can probably Google them up. Someone on ebay is selling them as a set, but you can find them for free.

:)
 
Well everybody, yesterday was MY day! :D
Early in the morning I went to a friend JP and we drove to the painter. The plan was to look at the finished paint, if everything was oke the painter would trailer my vette back home and that is very handy if it's a 2 hour drive!

When we arrived the vette was waiting for us.
It is painted entirely black, no sub color or metallic just black. The black has some clear coat on it and in between 2 clear coat sessions they sanded the clear coat and polished it so the orange peel is little. I'm very happy with the quality of the paint and she just looks great in black!
The painter painted everything separate and the doors and hood are already on the vette (hood still needs to be aligned). I need to fit the bumpers but that wouldn't be a problem for me said the painter.
The pictures.
IMG_4306.JPG


IMG_4308.JPG


IMG_4310.JPG


The painter placed the doors and the fit really nice. The space between the front panel and the door is from top to the lowest point almost equal. That was a problem with my vette and I didn't know the finished product would be this good.
IMG_4315.JPG


The paint still has some spots with dust point (max 6 on the entire car so not that much). The paint is perfect with no runners, to my eye the paint is about equal everywhere. On the body you can see a little orange peel but its much less then original. On the metal headlight and mirror parts the paint is like a mirror with no orange peel.
IMG_4319.JPG


I forgot the put the little clips and corner pieces on the window frame so the front window could not be fitted before the clips and corners pieces where on.
IMG_4322.JPG


When the window was in the vette could be rolled onto the trailer. Here you can see the front window is a little bit tinted but not to much to get the police after me... I hope :D
IMG_4326.JPG


All the sanding didn't leave one spot untouched so I have alot of cleaning to do
IMG_4335.JPG


After the 2.5 hour drive the vette was back on familiar grounds :)
IMG_4336.JPG

IMG_4338.JPG


We rolled the vette back into the garage and there she is now.
IMG_4343.JPG


On the pictures she looks black but this is how much dust there is on the paint, so black could become blacker :D
IMG_4344.JPG


I have a list with to do things. I still need to think about the little dust spots in the paint, I could do it myself but to get the car perfect maybe wet sanding the entire paint and buff it out would be better. Do it myself after practice on some donor panels or find a shop I still don't know :)

I'm very very happy with the result and she really is a beauty!

Till next time ;)


Groeten Peter
 
Very nice, Peter..

I can hear the excitement down here.. :L


:w
-Stefan
 
Here is a good picture of my '81 engine bay. This all original, and very clean....good luck on your project :cool

2007_05220015.jpg
 
Thanks for the picture Mike!

I don't have much time to work on my vette but found a little time to put the clear headlights in the assembly. I thought it was going to be a 10 minute job but it turned out to be more work then that. My luck the clear lenses are plastic so first I altered them to make them fit but I still had to alter the assembly.
Here some pictures...

IMG_4395.JPG


IMG_4396.JPG


IMG_4397.JPG


IMG_4398.JPG


Groeten Peter
 
Yet another small update.

Not much because I'm still busy at school. Hopefully at the end of March I'll have my master. :)
I sketched a concept for the door-panel. Not like the old one but it should give the idea that it belongs in the car. Under the armrest is a small space to put a bottle or something but I don't know if there is space enough for that. I'll try to include a red light to work on the interior lights for extra safety. Because the dash will be something like vanilla camel color and the carpet black the door-panel also has the two colors. If you look at the lower black line that marks the underside of the dash. Under the dash is only black carpet or black leather. In the drawing under the black line there is still vanilla leather so I'm in doubt if black would be better or not. If somebody has a idea or something to say about this concept please say so!

D1.JPG


Today I got down the appraisal report for the insurance. Two weeks ago a guy came by to evaluate the car and (luckily) he was very impressed with the work I did. In the condition the 81 is right now (so without front and rear bumper attached, no interior nothing that is in working order (yet)) she still is evaluated for 17.000 euros so I'm very happy with that.
Till next time,

Groeten Peter
 
Small update for today. This day was not Corvette related but for my own education.
Today I graduated at the Technical University Delft (Holland) at the faculty of Architecture. So from this day on the worlds is one Master of Science richer and more important I'm an architect :D

So from now on my school career is over and I'll be looking for a job any time soon. I hear that school is better then work but when your 27 work is not an option anymore but a must. On the other side work brings more money then school so I hope to finish my 81 within one year.

Next time will be a normale resto update ;)

Groeten Peter
:beer 
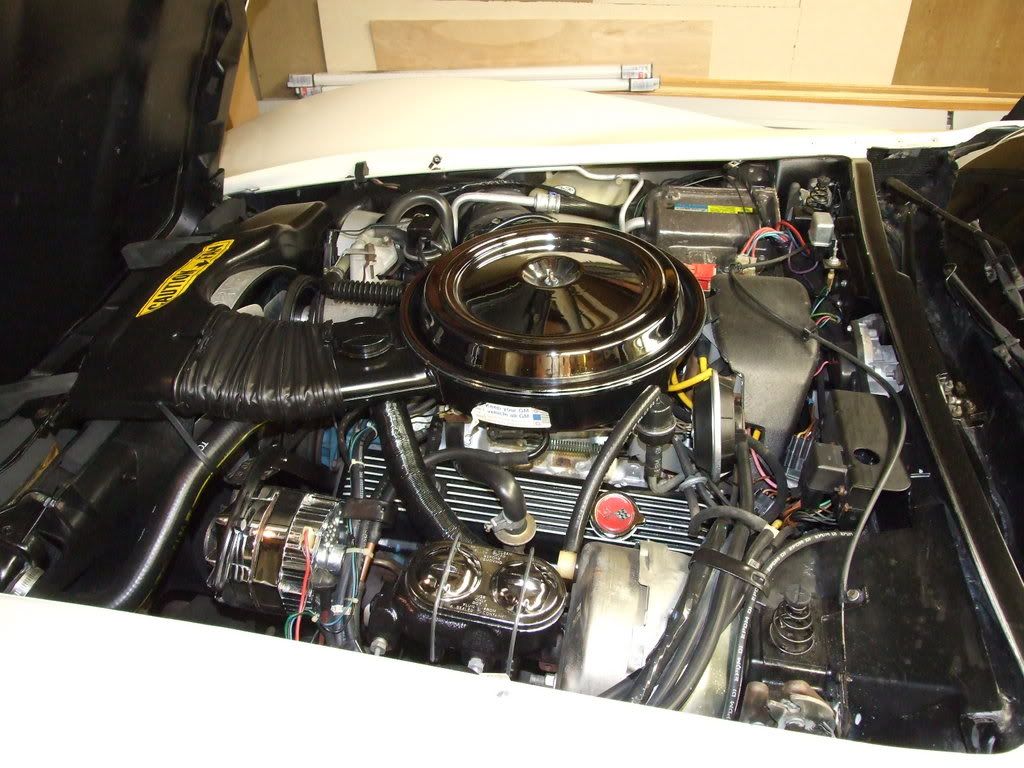
Congrats Peer. Great work
 
Peter,

Congratulations! You are right! It is like having a PhD on some other field. The degree requires a minimum salary and benefits.

Way to go, man!
 
:upthumbs Peter

This SOMETHING NoBody can take away from you, and most of all YOU EARNED IT! yea

Not everyone is cut out to take the Time and Effort to accomplish what you have done.. Congratulations on your College Degree and here :beer is the next 57 years ;)

Bud
 
Congrats on your degree Peter!!!!!!:beer:beer

the vette looks like it is coming along very nicely!!!!!:upthumbs:upthumbs
 
Peter:


Congratulations !! Thats excellent news.. :upthumbs

:w
-Stefan
 
Thanks everybody! :)

Now its just a week to take it slow, think some things through. After that making a portfolio and cv and go looking for a job. Hopefully with a salary it will be easier to finish the vette within the time I want to finish it.

Groeten Peter
 
Congrats on the degree Peter. That's quite an accomplishment. Good luck on the job search. I hope you find the perfect position.

Tom
 
Peter, I'll add my congrats as well. You can be very proud of your accomplishment! Good luck in the job hunt.

And post pix when you start working on the resto again.
:wJane Ann
 
Thanks everybody!

Well, the jobhunt is taking a little longer then I thought but no problem, I'll find one I like :D

Back to the vette.
I had a new idea and after a few months of ebay hunting I'm well underway for a new little project. I'm hoping to fit 4x bi-xenon units into the headlight assembly. They will still be aircontrolled but because the original lights are 5.75" and the units are only 3" the will be much lower and I need to make new headlight shrouds. I'll need old headlight assemblies because this will take a lot of grinding, welding and altering etc etc. Of course I'll finish my vette first and after that I'll begin on the headlights.
The 4 bi-xenon (Bosch) units. These are no cheap units but these units are also used by BMW and Audi. This will also mean I need to alter the wiring harness a little. :)

IMG_4416.JPG


IMG_4417.JPG


IMG_4418.JPG


In the last picture I only have 1 controller and 2 starters but now I have all 4 controllers and the right 4 starters :)

And then we have the vette.
I put on the rear bumper and some other little things. Still needed to adjust the rear bumper here.
IMG_4431.JPG


IMG_4432.JPG


In this picture you can see I have used 2 washerpumps, First I had just one (as everybody else) but the power behind the water was nothing. I hope with the second pump to get a little more.
IMG_4433.JPG


The radiatorframe is also in. I've closed most of the space between the frame and radiator with the original foam, but there were still corners open after that so I bought some (almost the same) foam and painted the pink black, nobody knows what is original but me (and the NCRS ;) ) Lucky for me two friends helped to get the frame with radiator, evaporator and shroud back in, took us the entire afternoon to put the thing in (it is not so difficult but the problem was more that I forgot a lot of things...)
IMG_4434.JPG


IMG_4435.JPG


IMG_4436.JPG


I also noticed that the calipers, steeringpump and brakefluid reservoir begun to rust again (seems like my paint was not the best, or the way I put it on) So took everything on, disassembled everything and sandblasted it clean. Then to the powdercoater for a nice grey (rust proof) coating. (I've picked everything up yesterday, looks very nice! But I need to wait for new seals. Pictures will follow later next week).

Well, don't be afraid of the following pictures. I say, everywhere where there is a layer of dust, there isn't a scratch :D

I continued with the front bumper and getting the foglights in the right way. It's not that easy to get this right so took me a lot of time (and I still need to continue with it). Somebody also said to me to buy an extra cooler for the 700R4 transmission, it was only 40 euro's so to cheap to leave it. The only problem was I didn't like the installation hardware so made my own brackets. After a friend helped me to put on the hood, I still need to put it on the right way but the hardest part is over. When we opened the hood, we found (of course..) it hit the oilcooler, so altered the brackets a little more and now it's a tight fit :) We also fitted the rearbumper on the right way, now it's at a 95% perfect. Well, original it also didn't fit perfect but we'll see.

IMG_4439.JPG


IMG_4440.JPG


IMG_4441.JPG


IMG_4443.JPG


IMG_4444.JPG


A closer look at the foglights, I have a (black painted) piece of fiberglass which fits over the foglights, the fiberglass will be glued to the fiberglass of the bumper so there will be no space between the foglights and the frontbumper.

IMG_4445.JPG


IMG_4446.JPG


Now it begins to look like a real 81 again :)

And before I forget, if somebody is on the neightbourhood sunday the 31st of august (south west of the Netherlands) you're more the welcome on a little meeting I give. A change to see this project youself. ;)

bijna_af_meeting.jpg


Till next time!

Groeten Peter
 

Corvette Forums

Not a member of the Corvette Action Center?  Join now!  It's free!

Help support the Corvette Action Center!

Supporting Vendors

Dealers:

MacMulkin Chevrolet - The Second Largest Corvette Dealer in the Country!

Advertise with the Corvette Action Center!

Double Your Chances!

Our Partners

Back
Top Bottom