Welcome to the Corvette Forums at the Corvette Action Center!

Help! Skid Bars

jwawhite

Well-known member
Joined
Jun 23, 2004
Messages
157
Location
oxnard
Corvette
2003 Anny Coupe
I did it this time in a parking lot.

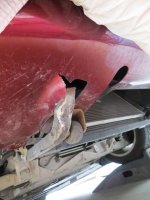
I thought that I would miss the concrete stop while turning left (u turn manuever) but the R bar just caught the stop, bent the bar outwards 3" rip in cover (underneath) and perhaps front cover is out of alignment.

Question, is it difficult to replace the skid bars? Any experience out there? I've read the posts about installing the wheels (on the skid bars) , have them on there but didn't help in this matter. They are great for head-on slow speed parking lot/driveway hits.

Yes, just took a look at alignment at HL doors, less of a gap at L HL cover!

Will not be able to replace the bars for a few weeks, took a look at my shop manual, not too difficult to do but there seems to be a step missing on removal. When I look at putting stuff back on, now it reads to reinstall the radiator support and a few other items.... some steps are missing on the tear apart.

Will loosen up front cover and realign. Any thoughts on repairing the small tear? You can't see it unless you get under car but still I would like to repair it.
 
Last edited:
More Stuff

A bunch of you have looked at this with nothing to say but "you're an idiot?" Yes, I am beating myself up over this mistake, now, anyone out there replaced theirs? Advice on the job I'm about to do in two weeks?

Notice; The dealer wants over $400 for the part and found it at Zips for $295. It's not in stock but they expect one soon, will come with some mounting special? bolts. Also ordered some new rollers, they really do help out in Parking
Lots when they roll up a concrete (stop) curb and some driveways....

Will drill the holes on the new radiator support/skid bars and then spray enamel black.
 
:w jw,

I have a set of rollers for the front of a C5. After receiving them I decided not to put them on our C5. I didn't care for the way they looked when I held one up under the front end.. :puke

There was no return so I still have them. original cost was $54.99 plus shipping cost. I would let you have them for the cost of Shipping. USPS which I have no idea what that is or will be.

Here is photo of the ones I have, (Never Installed):
250_FattDaddy_Web_View_edited.jpg


and here is the website:
Frame Saver

Bud
 
Those are part of the radiator supports, and not meant to be skid bars per se. That said, we have all crunched them at one time or another. I've never traded in a C5 or C6 with virgin support skids. I've tried three kinds of wheels, and don't recommend any of them. The drilling of holes in the piece to fit the wheel axles or bolts actually weakens the structure, as you can imagine. Hitting something with the wheels not exactly head on put the weight of the car on one of the wheels, and twists the supports.

There is a new product that I have installed on my C6. They are called "fangs," and are sold by a supplier in Sacramento, CA. They are nothing more than substantial slick plastic covers that are either screwed to the support or attached with tape. The idea is to slide over an obstruction and resist denting and deforming. I haven't hit anything yet, so I don't know how well they work. There is a stupid Corvette tax on these things. The regular price is fifty bucks a pair for two lousy pieces of plastic or forty bucks on sale. I guess it's worth it, if they work.
 
Last edited:
I can't help you with your repair issue, but I can also make mention of the "fangs". They seem to work pretty good and yes the Corvette tax is in effect with this part. I think I got mine for $30, that was very shortly after they came out. Although the best thing is don't get into that situation. The one to ask about taking the front end apart would be GMJunkie.......Jesse are you out there?
 
Help with skid bars...

I have been working on my '98 drop top for a few months, after work, restoring and repairing stuff 14 years old. Today I installed a new skid bar. Since my whole front clip has been removed it was very easy to do. When the manual refers to installing the radiator it means to place it on the skid bar on couple of rubber bushings on the bottom of each side (one is round and the other is kind of U shaped). The a/c aluminum line connections and both rubber hoses that connect to the water pump keep it in place, there are no bolts attaching the radiator to the skid bar. Next just install the cover, on which the plenum rests on. Then you need to install the horn and reroute and re-connect the wiring. The hard part of the installation if removing the front fascia and re-installing it without scratching it. If money is no issue, it would be best to have a pro go at it. I hope this helps...
 
The new skid plate has come in from Zips, looks good. Will primer and give it a few coats of enamel black.

Haven't decided what to do about the small rip underneath, I know of a great body and paint man, Jeff in Ventura, CA that does fantastic! work.

805 650 1476 for those of you who live near. He's the type of Professional that has his own shop with paint booth and restores vehicles for auction Barret-Jackson in AZ.

I could take the cover off and have it repaired by him or just do a patch job and forget about it.....

He has just done some work on another Anny Red. I do need front of rear wheel paint repair from the rock chips, may have him do the rocker panels and stop at the cut lines.

What I liked about him is that he perfectly match a silver paint repair for me on a MC fairing and did not repaint the entire piece-- he left the stock paint to keep the bike in its original condition and used the original Glaurit paint! Knows what he is doing!
 
Great news, did it come with the nut inserts already installed? My skid plate didn't so I had to buy a whole bunch of them at www.rivetsinstock.com so I could install the six or seven (I can't remember the exact number) nut inserts needed. I painted it by going over the welds with Rust-Oleum red primer and priming the whole thing with self etching primer. Then I painted it red, just to give it a different touch, although it will barely be seen under the front bumper.
The rip should be no problem to fix, especially now that there are so many different alternatives available for fixing that type of damage. Your pro should have no problem bringing it back to its original glory...
 
Progress

The weather in California has been a little bit cold for spray painting so about in the middle of the day I pull out the skid plate along with the spray can
(with a black sock over the silver can) and when warm, give a the frame a coat of paint. (Sorry for those that live in really cold and snowy climates) The skid plate came with the nuts installed, thanks a bunch ZIP for selling me

what I needed (!) and the plate has a few coats of primer and now I'm about done with the top enamel black coat. I have found another 'Vette site which gave me some
heads up in R&R the plate. I may as well pull off the front cover and have my local professional repair the tear underneath... a bit of worry here, he states he needs to see the
cover to determine if he can repair it. The tear is just next to the down bar on the skid plate, you cannot see it unless you get underneath the car. I'd like it repaired or just remove
the piece if it acts like a flap.. the cover seems to be brittle? I've found a few small pebble size pieces on the ground, with anny paint and grey interior..it may not be that pliable in that
area?

Thanks so much Bud for the offer of the wheels, I had some on it and have noticed that the wheels are now frozen somewhat, with deep wear marks. I think I'll try the Fangs this time
and see how they work.

Looks like next week will be some warm weather and I'll get to work repairing my car

Bud, the scratching of cover can be avoided with another helping you and placing blue painters tape at strategic areas, that way you avoid scratces plus a ground cover helps also
 
Last edited:
Progress, at last!

Here is an update for you: It is possible to remove the Skid Plate by yourself laying on the ground under your Corvette. I drove the car up my low ramps and have about foot and a half of working space. The Slid Plate (SP) is about 9" tall if memory serves and lately it's not serving!! Anyway the most problematic for me was to unbolt the electric air pump on the left lower side of the SP. Note of advice, you can see the upper bolt for the air pump through the air inlet for the disc brake and remove it easier.... But prior to that was removing the air duct for the disc on the L side. Perhaps it's just not hot enough, I could not collapse the duct to remove it out of it's holder, the splash shield for the LF tire. I ended up collapsing the part in half to remove and used a heat gun to "reinflate" the duct. BTW, the duct had numerous road stones in it! After disconnected the air pump wires, rubber inlet (?) tube, a few other harness's I started to unbolt the SP, 13 mm headbolts. I loosened the back on the L side and the SP under tension from the damage, released itself. Upon inspection after removing one eyelit was oblong from the damage, a hit to the left SP bar which was pushed outward after just clipping a parking lot stop in a U-turn. There is a jagged rip in the cover about 3-4" long, has serrated edges. Anyone fix this type of tear? Could I put a slight coat of JB Weld on the edge faces and call it a day? Looking at Urethane repair pages, in one they recommend silver tape on the exterior side and then just burn in a repair strip, heats up to 600 degrees and melts the piece together with a urethane stick? --no need to V cut a grove 'cause it's hidden.....Suggestions out there?? The Mechanic manual reads to release the bumper cover all over the L side to pull the cover forward to reinstall the brake air duct, I've read on another site that a person can just collapse the ribs and reinstall, what has been your experience? Is it difficult to remove the two nuts on the bumper cover near the HL assy? I know mechanics never clean all the parts and just put everything back on and call it a day But I will clean all the lower air deflectors, repaint with rubber paint, clean lower panel covers, etc, etc. While I am in there I will replace the L turn signal assy, mine has a crack in it. So it looks like once I get it all cleaned up and repair the small tear I will reassemble the and install the SP. Looking up into the radiator area, I cleaned out some debris, pine needles mostly but taking a look, the factory may have done a poor job sealing the area up with the rubber weather strip, have you taken a look and noticed it does not go all around, on yours? Or is this just the design of it?? More to follow:)
 
Last edited:
Update

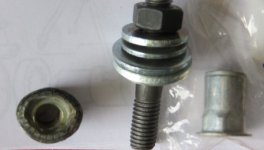
Was underneath the car preparing for the installation of the new Skid Plate (SP) and the noticed the R rail nut insert and frame rail was pooched outwards. When I touched the nut insert it fell out! There was not enough room to use a smitter so I ended up removing the front bumper cover. If only I had known how much easier it would have been, with the fascia off it's so much easier to remove the SP. I took a smitter to the frame rail and then inserted the nut and to my horror, the pentagon receptacle for the nut insert was no longer tight enough. I took the nut to the vise and slightly elongated it by partially collapsing it and it fit tightly into the frame. I then installed it with a hardened stud and nut. It worked! I bolted stuff up, the radiator slipped about 1/2" down from the nylon straps but I just pushed it upwards and installed the bolts for the SP. It calls for 50 NM for torque but I don't feel comfortable with the torque on the possibly compromised nut inserts and will use blue permatex and torque at half the value. Next I put the air pump in place and noticed that the nut inserts do not line up so I will have to elongate one eyelit on the air pump frame!! No such thing that bolts right up, the biggest lie in the market for aftermarket parts........Can only work on the car for a few or less hours every few days and the job is just dragging on me. The rip is less than 2" will use urethane hot iron and stick to repair underside and let it go at that. There are factory groves in the cover that should have been sliced to fit over SP but the Factory sliced the cover about 1/4" to the side.. also discovered that the frame rail weld to the front cross piece was a questionable job, the weld was not fully done on the bottom, he or she missed a spot! My L lens came in from Mid America Motorworks will install on cover while it's off. Also my silicone grease came in to freshen up the weatherstripping.. More to follow....
 
More Update

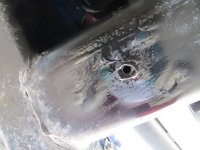
I had a few hours today and installed all the items to the Skid Plate (SP). The purchase was excellent on the R front nut insert and torqued it to 44NM instead of 50 and put a bit of blue permatex on it.FrameRail.jpg I know it looks ugly but part of that is enamel black that I spray on to cover the sanded and cleaned area around the nut insert. The outer ring on the nut looks ugly too but that's what you get when you use the incorrect tool, a hardened stud with nut and some washers to install it. But the purchase was great and will hold until some idiot takes out the R skid bar while making a U-turn in a parking lot thinking " I can make that turn".......Next up will place the cover on some horses and get to work on the minor tear on bottom of fascia. My urethane heat gun has arrived with sticks and instructions, this will be a first for me also. The job looks good with the nicely painted SP and all items installed correctly. I wanted to keep all original but the clamps for the wire looms according to another partsman at Chevy are not available, these clamps are like a dual guillotine with a dick that pushes into a predrilled hole in SP on the R side of the SP. The guillo part holds the wire loom (which is covered with split loom) and it's held by the jaws of the clamp. You need a large and small one, but he did sell me two stays that have a dick on them and they worked like normal stays but these stay in place.....Need some assistance on those that have installed the cover, how did you place it over the SP? Did you heat the cover bottom? Spray some WD on it?...nut insert.jpgDamage.jpg
 
I had a few hours today and installed all the items to the Skid Plate (SP). The purchase was excellent on the R front nut insert and torqued it to 44NM instead of 50 and put a bit of blue permatex on it.View attachment 13654 I know it looks ugly but part of that is enamel black that I spray on to cover the sanded and cleaned area around the nut insert. The outer ring on the nut looks ugly too but that's what you get when you use the incorrect tool, a hardened stud with nut and some washers to install it. But the purchase was great and will hold until some idiot takes out the R skid bar while making a U-turn in a parking lot thinking " I can make that turn".......Next up will place the cover on some horses and get to work on the minor tear on bottom of fascia. My urethane heat gun has arrived with sticks and instructions, this will be a first for me also. The job looks good with the nicely painted SP and all items installed correctly. I wanted to keep all original but the clamps for the wire looms according to another partsman at Chevy are not available, these clamps are like a dual guillotine with a dick that pushes into a predrilled hole in SP on the R side of the SP. The guillo part holds the wire loom (which is covered with split loom) and it's held by the jaws of the clamp. You need a large and small one, but he did sell me two stays that have a dick on them and they worked like normal stays but these stay in place.....Need some assistance on those that have installed the cover, how did you place it over the SP? Did you heat the cover bottom? Spray some WD on it?...View attachment 13655View attachment 13656

Who would do such a thing? :L
 
Not me! Fascia Installation

Now, now Tom, it was someone else that wrecked it,,yes, yes, that's how it happened :L Tom, check your email messages, did you get them? I have a question, did you put your cover on the C5? If so, how did you slip over the skid plate "points" while putting the fascia back on? I am near that point, just waiting for a supplier to send me the R signal lamp. Both of mine have rock chips? cracks in them. I also bought these clear covers to go over the signal lenses, these supposedly stop road cracks. Will get to work on all weatherstripping with silicone grease and put some life back into them. Then I get to drive it again!
 
No, I haven't received any email messages, might have gone to the junk folder though, so I'll check there.

I have not had my bumpers off, so I can't help you there. I'm hoping that GMJunkie will see this and chime in. I'm sure that he can help you.
 

Corvette Forums

Not a member of the Corvette Action Center?  Join now!  It's free!

Help support the Corvette Action Center!

Supporting Vendors

Dealers:

MacMulkin Chevrolet - The Second Largest Corvette Dealer in the Country!

Advertise with the Corvette Action Center!

Double Your Chances!

Our Partners

Back
Top Bottom