Welcome to the Corvette Forums at the Corvette Action Center!

Well I'm back & wrenchin on the 64

Well a bit more progress.....

The horn system needs some love... a LOT of love...

So I was able to find the line ( black 20ga ) from the turn signal connector.
The wire makes it out from the fuse panel / bulk head connector.
The wire makes it to just above the heater core on the firewall.

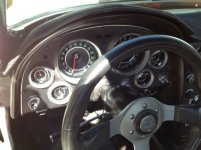
Tomorrow, I have to get some new hardware 5mm X .8 for the steering wheel adaptor.

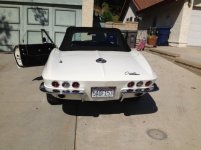
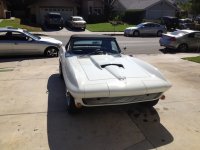
Next, the front signal lights.
The passenger side appears to be flipped.
High wattage filament turns on with running lights, low wattage for turn.
( so that is wrong )

AND

Is it normal for the running lights to turn off when the headlights turn on?

Mike
 
there is a fair amount of gap between the front of the shroud and the back of the radiator...
Was there some factory seal.. to close that gap?

No, but judicious application of foam pipe insulation in that area (and along the bottom edge) will aid low-speed cooling. In addition, '67 small-blocks with A/C used a clip-on molded rubber flap/seal between the top of the radiator support and the underside of the hood - all of the usual Corvette vendors (LICS, Paragon, etc.) have the seal and the clips for it.

:beer
 
Is it normal for the running lights to turn off when the headlights turn on?

Mike

Yes, it is - that's the way the system is designed; the front parking lights didn't stay on when the headlights were turned on until 1968.

:beer
 
John

Thank you for the time & wisdom.....
Ok so on this list....
New radiator ( correct ) Maybe an aluminum Dewitts...
Swap connections on pass side turn signal / running lights.

I have an e mail into Lectric Limited for a new engine bay harness,with s slight twist...
I'm asking to have the 4 ( or 5 ) wires for the alt broken out behind the distrib.
My alt is a single wire system...

I'm asking for enough length so I can run the Alt on either side of the engine, since I plan to install vintage air...later..
I would like to be as ready as possible.. for ease of relocation..

Today I ordered the correct horn cap, horn button contactor & horn relay.

Now I could extend , repair & modify the existing harness, but due to age time & effort to repair all the kludges..
It's just better to replace...

The car runs very nice & it's starting to " feel reliable "...

Thanks
Mike
 
Front harness

Well Full throttle corvette will not make a " custom harness " you have 2 choices.. alt on drivers or pass...
So I ordered the pass side version and plan to mod it myself so I can go either way...

So it's waiting time again....
Harness
Horn relay
1 horn
Horn " switch " for hub
Cap for switch
Windshield squirters
Upper radiator hose
and 17" 7 blade fan ( maybe not " correct ") but I'll take the extra air flow.

Plus.... one of the welded nuts in the core support for the radiator upper mount is MIA... so looks like some fabbing is in order..
I plan to make a square " nut " out of steel to fit into the to channel. That way at least is will have all the bolts and look correct.

The upper hose currently had a weird dog leg in it which causes the upper hose to be to high, compared to the rest of the cooling system.
I'm sure that will keep a rather large air bubble in it since the high point is 4 " higher then the top of the overflow tank.

I wonder about the front turn signal pass side..
Can the wafer that makes contact with the 2 bottom pins come out far enough to be turned 90 degrees?
I checked the wiring and all colors match... but the running light ( when turned on ) is using the brighter filament and the turn signal is using the dimmer filament..
The lighting harness is NEW.. The drivers side is correct...so that has me going....

The typical fix would be flip the 2 wires... but then my colors would be off in the harness ( which I do not want ) ....
So gonna get OCD on this... this weekend

This car has had YEARS of rube goldberg mods.. so 1 problem at a time
 
Disaster down below

So about 3:30pm, my son & I started to pull the old harness...
We got it out, with a minimal about of fuss.
Then it was down to pulling the wires off the starter....
We started putting the new wires back on the starter and

SNAP

The back of the solenoid broke off...
2 hrs later.... repaired solenoid. ( had a spare solenoid ).

So we are ready to re attempt the new harness install tomorrow.
 
It's always something, isn't it? I must say that I am enjoying your thread here. :w
 
And Victory

6:45 AM PST....Much coffee was needed... but wanted to get started before it got hot!

Starter in..Horn relay in..Harness in...:happyanim:
Had to do a bit of custom wiring for the MSD & petronics
Converted the regulator connector ( jump Black pink to blue ) to feed 12 volts to the 1 wire alt..
The horn parts for the column didn't come in...:eyerole
But I decided to test to see if the secondary system worked, grounding the black line at the relay.
The horn relay works,
I only have a high note horn in as of now... and it's not sounding to wonderful....
( Who stepped on the cats tail )
Cleaned up some misc wiring....And BONUS... the amp meter now works!

Younger son went for a test drive.... and made it back in 1 piece.

So take that off the list....

Tool put away time and it's 9:30! PHEW

The new upper hose is the same shape as the hose I have in there....
So I have to come up with a good way to lower the hose .....
I do not want to have air bubble itis....

Now it's time to start the weekend honey do list....... Market etc etc....

Mike
 
More wins, 1 loss, 1 point for almost bubba win !

The 17 inch fan out of a 69 didn't work, the hole pattern is off ( well there's another door stop ) .....LOOSER

New ( er ) horns in and working! ( No horn switch yet )
Windshield squirters in, new hose to squirters ( all I had was yellow silicone, correct hose on order ).
The original hoses just shattered at the slightest touch!
PLUS didn't drop or loose ANY screws for the grilles.
Cleaned up ORIGINAL squirter bottle & cap ( one of the few original parts on the car ) ...
Primed system an lo and behold... it actually squirted!
Not very well,only made it 1/2 up the glass... but it proved the electrical system worked... YESSSSSSSS.
I can only guess what the O rings & diaphrams in the pump look like.

New PVC grommet in Mickey Thompson rocker cover...
( note to self GM PVC grommets do not work well in that application.. it took me 1/2 an hr to get that Bastardo in )
the good news is the PVC valve will not blow out of the grommet and leave an oily mess.
After market regulator bypass plug and nice ALT adaptor in & working.

And the BONUS ( kludge ) of the day...
One of the welded nuts in the core support to hold the top bracket in position had broke and went the same place all left socks go.
So the top of the core support is an open channel...
Well I though of re inventing the wheel and then it dawned on me...
Unistrut nut
Unistrut A1008 Channel Nut with Spring for A1000, Lot of 7 - NEW | eBay

We had these at work.. and I got one to take home for an experiment.......
It fit in the channel ( had to cut some of the spring off ).
Took a wood dowel ( 1/4 X 3 feet ) and pushed it in, while watching with a mechanics mirror.. and BOOM..
It lined up PERFECTLY.. I even had a old body bolt ( 3/8 X 16 ) to put in there...

Ok so I know the other side is a fine thread and a smaller bolt....and " factory " blah blah blah...
But ( putting the right spin on it ) it's heavier duty ( read Hi Preformance ).

Yes it still has a 350 Monte Carlo engine in it ( with a nice cam ).
Yes the clock is still broken.
No nothing is " matching numbers " except the pink & the vin.
Now the car starts on the first key blip.
But the power steering leaks...
It's got Camaro rally rims..
No front bumpers, and the P/S turn & running lights are still flipped ( tonight's project ).

But it is paid for... and with all the attention she's been getting ,the car just seems happier these days.

I think I'll take her for a cruise later, maybe even the car wash!

Mike
 
Last edited:
Well that was easy

The running light / turn was just a matter of flipping 2 wires....
BUT none of the colors jived with the schematic... so I have to assume it's an after market turn signal assy ( cheap knock off ).

I also noticed ( after taking her into the car wash for a full detail ).. that the weather stripping between the door and the windshield ( on the door ) is missing!

The pass side door needs new W/S around the door...
The tires are starting to dry rot...

sigh.....

Oh well she sure looks purddy

Mike
 
Current Pix

Work in progress:happyanim:
 

Attachments

  • Back_SMALL.jpg
    Back_SMALL.jpg
    62.3 KB · Views: 124
  • Frontsmall.JPG
    Frontsmall.JPG
    78.2 KB · Views: 117
  • Drivers-Side_E_bay_SMALL.jpg
    Drivers-Side_E_bay_SMALL.jpg
    85.7 KB · Views: 131
And a bit more

Say CHEEEEEEESE
 

Attachments

  • ClusterSmall.jpg
    ClusterSmall.jpg
    67.2 KB · Views: 118
  • Drivers_Side_Small.jpg
    Drivers_Side_Small.jpg
    66.4 KB · Views: 127
  • Pass_Side_E_bay_small.jpg
    Pass_Side_E_bay_small.jpg
    69.5 KB · Views: 115
I also noticed ( after taking her into the car wash for a full detail ).. that the weather stripping between the door and the windshield ( on the door ) is missing!

The weatherstripping between the door vent window frame and the windshield is all on the windshield pillar - there's none on the vent window frame.

:beer
 
I agree John.....

After reading the assy manual... but it's not what the PO did... There's 3M glue residue
on the window frame , on the door side.... time for a bit of clean up.. and more parts order(s).


Mike
 
I can see why you say the tires are dry rotting. Eagle ST tires haven't been made in a long time. We still have them on the '81 although we don't do any interstate high speed driving with it. New tires are on the list for this winter.

Tom
 
Things that you don't know till you know em

So trying to get the horns working from the inside....
So I always was curious why the hub didn't line up to the steering column marks... ( In the back of my mind ) .....
The PO put a MOMO wheel on, he tapped the hub for metric 5mm X .8
Didn't tap em all the way.....
So chased the holes...
My new hardware for wheel to hub was to long 16mm ( needed 12mm ).
Bash to Osh....
Got all the hub holes cleaned up...
Steering wheel on ( so far so good )...
Arrgghh.. no indents for the factory horn switch....
Transfer marks from " factory wheel " to Momo ( and no I cant use the factory wheel It hits the top of my legs... )
Grind, test fit.. grind test fit.... 20 min later horn switch in BEEP BEEP Yeah!
BUT
I couldn't get the horn cap to click in....
Well it can only go in one way... and currently it's 20 degrees off... because of the bolt pattern of the MOMO wheel!

The MOMO has it's top screw @ 12:00 O clock
The factory wheel is at 11:00 and 2:00
So the entire thing is off set by ~ 20 degrees

Sigh

But it does all work... so I guess I will be ordering a new steering wheel...
Mike
 
Last edited:
Is it possible to drill new holes in the right orientation?
 
Yes maybe

But I bought a new one anyway... going on this weekend... then on to squirters!
 
Saturday

New steering wheel on, horn cap now on straight.
Lined up all hub / steering shaft marks... Wheel 10 degrees off
New tires ( went with the BFG's )
Alignment... Car now DRIVES straight with the steering wheel in proper orientation...
Yet another miracle of physics gone right.....

Tomorrow, squirters...

Mike
 
And FAIL

So I bought a kit off Flea bay that was
"the one & only complete kit"...
So I went in.... took all the old stuff off.. and NONE of the parts matched...
My squirter valve assy was ( is ) a 1 piece... this is a 2.
The hardware provided was self tapping...
Mine are machine screws, to hold the vale assy in.

So I pouted ( for the given period of time ) and starter cleaning up my original stuff...
The rubber looked " newer " the bellows were in good shape..
Cleaned that all up.
Soaked the valve assy in hot soapy water for 1/2 hr... that got all the Yeech outta there..
Put it all back together... nuttin.. gave up for today on that.

Did an inspection on the petronics.. and the reluctor was hanging down a HAIR to far, not allowing the advance weights to move freely.
( straightened that all out ) car still starts...

And then noticed the feed line from the washer bottle came off...
I need to replace the line, so I hope that is the " issue "...

Had to move on to house chores....

Mike
 

Corvette Forums

Not a member of the Corvette Action Center?  Join now!  It's free!

Help support the Corvette Action Center!

Supporting Vendors

Dealers:

MacMulkin Chevrolet - The Second Largest Corvette Dealer in the Country!

Advertise with the Corvette Action Center!

Double Your Chances!

Our Partners

Back
Top Bottom