- Admin
- #1
LT5 Secondary Port Operation & Vacuum Diagnosis
Before getting into diagnosing the LT5 engine's secondary port vacuum system, I thought it would be a good idea to take this opportunity to clear up a few popular misconceptions about the LT5 engine and establish a basis for understanding what the engine is and how it operates.The heart of the 1990-1995 ZR-1 Corvette is the LT5 engine; one of the most technologically advanced engines of its time. A lot of misconception seems to exist about the history and operation of the LT5 engine.
Rather than go into great detail here about the engine, a few facts should be addressed up front:
- The LT5 engine is an all aluminum, double overhead cam design with 32 valves, and 16 fuel injectors (8 primary, 8 secondary).
- Power output was as follows:
- 1990 - 1992: HP: 375 hp @ 6,000 rpm, Torque: 370 ft-lbs @ 4,800 rpm
- 1993 - 1995: HP: 405 hp @ 5,800 rpm, Torque: 385 ft lbs @ 4,800 rpm
- The LT5 motor was designed and engineered by both GM Powertrain in Detroit, MI *and* Lotus Engineering in Hethel, England. It was not solely designed by Lotus Engineering. It should be noted that at the time, Lotus was owned by General Motors.
- The motor was built by Mercury Marine in Stillwater, Oklahoma. Mercury Marine was chosen by GM to build the LT5 due to their expertise in building aluminum outboard motors and their ability to manufacture engines on a small scale.
Valet Key ("Power Key")
Since there is a lot of misunderstanding about what the purpose of the Valet Key is and how it works, I thought I would include the following from page 6E3-C2-2 of the 1990 Corvette Service Manual:
"The driver can select two engine power modes, "FULL" or "NORMAL" power, with a a console mounted key switch. This switch is wired into the ECM, and allows the driver to determine the engine output by controlling secondary port throttle valves, secondary injectors and secondary fuel pump operation. When the key switch is in the "FULL" power position, the "Full Engine Power" light, located in the driver information center, is illuminated."
"In the "NORMAL" power position, the ECM does not allow the secondary port throttle valves to be opened, or allow the secondary injectors to be turned "ON." In the "FULL" power position, the ECM enables secondary operation only if no trouble codes are stored and other criteria are met..."
It should be noted that with the key in the "NORMAL" power position, the engine is limited to approximately 210 horsepower.
The following information below comes from Tim Holland, a Lotus Engineer who started at Lotus in March of 1985 and began work on the LT5 project in July of 1985. Among his other responsibilities for the project, he served as the mechanical/calibration engineer as well as the emissions engineer responsible for meeting EPA requirements.
Secondary Port Throttle Operation
In order for the secondary port throttle valves to open, the following parameters must be met:
When these parameters are met, the ECM will signal the ports to open and wait for .5 seconds before turning on the secondary injectors. As the secondary injectors share the same drivers as that of the primaries, the pulse width signals are halved when the secondaries operate.
As shown in the diagrams (below), there are three different styles of driving which will operate the port throttles:
- Ref. line A-B. Constant throttle position with a rising rpm. At the point the arrow corsses into the 'Port Throttle Opening Region' (top left shaded area) the port throttles open and the secondary injectors start firing.
- Ref. line C-D. Constant rpm with increasing throttle position - logic as above.
- Combination of the above: i.e. increasing throttle and rpm - logic as above.
Secondary Port Throttle Vacuum Leak Diagnosis
One of the easiest ways to determine if you have a secondary port vacuum leak is to simply turn the ignition key to the on position but do not start the car. You should hear the Secondary Port Throttle Vacuum Pump turn on. If you don't hear the pump turn on, it's possible that it could be burned out.
The pump is located in front of the coolant reserve tank right underneath the headlight bucket on the passenger side of the engine compartment (see Figure 1 below). The pump should run for 5-10 seconds to prime the system and then turn off.
Figure 1 - Secondary Port Vacuum Pump - Part #10098474 (Also check Part #10098493)
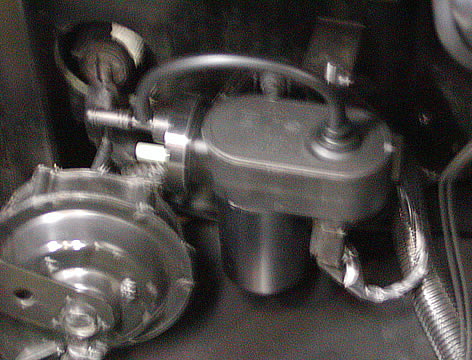
Unfortunately the quality of this photo is not as good as I'd like but good enough for this example. This is the secondary port vacuum pump located under the passenger side headlight bucket
So what does this pump do? There is a vacuum reservoir located under the plenum. If the vacuum level in the reservoir drops below 41 kPa (12" Hg) while the secondary port throttle valves are open, the pump is turned "on" by a vacuum switch to supplement engine vacuum.
If the pump cycles on and off every few seconds or it runs continuously, chances are, you have a vacuum leak somewhere in the system.
To begin, take a ride to your local Sears Automotive Center and purchase a hand held vacuum pump as shown below in Figure 2. This pump is extremely invaluable and will help you to locate the source of the vacuum leak. The pump comes with all necessary hose adapters.
Figure 2 - Handheld Vacuum Pump
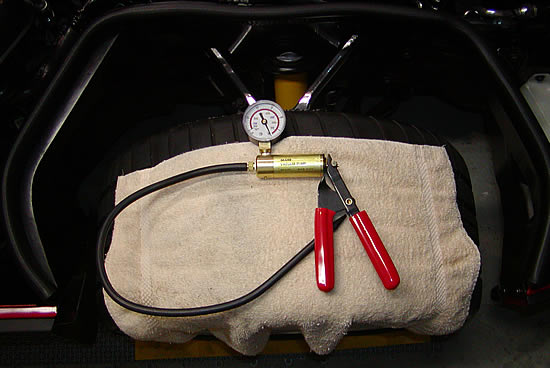
Figure 3 below shows the vacuum connection between the line going to the pump (right - see pump below) and the left hand vacuum system going underneath the plenum (left).
Figure 3 - Vacuum Connection
Disconnect the hose at this connection. At this point, with the engine key in the "On" position, the pump should turn on and run constantly. (Another way of verifying that the pump is operating correctly) Connect your hand held vacuum pump to the line going under the plenum and bring the system up to 10-12 Hg. If the system does not have a leak, the gauge needle will stay at that level. If there is a leak, it will slowly move back to zero. If there is no leak under the plenum, repeat the procedure at the other end of the hose going to the pump to determine if there is a leak on that side of the system.
If you have a leak under the plenum, it's time to remove the plenum from the top of the engine. To do this, follow the procedure outlined in your service manual for plenum removal. You should always have a service manual for your model year prior to conducting any diagnostic tests or repairs. If you don't have a service manual for your car, you can purchase one from companies such as MidAmerica, Ecklers or Helm.
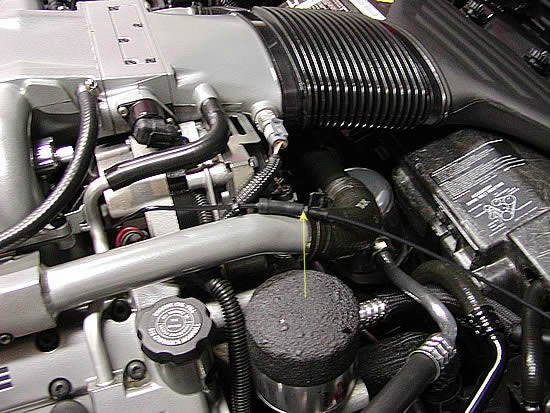
To put everything in perspective, below is an LT5 engine with the plenum on (Figure 4 below). With the plenum off, it's a much different picture than what you see here!
Figure 4 - LT5 Engine Prior to Plenum Removal

Figure 5 - Secondary Port Vacuum Hose Assembly
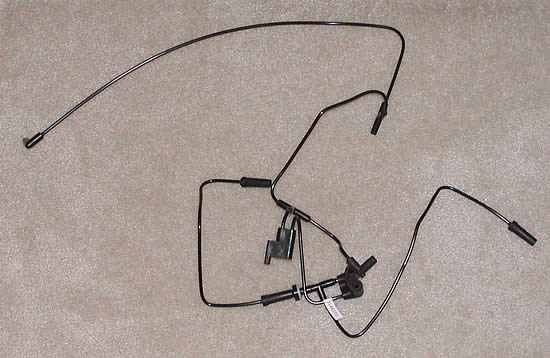
In this photo, you can see the entire secondary port vacuum hose assembly (Part #10146221). At the lower right you can see the connector that is pointed to in the picture above. The upper left hand corner connects to another connector under the ECM.
Below is a picture with the plenum removed (Figure 6A).
Figure 6A - Plenum Removed

1. Primary Port
2. Secondary Port
3. Secondary Port Control Solenoid
4. Secondary Port Vacuum Actuator (Part #1996743) (just to the right, you can see the metal arm and attachment going to the injector housing
5. Fuel Rail Assembly with injectors inserted into the Injector Housing
Figure 6B
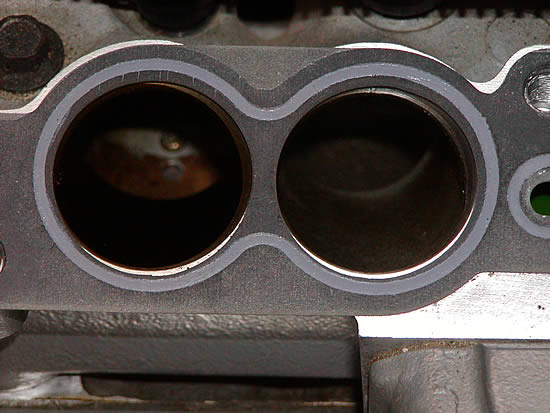
Figure 6B is a closeup view of a primary and secondary port. The primary port is on the right and the secondary port is on the left. You can see the butterfly valve inside the secondary port.
Below is a picture of the LT5 engine throttle body.
Figure 7- LT5 Throttle Body
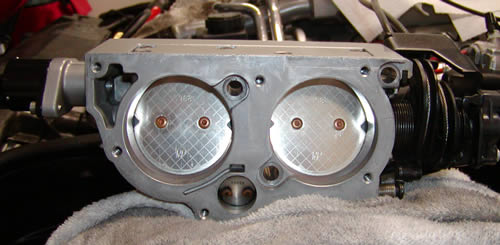
In the center of the throttle body, at the bottom, you see the primary throttle valve which is 22 mm (0.87 in.) in diameter. Above are the two larger secondary valves which are 59 mm (2.32 in.). The secondary throttle valves begin opening when the primary valve is 80% open and are completely open at full throttle.
From page 2-9, Corvette LT5 Fuel and Emissions, Course No. 16009.14-1:
"The primary throttle valve is operational when the vehicle speeds are less than approximately 113 km/h (70 mph) (level terrain cruise). The secondary throttle valves are opened at approximately 80 degrees of primary throttle opening."
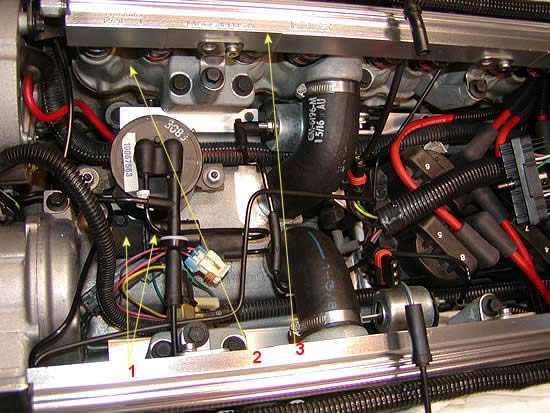
Figure 8 - Top View, Plenum Removed
1. Secondary Port Vacuum Reservoir (Part #10067563)
2. Crankcase Ventilation Cover
3. Secondary Port Vacuum Actuators (Part #1996743)
4. Ignition Coil Packs (starter is underneath them)
5. Vacuum connector which plugs into the Secondary Port Vacuum Solenoid
6. Crankcase Breather Hoses (Part #s 10110908, 10110907)
In this picture you can see the top of the Crankcase Ventilation Cover. For those of you with 1990 ZR-1s, this is a common area of oil seepage. The cover bolts were not torqued properly from the factory and can loosen up over time. If you notice the top of your engine V is damp with oil, chances are, this is the source. It's a good idea to replace the Crankcase Breather Gasket underneath (Part #10168682) and re-torque the bolts.
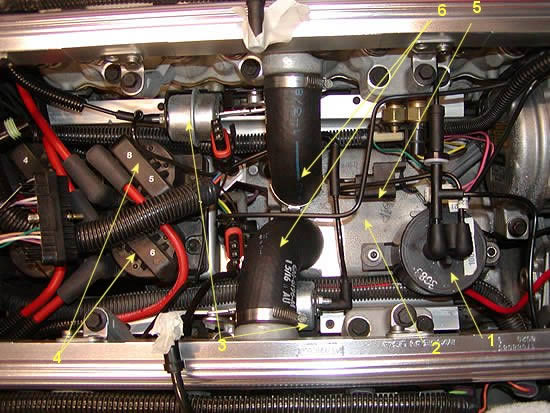
Figure 9
1. Vacuum Solenoid with conical air filter (Part #1997222), Conical Air Filter Part #: 10159525
2. Injector Housing
3. Fuel Rail
Figure 9 is a different angle taken from the driver's side of the engine looking down at the vacuum solenoid.
Figure 10

From LT5 Fuel and Emissions, a GM STG Training Course Book, pages 2-12 and 2-13:
Secondary Port Control Solenoid
This solenoid is used by the ECM to control the application of vacuum to the secondary port throttle valve actuators. The solenoid is normally closed and is opened ("ON") when the ECM provides the ground path. The solenoid is located under the intake plenum at the front of the cylinder block valley, near the left hand side of the vacuum reservoir. The sensor is connected to the engine wiring harness by a two terminal blue connector. (Refer to Figure 2-15)."
Figure 11

Secondary Port Throttle Valves, Actuator and Linkage
"The secondary port throttle valves are used to provide additional control of airflow to the cylinders. The valves are vacuum operated, and controlled by an ECM actuated solenoid, based on input signals from the Throttle Position Sensor (TPS), engine RPM, engine oil temperature sensor and Manifold Absolute Pressure (MAP) sensor. Vacuum is supplied through the vacuum reservoir and vacuum pump. (Refer to Figure 2-14)."
"In operation, the secondary port throttle valves are closed during low engine speeds and loads, allowing no air path to each cylinder. Additional air is allowed to enter the cylinders at higher RPM when the following criteria are met:"
"When the TPS indicates to the ECM that the driver has pushed down on the accelerator pedal far enough, and the oil temperature sensor indicates engine oil temperature is within an acceptable range, the ECM will turn "ON" the secondary port throttle actuators through the secondary port throttle control solenoid allowing engine vacuum to be applied to the actuators to open the valves. At the same time, the secondary injectors are turned "ON" to provide additional fuel flow to maintain the correct air/fuel ratio for maximum power (12:1)."
"The secondary port throttle valves are located in the right and left hand cylinder head (four plates per head). The actuators are mounted to brackets attached near the center of each cylinder head. A common linkage incorporates each set of four throttle valves together to the actuators which will open all throttle valves in unison (Refer to Figure 2-14)."
At this point, if you trace the various connections of the vacuum lines, you'll see that they go to the secondary port throttle valve actuators, vacuum solenoid and vacuum reservoir. These are the three main areas for vacuum leaks to occur due to mechanical failure of these parts.
1. Test the Secondary Port Throttle Vacuum actuators by disconnecting the vacuum line, connecting your vacuum pump and applying enough vacuum until you see the secondary port throttle valve plates open. Once open, they should stay open until you release the vacuum from the pump. If they slowly start to close, chances are the secondary port throttle valve actuator needs to be replaced. Conduct this procedure for both actuators.
2. Test the Vacuum Reservoir by connecting your vacuum pump to one inlet and blocking the other. Apply 10-12 Hg of vacuum. If the gauge starts to decrease, replace the vacuum reservoir.
3. Test the vacuum solenoid which is in front of the left hand side of the vacuum reservoir. Make sure all connections but one to the solenoid are blocked and connect your vacuum pump to the free connection. Apply a vacuum as described in step two. If the gauge decreases and vacuum is lost, the solenoid needs to be replaced.
Case in Point
Recently, I noticed that my secondary port vacuum pump was cycling on and off when the ignition key was turned on. I started off by confirming that a vacuum leak existed under the plenum. After removing the plenum I checked the vacuum at many of the connections and found that the vacuum solenoid was not holding a vacuum. Upon replacement, the vacuum pump primed the system, turned off and did not continue cycling on and off as before.
As you can see below, I had a couple "visitors" who came to my garage wondering why there were tools and a plenum strewn all over the garage floor:

Tips
Keep in mind that if you run vacuum checks on the three main areas I outlined above and they all pass the vacuum check, it is possible that you have a leak somewhere else in the vacuum lines. The vacuum line system consists of several hoses and check valves that are routed throughout the "V" under the plenum.
Make sure that before you put the plenum back on the engine, all vacuum lines and electrical connectors are reconnected! This is very important because all it takes is one failed connection and you will be pulling the plenum back off to determine why the secondaries don't work at all.
As you can see, the most difficult part of diagnosing and repairing most secondary port vacuum leaks is the removal of the plenum. Once you get the plenum off, you have easy access to most of the key components that control secondary port vacuum operation. Good luck!
Last edited:


")


