Welcome to the Corvette Forums at the Corvette Action Center!

Original L81 engine pic's..

Thanks for the info Gerry, I didn't know were to start looking for that info :)

As for the project... As they say, slowely but surely :D
The CC had a problem, the rod on the magnatical disc was chewed away, or the bushing that it was running in was wider then it should. One way or the other the rod had taken some damage as you can see:

IIMG_1640.jpg


Cor (to which I'm still very thankfull!) was very helpful and willing to help me with this problem. We decided to put a sleeve around the worn rod that would fit inside the bushing. After Cor had put some work into it this was the result

IIMG_1828.jpg


After it all fitted again I could assemble the CC ones again (I previously cleaned it before knowing the rod was busted). Some grease and oil and the disc was spinging perfectly ones again.

IIMG_1830.jpg


And the end result

IIMG_1833.jpg


When putting everything back into the car I was to fast and didn't look out. I broke a vacuumconnector from the resume solenoid. Now I know they are very hard to get by. One salvage yard offered me one for $100 which is to much for me. I think i'll follow previous advice and go ahead with a cheaper fix.

IIMG_1835.jpg


Things to do for 2012.

- The 700R4 needs a different lookup wiring that will be controlled by the L81 ECM and some manual oil pressure switches.
- The 700R4 is loosing some oil at the speedo cable (gear) but I can fix that when I'm swapping the lockup wiring.
- The wheels need to be rebalanced.
- The airco needs to be filled with R12.
- I've giving up on the low fuel light, got the new one from Kirban Performance (this one will also let me connect it to the safety beld light without a problem so the low fuel light will also light up a few sec. when starting the car)
- When I have some time left I could continue with the xenon units or even the dart heads.
- I still need to contact the painter for some minor paint defect corrections.

Greetings Peter
 
And some least week stuff.

Made the brackets for the HID projectors. Rented a cross laser to measure the headlight top in the car (at the new hight) and dublicate this with the laser on the headlight top in the frame on the kitchen table. Got the HID projectors as level as I could with the laser so I could start putting them inside the top unit. As this unit will only open 13.5cm I also need to fabricate a new bezel and make a new (shorter) headlight front link (all in good time :D).
These are some pictures when testing the units in the kitchen.

IIMG_1839.jpg


IIMG_1840.jpg


IIMG_1845.jpg


In the last picture you see the assembly at the correct hight as it will be in the car. As you can see I have 2 bi-xenon units per side (one side at this moment). I don't think my (ones a two years) road checkup master will mind me upgrading to bi-xenon but 2 low beams a side aren't allowed overhere so I still need to figure out how to wire it for the safety check. :)

Greetings Peter
 
Time for a little update.

Got a Ipod interface to connect to my Pioneer radio. Now I can get all the cd's out of the car and I only have to connect the Ipod in the glovebox.
IIMG_1974.jpg


IIMG_1975.jpg


Put in some new (homemade) wiring to get the lockup working right. Well it still isn't working like it should (isn't working at all) So I still need some time to get it going. :)
IIMG_1981.jpg


Connected the new low fuel print to the back of the gaugecluster.
I inverted the print so it would fit better only thing is (like you can see) is the little ground wire to get from the terminal to the print). You can also see an extra wire going to the lightsocket, was trying to light the low fuel light at startup like the seatbeld light but it didn't work. :)
IIMG_1984.jpg


Then back to the HID headlights. I was wondering if it would fit the original assembly. So I could lend one from a friend.
This is the original setup.
IIMG_1993.jpg


As the xenon (HID) units use 4 mountingholes and you only have to use 3, I left the middle (lower) ones unused.
IIMG_1998.jpg


It's a close fit with the xenon unit.
IIMG_1999.jpg


With the old elbow piece the headlight can't fully open, hopefully with the new (shorter) elbow piece the problem is solved (NOT)...
IIMG_2000.jpg


IIMG_2001.jpg


And the mockup viewed from above.
IIMG_2003.jpg
 
part 2.

Lucky for me a good friend could make the new elbow piece from me. As this is only a mockup it's 2mm thick, the final model will be the original 6mm thick.
IIMG_2022.jpg


So in the new situation, the headlight will be up 13cm, in the old situation it's 17.5cm.
IIMG_2012.jpg


Donald from this great forum helped me with another resume solenoid for my cruise control. I had broken off a vacuumopening and epoxy couldn't hold it together. This one is still like new!
IIMG_2015.jpg


So swaped the old one for this one, now I need some time to test it :)
IIMG_2017.jpg


So back to the xenon units.
Fitting the xenon units in the headlight assembly with the new elbow piece wasn't that easy.
In the closed position there isn't a problem. You can see I need to adjust the elbow a little so it hits the low position bolt better.
IIMG_2025.jpg


But the open position is a problem. The elbow piece is hitting the metal xenon bracket. No problem I can still adjust it to make it fit. But the outer spring is hitting the xenon solenoid and the metal spring retainer is also very close to the solenoid.
IIMG_2026.jpg


I tried swapping the springs so they cross each other. Not a perfect solution but it helps a little.
IIMG_2030.jpg


I'm thinking about getting a new spring retainer, grind some new spring "lines" in them closer to the middle so I can cut off the outer part. Hopefully that will be enough to clear the solenoid.
Well that is it for now :D

Greetings Peter
 
That just might work as long as moving the springs inboard won't cause them to rub during operation.

Tom
 
Sorry everybody,

I'm a little behind with the pictures. I'll try to correct it within a few days. For now, the HID mockup is in the vette. This is a small vid when starting the HID bulbs they turn nicely from light blue to white :)

MVI 2503 - YouTube

Greetings Peter
 
Hello everyone,

I'm doing a body off resto on my 81 corvette. But to go to the subject..
My L81 engine has been redone inside and out. No major changes. The crankshaft was to far gone so i have a new one (still a 350) new pistons, a new Comp Cams cam, 1 new valve a new high flow oilpump and al the normal small things. I would like the have the outside of the L81 close to original but i don't have any picture's and i can't find them anywhere.
I put on some sparkplugshielding, i like them but i don't know if these are OEM or not?

If someone has picture's of a OEM L81 please post or email them so i can look for variable's between the two.

Here are some pictures of my L81 still in progress...

IMG_2860.JPG


IMG_2861.JPG


IMG_2862.JPG


IMG_2863.JPG


Greetings Peter.

Peter -

Looks beautiful! What brand and color paint did you use for the chevy (GM, Corporate) Blue?

Jon
 
Hello Jon,

Sorry for the late reply! And yes that is GM blue (so not the original L81 blue).

Greetings Peter
 
Hello Jon,

Sorry for the late reply! And yes that is GM blue (so not the original L81 blue).

Greetings Peter

Hi Peter -

I guess that's where my color confusion is - there's "GM Blue," "Corporate Blue" and neither seem to match the original blue. Is there such a thing as "L81 blue?" If so, who makes it in a sray can?

Jon
 
Sorry for the delay everybody but here are a few months worth of pictures :)

First of I continued with the xenon stuff.
I needed to change the lever on the headlights so it will not open more then 13.5cm (original it's around 17cm I think). A good friend of mine wanted to make the levers and so he did. Just perfect!

IIMG_2034.jpg


Of course with the new lever it still didn't fit well as one spring was still hitting the solenoid print. By heating the spring and turning the hook around it just did the trick. :)

IIMG_2035.jpg


IIMG_2036.jpg


I also changed the center pin a little so the springs will be closer together.
As long as they aren't binding it isn't a problem I think.

IIMG_2038.jpg


IIMG_2039.jpg


IIMG_2040.jpg


IIMG_2041.jpg


Also rechanged the cooling system with the old R12. Now it is running a nice 44F with a 75F outside. :)

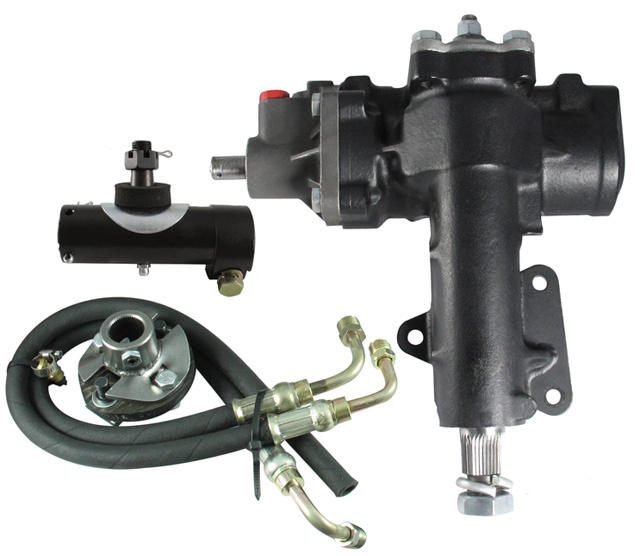
On ebay I found a nice new Borgeson unit with discount. As it is for a C2 the steering coupling doesn't fit. Cor told me the Borgeson coupling isn't as strong as the original one so he used the original half and bolted it to the Borgeson other half so I will do the same.

999031-2.jpg


So when the package arrives overhere I have some stuff to do :)
 
At the end of October I test fitted the xenon unit in the vette. Hooked the wiring to the original wiring just for the test. There will be a better new wiring for the units in the car with two relays so all the power will not go through the light switch. The light switch is only used to trigger the relay and power will come directly from the 12v wire from the alternator.

IIMG_2500.jpg


IIMG_2496.jpg


IIMG_2490.jpg


IIMG_2491.jpg


IIMG_2492.jpg


Begin November I still had to change (or shorten) the center pin a little. As the spring was hitting the print the assembly will only open 12.5 cm and not the 13 to 13.5cm it should do. Spring are just slightly toughting each other but not a big problem sofar.

IIMG_2506.jpg


I cut open an old (or new..) headlight shroud that I bought on ebay. This is a little mockup from how it should be.


IIMG_2507.jpg


IIMG_2509.jpg


IIMG_2510.jpg


I thought I had space for the ballast under the hood around the headlights but that isn't the case so I moved them to the other side. The ballasts are waterproof by themself but just in case they will be covered with a plastic bag made from thick truck plastic.

IIMG_2512.jpg


As the wiring from the ignition system to the HID / xenon bulbs is very short I had to place them very close to the bulbs. Just had some space left next to the xenon assemblies.

IIMG_2513.jpg


IIMG_2514.jpg
 
Last edited:
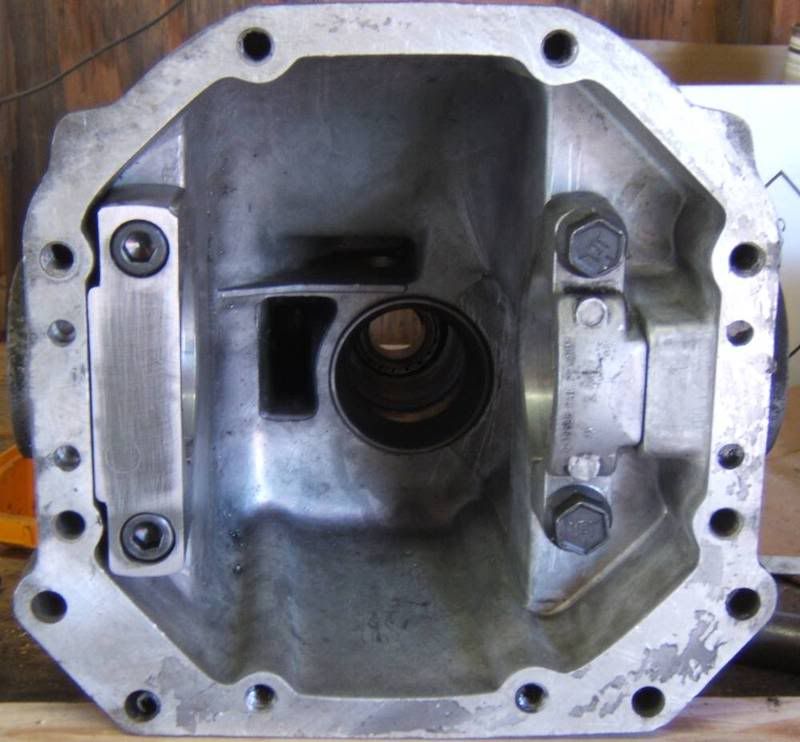
Last week I had time to remove the diff. It makes a little hauling noice when driving. As I'm planning to make a nice 383 (in time) and I know the stock diff has some weak points I wanted to beef it up a little. I didn't want to remove the exhaust and stud rods so it was a little difficult but it went oke

IIMG_2517.jpg


IIMG_2515.jpg


IIMG_2516.jpg


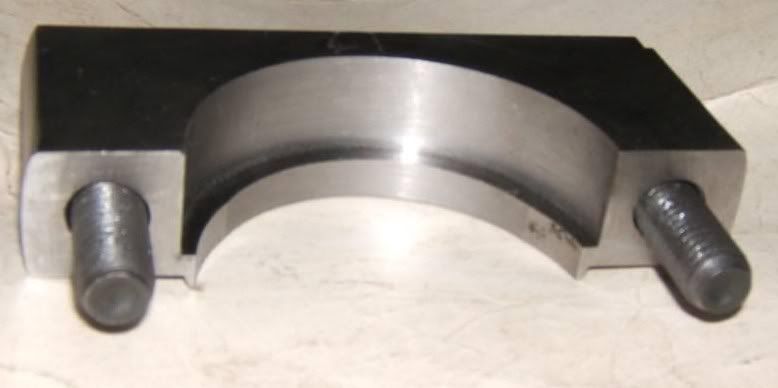
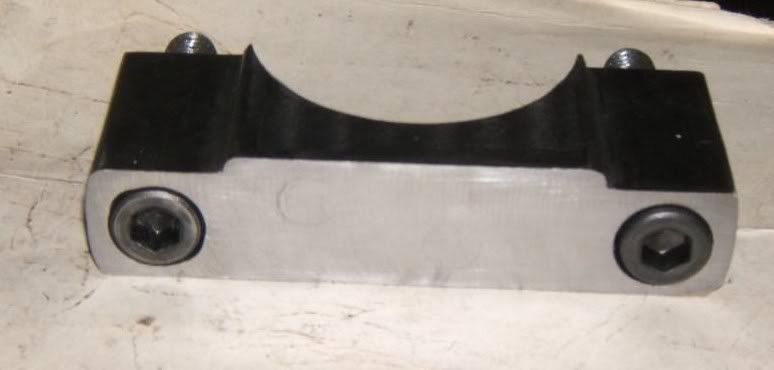
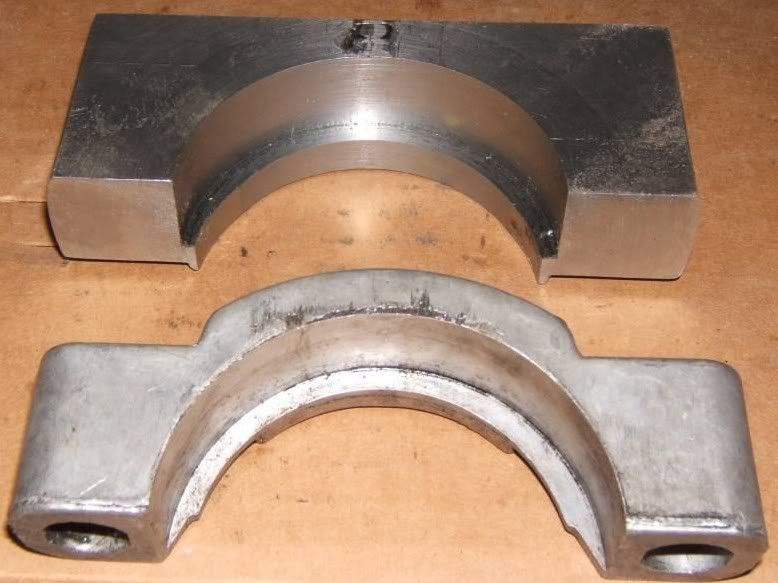
Mike said to me the main bearing cap on the drivers side is very weak and needs to be replaced for a billet one. But as all caps are different it has to be made specially.
This is an example made by him (go the pictures from the CF.com)

274909df9f3f0e9-1.jpg


274909dfa08281d-1.jpg


274909e4c3dfb9d-1.jpg


Bob7.jpg


So the diff is going to a company here in Holland as they say they can make the bearing cap.

Update from today.

Had some time after christmas to make a new shroud that fits the new xenon units. Still not finished but this is a mockup and we can make a contramockup from this with polyester and from the contra mockup we can make the final shroud from polyester.

IIMG_2518a.jpg


IIMG_2519a.jpg


And with the xenon units in place.

IIMG_2520a.jpg


IIMG_2521a.jpg


IIMG_2522a.jpg
 
For the wiring I bought some nice fuses to protect the system. The main fuses will be 2x 30amp and the individual fuses 4x 20amp for each xenon unit one.

fuseholder.jpg


And the relays came in. Problem with the xenon is it is the same bulb for normal and full headlights. On the Corvette when you switch to full headlights the normal ones will go out as power is cut. These relays solve this problem.

IIMG_2533.jpg

Well that's it for this year! See you all next year :) :w

Greetings Peter
 
Oeps, sorry it's already the third month of 2013. I have a lot to say and some nice picture to show you so let's begin :)

First I put some clay and putty on the edges to give the mockup some round edges (sorry this is the mockup frame and not the contra molding).

IMG_5331.JPG


IMG_5333.JPG


Opened up the differential. The cross shaft is already showing some wear. Lucky for me I bought a new cage with all the gears etc etc from Tom's. I also found a shop over here that can make a new billet bearing cap like the one Mike is making.

After some more sanding, putty, sanding and putty etc etc the mockup was ready.


IMG_5337.JPG


I also begun on the wiring for the xenon (HID). This is the one on the passenger’s side. From left to right, in red the premium fuse (30amps but can bring it down safely to 20 amps). Second to the left is the Wolstentech relays, this thing keeps giving current to the headlight even when I switch from low to high beam and back. It also gives me the option to delay when the headlights are turned on or when going out up to 30 sec. So I can first let the headlight come up and after that the lights will turn on (just an example). On the right are the two secondary fuses (15 amps, can go down to 10 amps) for the left and right headlights on the passenger’s side. After that the current goes through the tiny oem bmw wires to the switches and ballasts.

IMG_5339.JPG


Then the final assembly of the mockup in the car.

IMG_5350.JPG


IMG_5351.JPG


IMG_5352.JPG


Sorry don't have any pictures making the contra molding from polyester.
Used some old polyester so the contra molding is much thicker, on the other hand also much stronger than normal. In the process the original mockup couldn't be salvaged but this is the contra molding on the outside (that isn't going to be used!).

IMG_5353.JPG


And the inside.

IMG_5356.JPG


Then again, a lot of putty, sanding more putty etc etc, several layers of base paint and waterproof sanding to get it right.

IMG_5357.JPG


1/3 Greetings Peter
 
Last edited:
2/3
Enough on the headlights right now. I was planning to make a nice 383 so I bought this 350 roller block from a friend. It's only a two bolt but with a 1 piece RMS. Why not a 4 bolt, well simple, maybe overkill but I also ordered some splayed bearing caps which in my opinion is even better than a 4 bolt. It still needs a lot of work but I'm not in a hurry and this engine is even second place because I already found something better! Later more on that. :)

IIMG_2540.jpg


All my ebay stuff was gathered in the States and send to me by container. And this is it.
In the first picture, bore gauge and mitutoyo, 0.001" indicator with magnetic base, 1 to 3" outside micrometers, Cipco splayed bearing caps and the Compcams 1.6 roller rockers.

IIMG_2541.jpg


And on the left side. All the parts I need from Tom's and at the top the Borgson steering house.

IIMG_2542.jpg


Reading some topics an easy way to make the cage even stronger is polishing it. Well, up till now it wasn't that difficult but I only did the easy outside. A friend said that shot peening it would even be a better idea, so I'm waiting on the price right now, if it's right they can also do the aluminum diff housing and batwing.

IIMG_5366.jpg


Then making the final frame inside the contra molding. This is a picture with 2 or 3 layers polyester.

IIMG_5359.jpg


With an extra layer.

IIMG_5360.jpg


And the final product. Lucky for me, I put on the final layers in the morning and we already tried to take it out of the molding in the evening. This way the polyester was still flexable that way it was possible to get it out, if the polyester had been hard then the only way to get it out was to destroy the contra molding. Now I can make a second copy in case something goes wrong with the first one, of course I'll also save the contra molding. So in the front the new shroud and at the back the original one :)

IIMG_5363.jpg


IIMG_5364.jpg


Greetings Peter
 
3/3
So then the basic shroud in the vette :)

IMG_2547.jpg


IMG_2548.jpg


IMG_2549.jpg


And of course still some final adjustments, more polyester putty and sanding. This final picture you can see we put it in some black uv protecting paint. This still needs to be sanded, then some final spray putty or several base paint layers so this shroud it ready to go to the painter :)

And before I forget. The 383 is already in the freezer because I found a nice 400ci Dart SHP block. So I'm going to build a nice 400 but it can take me several years because I'm not in a hurry. Today have an email the block in ready for shipping, should arrive there around 5th of April. That's it for now! :)

Greetings Peter
 
What a wonderful feeling it is, to open up a box with goodies from the States, I know!

And after you have installed your new lights, the FIRST thing to do is get that Borgeson gear installed!
You will not recognise your car, and remember, you cannot do without it, when you have installed all that superpower [eventually :D ]

Cor :cool!:
 
Yes, it was very nice, I also said to myself, Santa is late this year! :rotfl And there is more to come! :D

I think I can install the Borgeson in one day so that isn't a problem. The thing is I want(ed) to change the flex lines above the Borgeson for hard lines and only behind the Borgeson to the pump flex but I can't find a company that can make that for me. I think it's nicer to see polished hard lines running over the Borgeson then them rubber flex lines.

Greetings Peter
 
It doesn't look too bad with rubber lines, and in any event, it is only a short distance anyway.
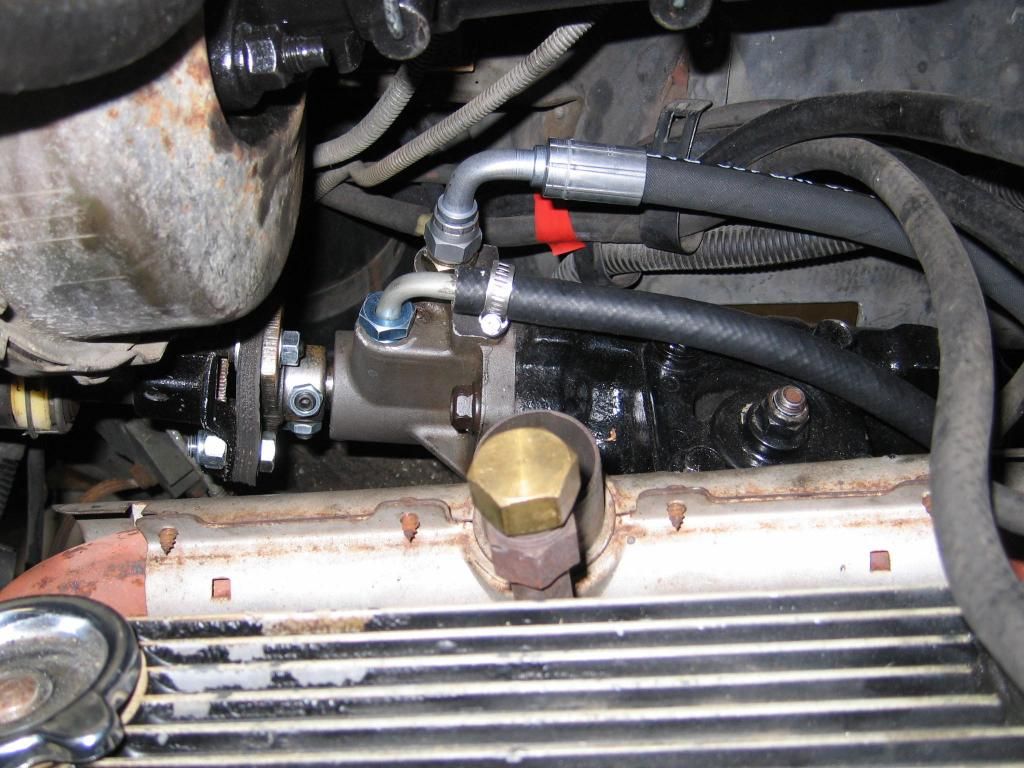
Here is a pic of my installation of the Jeep box;

IMG_2637_zps07c7be25.jpg


I did not use Borgeson hoses, but had the pressure hose made up here it is a 3/8JIC fitting, which any hose supplier can make for you
The adapter I bought in the US, also the return 90* adapter [from Rockauto] and a local low pressure return hose; mind you, the Borgeson return is a high pressure hose, and very difficult to install, as I have read many times, so I opted to do my own thing.
It is an textile reinforced hose, particularly made for steering returns.
Hope this helps.
Cor
 

Corvette Forums

Not a member of the Corvette Action Center?  Join now!  It's free!

Help support the Corvette Action Center!

Supporting Vendors

Dealers:

MacMulkin Chevrolet - The Second Largest Corvette Dealer in the Country!

Advertise with the Corvette Action Center!

Double Your Chances!

Our Partners

Back
Top Bottom