Welcome to the Corvette Forums at the Corvette Action Center!

Original L81 engine pic's..

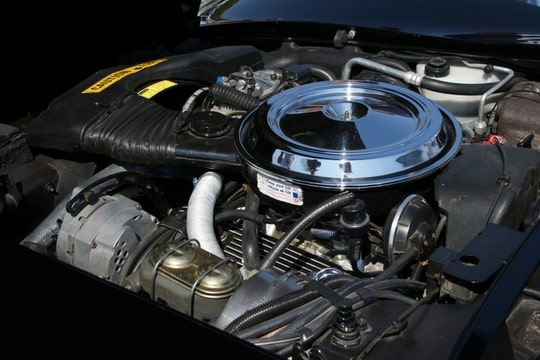
Speed pro's with 4 valve reliefs (5cc). But if I would do it again I would go with max 2 valve reliefs for a better quench area.

Greetings Peter
 
I'm sorry for letting everybody sit in the dark for about 4 months. Not that I have to many updates but let's begin.

To get back to the list, all is resolved except for:
1. got the connector but lockup isn't working like it should
2. carb is working and rebuild it correctly but after a few days still all fuel gone from the carb and can't get her under 800-900 rpm in P (I knife edged the upper side of the throttle valves from my old carb and maybe there is to much play between the valves and the valve wall)
7. widows need some extra time to adjust. New seals seem to be to thick at the rear of the door.
10. custom leather interior is on its way, they'll begin in a few weeks :)
17. got an appointment with another painter to paint some small things like the valance panel and side marker surroundings. To correct small problems with the cars paint I'll go back to the original painter to see if he can fix it.
18. still needs to be done, not a big problem
21. got the system charged with something else now to see if it is air tight. If everything is oke R12 will go back into it.

But to continue.
Got the new tires on. Dunlop GT Qualifier, much better then the old BF's I think.
IMG_5053.JPG

And I also got new chrome bolts (BBS) that fit surrounding the heart of the rim.
IMG_5054.JPG


Pictures rebuilding the carb.
IMG_5055.JPG

IMG_5056.JPG

I see now I didn't epoxy the accelerator plug and under the M/C solenoid...

The true dual exhaust.
50mm (between 2.25 and 2.5") stainless pipe, with Ultraflow Dynomax mufflers. No cat needed overhere. :)
IMG_5081.JPG

IMG_5082.JPG

IMG_5083.JPG


The seats. His it the color the entire interior will be (except for the black carpet). As you can see the guy working on my seats has some idea's on his own, with a few conversations he convinced me that his idea was better the the original layout. I also have to say I changed the "bump" in the middle of the seat. Normally this bump would be half way in my back and after driving for more the 2 hours I was broken. Now the bump is lower where it should be, drives much nicer now.
IMG_5058.JPG

IMG_5060.JPG


As you can see the leather has wrinkled a little. In the mean time the upper side of the seat is almost perfect and the bottom side still needs some extra attention to remove the wrinkels from the left and right sides. As you can see the lower part continues in the upper part of the seat and the inserted part in the middle is now better the original (more depth in it)

Well that's it for now with the pictures :)

Greetings Peter
 
After a very very long time with nothing... here another update :)

In the meantime I found a "nice" set of Dart 180cc heads. But when I inspect them here in Holland almost all the valves where bend.... Let a shop check both heads and after some minor shaving they were allright.
At this moment they're save in a box till I have some time and money to look for the other parts.
Want to go with 1.6 magnum rollertip rockers and some new valves etc etc.
Just by luck through my work I visited somebody that had a rebuild valve grinder. Still can pick it up for 50 euro's (no money I think) so I can backcut the new valves myself.
I also want to cc the heads and after that do some porting.
But for now the heads.

IMG_5094.JPG


IMG_5096.JPG


IMG_5097.JPG


The exhaust is in it's place. After this picture I did a little polishing so it looks a little better. I have to o2 bugs but the openings were to small for a wideband sensor. So I needed to lower the exhaust and with a dremel open up the opening some more. Problem the exhaust studs were all rusted and that to replace them. Well it took me 6 houres to get them all out but after that the new ones where easy :D

IMG_5099.JPG


Of course had some problems in the meantime.. Found I was missing coolant somewhere. After some research found the new coolant reservoir was sitting to low and the nipple from the airco dryer was pressing on the reservoir. Problem was I had a different right inner fender and it was sitting just a little lower then the old one. After redrilling the holes everything is fine now (with a new reservoir of courese)

IMG_5108.JPG


IMG_5109.JPG


IMG_5266.JPG


IMG_5267.JPG


After that the next problem, where did I put my camera? After looking for it a number of times I decided to buy a new one.

On ebay I found a dual sensor wideband tuner. In the picture you can see the display mounted in front of the dash compartement (next to that my finished steering wheel with matching leather).
In general the air fuel mixture should be 14.7 (parts air) and 1 part fuel. On heavy acceleration more on the save side with 13:1.
As the E4ME is controlling the primaries the idle mixture is nice around 14 - 15:1. When driving the mixture is lean around 17:1 and on heavy acceleration it's to rich with 8:1. So still some work to do there.

IIMG_1146.jpg


Problem with the carb why it is running to lean. First I checked all the vacuum tubes with a vacuum meter. No problem there but when I tried to check the carb bolts one bolt on the rear had distroyed the last piece of thread in there. So bought a v-coil (or heli-coil) set to put on some new threads.

IIMG_1143.jpg


IIMG_1145.jpg


IIMG_1147.jpg


IIMG_1149.jpg


Second problem with the carb as a result of the first I couldn't get the idle rpm below the 700. After checking the baseplate and put it against the light this is what I found.

IIMG_1153.jpg


IIMG_1154.jpg


IIMG_1155.jpg


IIMG_1156.jpg


Yesterday I had some time to loosen up the little screws that hold the blades in place. Opened and closed the blades a few time for some better centration, after that some small hand adjustments and now it looks alot better (less leaks I think). Because I also knife edged the blades I replaced one with a normal uncut blade but it was no better than the cut ones. So I hope this will fix the problem.

Last week I also bought 2 empty cows so that the carpender can start on the interoir (dash). Almost 6 m2 so this should be enough to cover everything plastic with leather. The top of the dash and the lower parts of the doors are going to be black leather.

IIMG_1157.jpg


IIMG_1158.jpg


Till next time :)

Greetings Peter
 
Frame Off

This is nice and after seeing these picture I can not wait to get started on mine. This is a job well done.
 
Thanks for the update. You're making good progress. Can't wait to see what the dash looks like covered in leather. Should be nice.

Tom
 
Peter,

she's looking better and better.. :upthumbs


I admire your patience. It's fantastic to see from the sidelines (literally. :L over here). I dont know if i wouldnt get too frustrated and wanted it back together. Hats off for that!


And 2 empty cows? Ohhhh. I thought you would invite all for a bar-b-q to get rid of all the meat.. ;LOL

Groeten!

:w
-Stefan
 
Peter,

I've must of been sleeping, this is the first I've read this thread. Wow, what a fantastic job you are doing, the car looks like the stuff dreams are made of. Of course I love the Black paint "wish mine was as nice as yours". Keep up the great work you are doing. Good Luck Tim
 
Thanks for the nice words everybody!
Good to hear other people are also enjoying this rebuild. :)

And almost specially for Tom. I got the dash back last monday. I think it's very very! nice to see. All the lines are nice and straight, and as I followed the proces now I know it take alot more time and effort to wrap the dash in leather. One example. The openings in the dash (vent openings, centerconsole etc etc) are a problem. When the opening stays in sight you have to fold the leather "back in". Problem with that is in the corners you don't have enough leather to make it perfect. So for every opening they put a new larger piece of leather behind the first one so the corners will be perfect.
In the first two pictures you can see the wrapping proces.

IIMG_1190.jpg


IIMG_1191.jpg


Light makes the color of the leather more yellow then in normal daylight.

And here you see the dash finished still without the console etc etc. First I want to clean the dash and put some leather wax or stuff on it. After that I need to install the ventilationsystem first and then reinstall the dash.

Next to be finished are the piral covers around the windshield and the doorcovers. I did a new design on the doorcovers (with a little 82c) in it.

But first the dash :)

IIMG_1208.jpg


IIMG_1209.jpg


Greetings Peter
 
Fantastic!!!

:BOW I Bow to you Peter ..fantastic job !!!!
And some would say but its only an 81!! not worth the effort ..but WE all know different dont we ???

Neal
 
Hello Neal,

Thanks for the compliment and YES we know better!
It's not what brand or year car you have, its what you see in it and what you make of it! Just like the incredible paintjob on your 81! :upthumbs

I have some extra detail pictures from the dash and a picture with the dash finally installed.

IIMG_1211.jpg


IIMG_1212.jpg


IIMG_1213.jpg


IIMG_1215.jpg


The carpender is now bussy with the doorpanels. Lucky for my the carpender also has his own idea's and is not afraid to say them. For me an extra challange to explain why I want something and how I see the interior when completed.

Greetings Peter
 
I got one doorpanel back. Looks great to me and I'm very happy with it!
Of course the doorhandle, armrest etc etc need to go back in but I first test fitted it in the vette.
The pictures.
Original and new doorpanel

IIMG_1223.jpg


Doorpanel fitted on the door (without bolts)
IIMG_1225.jpg


And the door almost closed with the interior.
IIMG_1226.jpg


IIMG_1227.jpg


I hoop next week both doorpanels are finished so we can begin with the window adjustments. To fit the rubber to the final stage and the carpender can continue with the window surroundings.

Greetings Peter
 
Definitely the most elaborate work on an L81 to date, Peter! :)

I particularly like the bottom sections on the door panels, and the dash came out magnificent! :)
 
Thanks for the compliment Gerry! :D
The leather interior is finished, and the wool carpet is in place. Still some little points that need to be looked at but no big problems.
Last week was the first big meeting I went to to display the vette. But first the interior.
As you can see on the first picture the center console is raised and there is a leather "plate" under it. The plate is screwed to the floor with extended metal so you can't see the screws. But the negative side to that is that the carpet under the plate always needs to be removable to get acces to the screws. So there is a velcro backing to the top of the carpet, the rest is glued.
In the rear there will be a box against the wheel well's so the wheel well's wil not be visible. But that is for a later date.

IIMG_1254.jpg


IIMG_1255.jpg


And finaly the armrests are finished and installed. Carpet finished so the seats can be reinstalled. I'm still bussy making alterations to the leather plate so the it can't me seen where the metal extentions are (you can see them in the second picture if you look close, I already fixed the problem on the passenderside).

IIMG_1259.jpg


IIMG_1258.jpg


And the "finished product" for the meeting. I also polished the black paint again to go most of the swirls and cobwebs out.

IIMG_1269.jpg


IIMG_1271.jpg


IIMG_1272.jpg


Still alot to do. Today the yearly check to keep it road legal. No big problems. The handbrake always is a problem but the guy from the shop knows that so no problem. CO output was 1.47% very nice under the 4.5% max output.

Problems to fix:
I think my EGR valve is still open when it needs to be closed at idle (carbon polution). This could explain the high idle 1400rpm and dieseling after shutdown (and difficult startup). Want to make a block off plate to see if that is the problem.
I have the lockup figured out. Parts are ordered to waiting on them.
The bluetooth is already in but need to install it. If the police see's you on the phone and driving gets you a 180 euro ticket.
Still need to make the rear speaker compartments.
Etc etc etc. :D

Greetings Peter
 
Definitely the most elaborate work on an L81 to date, Peter! :)

I particularly like the bottom sections on the door panels, and the dash came out magnificent! :)
:thumb
AND

Peter lives in the "Netherlands" taking on a project like that in the States where the availability of parts and resources are found quite easily is a huge project, I can't image doing what Peter has done with very little local support for parts and technical help :eek in the "Netherlands"...

At least 4 :thumbs from this ole boy...

Bud
 
Peter,

That is one special L81.

What's left? Get in it and drive it, pal. You can always correct minor details on a Sunday afternoon. :D

After this true, "overhaul", you have to be anxious to travel the country side and show us your country...if you don't mind, start at where the beautiful Neatherland's women sunbathe....:D:D:D :p:happyanim:
 
Peter, a bit off-topic, but would you have, or could you make a close-up picture of the seat switches on the drivers seat?
I have such a seat too, but the housing has gone, and a new one on its way, but still difficult to figure you it is installed.
Thanks
Cor
 
@Cor, there are two screws to connect the seat switch bezel to the seat, one in the front and one to the side (you can see it in picture). I'll take a close up picture this weekend if I have the time and don't forget. And while you're at it, cut some foam from the seat so there isn't any tension between the foam and the switch bezel. :)

@Bud and Gerry, Thank you very much! :)
To do this project perfect takes some time and off course money but it isn't so difficult to do this outside the US. With the internet it's very easy to find parts but the transport to the Netherlands makes it expensive. I especially have to thank Gerry! :upthumbs His is a very good friend and big big help to this project! To my amazement (couple of years ago) he offert to send me some spark plug covers for free that I didn't have (I still have to install them! :ugh) The is also a big help on to help me with different parts I was looking for, really I'm amazed somebody would to that without something in return. My big thanks to Gerry! :thanks::thumb


And your absolutely right Gerry. This is the time to drive this Vette and do all the minor problems on rainy evenings. :) Last week hat the yearly checkup to keep here legal on our roads. No big problems (beside the always troublesome handbrake) but last year (with the two meetings from this year) I drove around 1650km (1025 miles) so more than I thought! And on long drives she's at 19miles per gallon so not that bad either. But I'll promise to drive more this year then the past!
Some pictures from last meeting.

Foto-V6VP86F3.jpg


Foto-Y6W6YYIC.jpg


Foto-6SMQJOAZ.jpg


Foto-ELPSKAV8.jpg


Foto-XK4HHQI7.jpg


For some that want to few our openingsmeeting in the Netherlands go to: Openingsmeeting HCC de Meern 25-04-2011 | MijnAlbum - Fotoalbum Gratis Online! :beer

Greetings Peter

Greetings Peter
 
@Cor, there are two screws to connect the seat switch bezel to the seat, one in the front and one to the side (you can see it in picture). I'll take a close up picture this weekend if I have the time and don't forget. And while you're at it, cut some foam from the seat so there isn't any tension between the foam and the switch bezel. :)
Peter
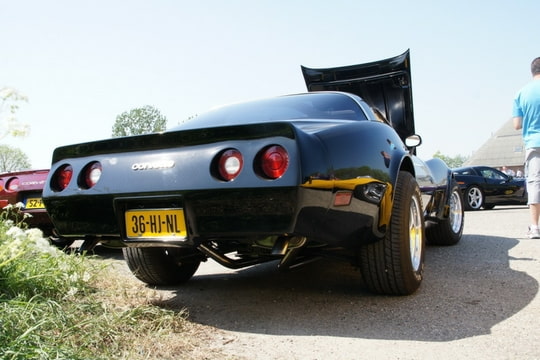
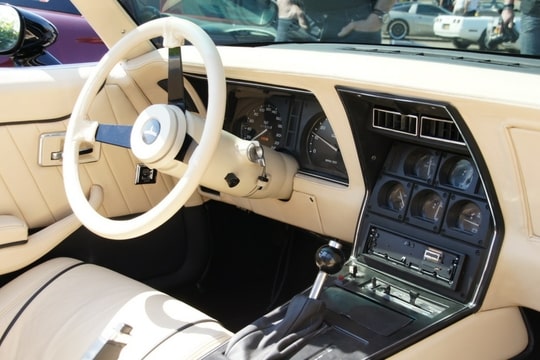
Ahh, that's where the problem is, I think: I figured that there is not enough room for the switch, but if you have cheat, and cut some foam away, yeah, that'll help.
I did know about the 2 screws, the remains of the old cover are also still there :D
Cor
 

Corvette Forums

Not a member of the Corvette Action Center?  Join now!  It's free!

Help support the Corvette Action Center!

Supporting Vendors

Dealers:

MacMulkin Chevrolet - The Second Largest Corvette Dealer in the Country!

Advertise with the Corvette Action Center!

Double Your Chances!

Our Partners

Back
Top Bottom