Welcome to the Corvette Forums at the Corvette Action Center!

Shinoda start

I thought about at least one Corvette admiring/driving/owning gal while polishing these Epsilon rims.
I resemble that remark.:L


Looks SHARP! Your hard work paid off - they look great!
:wJane Ann

attachment.php
 
GREAT looking car Mr Pirot. :) You have an excellent way of keeping my interest. I've read the entire thread and I'm wondering if you found the source of oil in coorant? Still waiting for the final pics of your car (did I miss them?) Prease post them when you can. Amazing project and documentation.
 
Gosh, you're too kind but thanks. I am waiting for the C6 headlights and am occupied by stuffing a Rustang engine/AOD in a '55 Nash for my wife, so I haven't looked further into the oil issue.

More, later:w
 
I'm wondering if you found the source of oil in coorant?
I saw that and few 'get' my nick.

Yes, I finally did and am close to finalizing the fix. The short(?) story is: When refitting the '87 hood on this '84, the front pieces were aligned to eliminate the spacers that raised the clamshell. After two replacement fans, I discovered the spacer-less mounted hood distorted the fan shroud, stopping the fan. Heck, it ran when I could see it! Yet, violating my simplicity-first rule, I figured it was, yet again, an electrical issue.

So I spent a LOT of time finding a temperature switch that would fit in an available bung in the BeCool radiator, then wired it to the fan relay. I needed a third switch, because the car uses one sensor for the ECM and another for the AutoMeter gauge I installed. Recall, that 1984 and the early '85s did not switch the cooling fan with the ECM. That works well, but did not solve the problem, so I started to think water pump.

I'd changed the coolant after a good flush and never saw another drop of oil in it, nor was there any coolant in the oil. Pressure testing the system and the cap showed no problem. I added Water Wetter.... Nope.

When pulling the spark plugs for compression testing, coolant flowed out of #3. Oops. Let the SuperRam games begin... again. What a PITA! This became an opportunity to doll up the underhood and find/replace the broken AIR pump/alternator/PS pump bracket; a surprise with no symptoms.

Pulling the Dart aluminum heads had two pointers: 1) #3 was real clean, with absolutely no carbon (#5 was clean, but not as much, and 2) the head gasket had a tiny indication of leakage. A steel straight-edge showed the heads to be true, but the fantastic local head guy, Bob McCrae, took 7/1000's off the warped heads.

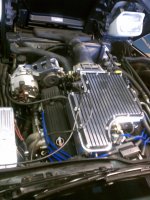
I am in the reassembly process, now, which is taking longer as parts get cleaned, polished and/or painted. The aluminum SR plenum looks incredible, after a professional polish, followed by ceramic clear paint. Film at 11 (it's not yet 10).

I painted the intake runners black and those crummy-cast stock valve covers wrinkle-flat-black. The alternator arm is being treated identical to the plenum, it being so visible. Not much is visible under the SR and my style is less flash, but functionally attractive. I have a pal who is masterful at dressing up a car, especially under the hood, so Richard's input is helping me get a result I'd not otherwise realize.
Still waiting for the final pics of your car .
Me, too.

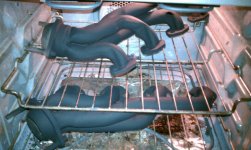
I have a photo that epitomizes, "you might be a redneck if", parts I and II. Hint: It takes a day to get the cured paint smell out of a convection oven whether shortie headers or valve covers! Hey, I love laughing and provide myself with ample material.

The shroud? I symmetrically trimmed it such that few will notice and hope that the hot start problem is also gone.
savewave.gif
 
Heads are torqued and most brackets painted gloss black, like the runners. I had the alternator arm polished and ceramic cleared, too, as it is so very visible.Only the overhead lights make them dissimilar in shine as this not-quite-finished pic shows.

ReReInstallPolished.jpg

The delay* is the SuperRam breaking the wiper motor cover, as I posted in '08, when the engine torques. Energy does not make a motor mount for these cars, nor does Prothane, as far as I can find. Mike P. at Energy is checking applications. I mentioned to him that I'd expect a market for these with all you hotrodders out there, worldwide. If you have searched, you know they are not too cheap and can be hard to find.

I prefer to drop the motor slightly or rotate it a hair on the mounts, for more clearance.

I'd appreciate anyone who has has and solved this sharing their method.... or I will post mine, later.

I'd sure like to run and drive this car again - soon. :w

*Okay, so I fixed the icemaker, the oven, the pool leak, ordered custom offset 18" steel wheels for the '55 F100-on-'84 Vette-suspension and made more progress on the '55 Nash-sporting 302 Ford. When did I find tome to work?
 
I keep finding shoddy work, courtesy of Sevens Only Racing at Buttonwillow, even after all this time. What a bunch of hacks.

Part of the clearance problem atop, was two very loose bolts for the bellhousing/engine attachment. That explains the rotational movement of the engine, when I lifted the tranny. Lifting, then tightening those bolts increased the needed clearance, which had changed imperceptibly with rebuilt motor mounts.

After lots of looking and no return call from Energy Suspension, as promised, I found polyurethane inserts that work with the early C4 mounts. Sorry; on that 'other' (unfriendly) Corvette forum. Prothane also makes them, for the 93-97 (?) LT-1 F-bodies. There is a thread that explains the insert replacement, that is better than the enclosed instructions. The hardest part was getting the motor mounts out. I did not find it necessary to drill larger holes for the bolts as was concerned about too much movement as a result of such drilling. Universal, were the admonitions to NOT use solid mounts.

I am cleaning up and dressing things up, including carefully rerouting wires and hoses. I also found the charcoal canister hoses reversed, which may explain the gas tank being pressurized. The cruise control has not worlked since this engine went in, assumedly because of inadequate vacuum, so I redid that line, rebuilt the tachometer filter (tack had retired early) which is newly mounted elsewhere.marked TDC and the timing marks, safety wired the header bolts )drilled).

Tonight, I modified my tool for spinning the oil pump shaft to prelube the bearings, etc. I made a sleeve to hold the drill-driven distributor-replacement shaft on it and am indexing the plugs. The plenum is finally next for reinstallation, but I ran out of permatex black (good seal) and the stores are closed. I again used my SnapOn boroscope to find TDC... man, that tool is SOOOOO handy. Besides, I get some kind of charge out of looking inside the cylinder with stuff movin'.

Hey, does the attached pic make me a redneck?

Some may recognize that these are NOT Corvette headers. True, they are stock hi-perf SBF (302) which were sold; replaced with new ceramic coated ones; the package going in a 1955 Nash Rambler for Mrs. Whalepirot. That, is one long story, for another forum. I suppose, with a Corvette powered and chassied '55 F100, I could complete the circle by installing the flathead Nash six in a Corvette?.................


Nahhhhhhhhhhh. :w
 

Attachments

  • HdrBake.jpg
    HdrBake.jpg
    124.4 KB · Views: 106
Last edited:
Hey, don't be sorry about finding the parts you needed on that other forum. At the end of the day, you got what you needed and that's what is important!

It must be frustrating to you to keep finding shoddy workmanship. On the upside, you've putting things right now!

A buddy of mine on the west coast replaced the stove after his wife objected, saying the odour of baking powder coated parts was lingering in the oven. Mind you, he grabbed the old stove and installed it in his garage... :)

-Mac
 
I could complete the circle by installing the flathead Nash six in a Corvette?.................
Nahhhhhhhhhhh. :w

YEAH................................ Right before you JUNK it! :L:L:L

Andy :w
 
Is it really worth indexing the plugs? Seems like a ton of work! Sorry that just got me thinking. I can see the point having them all lined up perfect. Hmmm must start looking lol
 
No, to indexing

Upon further review, I decided it is not worth the few horsepower, given the effort. A drag-racing pal got me going on this after it was recommended to him by a longtime successful racer/builder. As I have a number of unused spark plug washers, I thought, well, as long as I'm in this thing.....

Web reports about indexing are slightly better than those about J.C. Whitney Fire Injectors (which I used and liked, in my '66 MB 230); that is, mild to wild claims. The theory is okay but sometimes the theory applied is not the overriding concern, or inappropriately applied. Another factor, some report better dyno results with the plug facing 180* (away) from the intake valve, not facing it.

These Dart aluminum heads use a taper seat spark plug, so my washers are useless (proper ones are sold). Maybe next engine.

I need to finish one of these three major car projects. :w
 
Last edited:
Thats awsome. We need more pics :D and yeah sorry i cant help. Just love your car!!

Sent from my Nexus 7
 
Last edited:
That's awesome. We need more pics :D and yeah sorry i cant help. Just love your car!!
Gee, thanks. I like it, too, though some days........like when it fights me with nasty surprises.

You want pics of the car on jackstands? :eyerole

Okay, the assumption of where the blockage is seems wrong. I got compressed air through the fuel feed but am stumped as to how there could be a blockage in the rail(s). Before I pull that dang SuperRam again, I will let the solution rise in my dreams... I hope.''

I disassembled the rails as the easier way to get the injectors out and felt, at the time, that there would be an issue. Sometimes I hate being right, but that remains to be seen.:w
 
the roar has returned

Slowly it is coming back. The fuel lines were reversed, which I did not think possible, especially given the unique shape from their routing beneath and through the A/C mount.

Fine tuning is in progress and yes, I'll work on more photos. Ya wanna to see the EGR valve? :chuckle

Teaser: I forfeited the stock valve cover color for flat black wrinkle (thanks, Richard). Looks great with the polished aluminum parts.

Thanks for the support (HOLY COW; over 7000 views?) :w
 
Reversed fuel lines??? That's a pretty good trick! :W

-Mac
 
Reversed fuel lines??? That's a pretty good trick!
Indeed, such that it puzzled many experts, too. I actually had a 'feeling' and when Rick said it was possible; that he'd seen just that when his shop did work on Corvettes, I was pretty sure. They used a variety of factory and aftermarket FI units, specifically mentioning Camaro.

I seem to recall that Corvettes have different sized lines but that Camaro used same-sized lines(tubes). Not knowing which way the fuel flowed did not help solve this. For others: The fuel feeds into the right rail and to the left rail via the front cross-tube. The rear cross-tube is return fuel, the pressure (amount) regulated by the FPR and channeled through the small rail-attached line to the return line to the tank. The b ig clue, at least on the rail unit, is the feed line is larger than the return line. Duh!
 
Of course the supply side would be larger! The part that gets me is this really shows the person who hooked it up either didn't understand what he/she was doing or didn't get a rat's patootie... :ugh

-Mac
 
Yeah, I screwed up; I admit it. It's easier than you might think, tho. It's a real wrestling match under that compressor, through the mount, with the IAC, etc. wires plus the heater hose and the A.I.R. hoses all demanding the same space in front of this dang plenum. Those fuel lines are steel, have been horsed about a bit and seemingly 'know' where they are to be, with no slack. So, I pout them where they wanted to be, and it was reversed. Some slight comfort that a guy who builds road race and drag C4s and C5s already had the tee shirt! I paid by hours and days or wrenching, cursing and bleeding, plus no Vette drive time. I was ready to buy a new one! (okay, again).

So, the white Shinoda is finally running very well, with the valves set properly and the timing in the ballpark. It is real tough to find that ESC wire for proper timing, so maybe tomorrow when the light is better and it is cooler. the ECM still has some learning to do, as it explores the distant areas of the fuel tables to find enough idle speed at the higher temperatures. I am glad the hot start issue seems gone, tho I will recheck the fluids and add more Water Wetter to see if I can drop the op temp some more. 210 on the Autometer gauge looks sooo high, even IF it is very normal for C4s.

The polished/ceramic clear SuperRam, hydroboost reservoir and alternator arm look awesome! So much better than color or my polishing efforts; too bad the pic doesn't quite show them as well as a visit would. I like the wrinkle black valve covers better, too (thanks, Richard)

The lumpy idle we all love is BACK!:w
 

Attachments

  • 409polished.jpg
    409polished.jpg
    120.1 KB · Views: 89
D-oh!! I thought the lines were installed by the hacks at your favourite speed shop in Buttonwillow... and you were putting things right... My apologies for my harsh language. Imagine me jumping to conclusions!!

-Mac
 

Corvette Forums

Not a member of the Corvette Action Center?  Join now!  It's free!

Help support the Corvette Action Center!

Supporting Vendors

Dealers:

MacMulkin Chevrolet - The Second Largest Corvette Dealer in the Country!

Advertise with the Corvette Action Center!

Double Your Chances!

Our Partners

Back
Top Bottom