Welcome to the Corvette Forums at the Corvette Action Center!

Question: Will the Edelbrock Pro Fo XT fit under an 84 Hood?

AussieCorvetteNut

Well-known member
Joined
Dec 19, 2010
Messages
189
Location
Gold Coast Australia
Corvette
1984 Two-tone Blue Coupe
I have read the following article a few times and it looks like the Pro Flo XT fits under an 86 hood, just wondering if the 84 and 86 hoods are the same?
I took a close look at my hood and then matched it up with a spare hood I have.
I also match this up with and 85 hood on another Vette that was at a swap meet over the weekend.
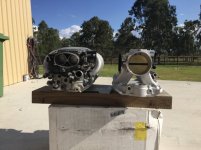
They all look the same except for the crossfire ducting, which is well away and to the sides of the hood.

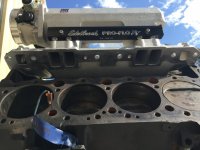
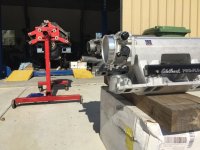
Edelbrock Pro Flo Xt Intake - LSX-Style Throttle Body - Vette Magazine

I know there is air ducting in my 84 hood, but this will not come anywhere near the Pro Flo.
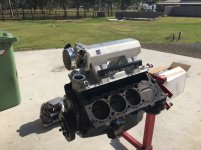
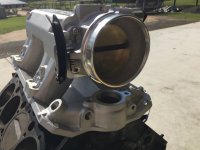
I am sure that the 9" on the Pro Flo is ok, it would just be the 90mm throttle body that will be an issue, as the hood starts to drop down.
I measured from what would be the china wall on the engine block to the top of the crossfire and I am sure it is 235mm or 9.25"

Any thoughts?
 
Last edited:
...well its on its way!

Well I ordered the Edelbrock Pro Flo XT intake, Edelbrock fuel rails and a 90mm Edelbrock throttle body as per the magazine write up in Vette/ Super Chevy.

The XT and Fuel Rails have just landed in Australia and are coming through customs, and the throttle body is still in Kentucky as I ordered it a couple of days later.


I emailed FAST and asked about hooking up the EZ EFI 2.0 Retro Multipoint Kit (30404) to the Edelbrock Pro Flo XT and Edelbrock throttle body, and the technician said there will be no issues with using the Edelbrock throttle body instead of the FAST 92mm Big Mouth throttle body.
He also said that as long as I use USCAR EV6 injectors and LS sensors we are all good with the install.
He said if I did put the EV1 injectors in, then I will just need adapters for the injectors wiring harness.

Looking at the injectors though, I am starting to worry that the 85 to 87 Fuel Pump may not keep up with demand...I was planning on running smaller sub-30 PSI injectors as it isn't a 383 build, which the standard pump should be able to handle.
I have installed a GM Restoration Fuel Sender and Pump for an 85 to 87 into my 84 Coupe...I needed a new sender unit anyway and my original plan was to install a TPI System...but with Edlebrock discontinuing the TPI Intakes, that plan went south.

The EV6 injectors are a different story...I cannot find the lower PSI injectors, they are all high PSI to suit late model applications.

I might be reading it wrong, and maybe there is a reason in the PSI differences between EV1 and EV6.
I am not worried about pressure VS volume as they can still be high pressure/ low volume, but I am worried I may have to use a bigger pump.


Any thoughts?


I have rebuilt the rear drive-line, suspension and brakes and dropped her on all four wheels again, turned her around on the hoist and stripped the hood and bumper, front brakes, suspension and steering ready for painting the firewall and chassis rails.
The under body and transmission tunnel have been resprayed and I have shot the two-tone blue's under the rear of the car...makes the rear suspension look great.

The biggest nightmare to come...engine bay wiring...:eek:hnoes

I have to sort through the 84 stuff I don't need and tuck away and then tidy up the 84 stuff I do need.

Any tips would be welcomed.

:beer

Tony
 
Well the Edelbrock XT arrived!

Its here...after nearly two weeks on a slow trip from Jegs, the Edelbrock Pro Flo XT, fuel rails and 90mm throttle body have arrived.
The reason it took two weeks is I purchased it from Jegs through their eBay store and used the Pitney Bowes Global Shipping Program...this program it's slow.

Check out the height compared to the 88 Corvette TPI unit.
 

Attachments

  • image.jpg
    image.jpg
    101.7 KB · Views: 299
  • image.jpg
    image.jpg
    95.1 KB · Views: 278
  • image.jpg
    image.jpg
    98 KB · Views: 277
  • image.jpg
    image.jpg
    99.8 KB · Views: 391
  • image.jpg
    image.jpg
    99.4 KB · Views: 291
Last edited:
Initial Assessment

I still have my 84 Crossfire system and I purchased an 88 TPI System, as I was going to install a TPI unit.
As Edelbrock only make the Vortec TPI Intakes now, my plans quickly changed.

It looks like the original Crossfire is actually higher than the TPI.

Sorry for the metric measurements:
From the china rail on the block, the TPI Unit measures 195 mm to the top of the throttle body, while the Crossfire measures 211 mm

The Pro Flo XT measures 208.28 mm in the main body, but the throttle body flange measures 230.89 mm (9.09").
The throttle body drops in height down to approximately 220 mm where the snorkel will be mounted.

Question is: How much higher than the Crossfire, does the bonnet sit?

According to the magazine story, the top of the throttle body is the issue.

I have made the decision to keep forging ahead and fit it even if I have to put a tasteful bonnet hump in.
I would like to keep the stock hood line, but will see how I go.

Now here are the claimed facts:

A TPI Unit will flow at 750 - 800 CFM (correct me if i'm wrong), and will be at maximum airflow at 4800 rpm.

The Edelbrock Pro Flo XT will flow at 1000 CFM and can flow right up to 7000 rpm.

Given that power is all about getting more air and fuel in, I think I might be happy with the Pro Flo, but heads are my next issue.


I will be running the FAST EZ EFI 2.0 Multipoint EFI Kit (30404) with the Pro Flo, and I am looking at the Retro Roller Cams from Comp Cams, 12-466-8 or 12-467-8.

Now the 12-467-8 has a high lift when used with 1.6:1 rockers, so I am having trouble finding a reliable set of heads that have maximum 0.600" lift as the cam and rockers are at around 0.575"

I am really keen on running that cam and I think it will work well with the Pro Flo, but I am struggling with the heads when I ask around, some say its only a 350, use 180cc heads and others are saying...ah dunno ;shrug

Given the flow capabilities of the Pro Flo and the good lift in the cam and rockers, I am leaning towards maybe Brodix or AFR.
Of course the standard 2.02/1.6 valve sizes, but the flow capabilities of the heads need to compliment the cam lift and the intake delivery.

At this stage, I am planning on only a slight bore to clean it up, so if the block and crank test out ok, they will go back in. If the crank is shot, a stroker assembly is on the list, but I would be looking at 72cc heads.

Any thoughts?
 
Last edited:
Question is: How much higher than the Crossfire, does the bonnet sit?

My '84 has a fiberglass insulation pad on the underside of the "bonnet". The Crossfire air filter housing makes an impression in the fiberglass insulation of about 10 mm at the front of the housing. I'd say the fiberglass insulation is about 30 mm thick. 30 mm - 10 mm = 20 mm (est.) at the front of the housing.

:w
 
Thanks Roy

My '84 has a fiberglass insulation pad on the underside of the "bonnet". The Crossfire air filter housing makes an impression in the fiberglass insulation of about 10 mm at the front of the housing. I'd say the fiberglass insulation is about 30 mm thick. 30 mm - 10 mm = 20 mm (est.) at the front of the housing.

:w


Would you be able to upload a picture of the underside of your hood?

That sounds like good news though, I have both TPI and a Crossfire systems at the moment and the Crossfire actually measures higher at the where the throttle body would be on a TPI.
The Crossfire is higher, so add the 20mm and I think we are almost there.

I spoke to a Corvette Guru here in Australia, who I know from when I was Treasurer of the QLD Corvette Club and he says that he has installed an Edelbrock Pro Flo XT on a C4, but used a TPI throttle body, not for height, but for ease of throttle cable location.


Thanks Tony
 
Last edited:
Progress on the front end.

I thought while I am working on getting the Pro Flo XT to fit, I would post a few pics on the progress of where the gem will be mounted.

For those with a keen eye, you will notice that 'Blue' has had a right hand drive conversion, the firewall has been changed to house the brake booster and clutch master on the right and move the air conditioning stuff to the left side...you can also notice that the heater core is mounted there as well...I am just about to replace it, looks new, but there has been crap from the radiator pumping through it.

I have also included a picture of the completed rear suspension.

The firewall is going the light blue and the chassis rails and k-member will be the darker blue...I am doing the aluminium components with heat proof aluminium paint and chemical resistant clear.
Shocks are black, so the colours of the components will stand out against the blue backgrounds...

:beer:beer

Tony
 

Attachments

  • image.jpg
    image.jpg
    104.9 KB · Views: 194
  • image.jpg
    image.jpg
    101.8 KB · Views: 221
  • image.jpg
    image.jpg
    101 KB · Views: 214
This is a GREAT build thread!

Keep the story coming! :thumb
 
Mmmm...anyone using a Hydraulic Throw Out Bearing

Hi Guys,

I have been talking to the local Tremec Dealer here in Australia to see if they can come up with a cost-effective way to install a TKO600 into the Vette.

Yeah I can buy one of the great kits from Silver Sports Transmissions or Hurst Drivelines (they are both great kits), but the average $4100 USD Kit plus $750 USD Shipping, plus the exchange rate, plus the import duty and taxes, put both of these kits at $8000 AUD...:mad

Anyway, while I figure the best way to keep cash in me wallet, the Tremec Dealer here suggested ditching the slave cylinder/ fork system and install a hydraulic throw out bearing...they have a custom one they have created and it is good for up to 1000hp...I won't get anywhere near that!

They said they may be able to do something under the dash with the pedal assembly, but failing that they could adapt the stock clutch master to engage the Hydraulic Throw Out.

Just wondering if anyone is using this on their cars and if they can share their experiences.

:beer

Tony
 
Last edited:
oooh, update on the Edelbrock Pro Flo install...

I am getting closer...

Spoke to an engineering shop locally to get some quotes for block and crank testing, cleaning and machining.

After speaking (emailing) Comp Cams and RHS Heads, I am locking in the following parts for the rebuild:

  • matching numbers block with machining (deck, bore and what ever is needed to clean it up)
  • original crank (clean and engineer)
  • New Piston caps to suit re-bore
  • RHS 12053-02 heads - 180cc/ 64cc - 2.02/1.6 combo with pre-assembled springs max lift 0.600"
  • Comp Cams 12-466-8 or 12-467-8 roller cam
  • Comp Cams 853-16 roller lifters
  • Comp Cams 7100 timing gear
  • Comp Cams 12200 distributor gear
  • Comp Cams 1605-16 roller rockers 1.6:1
  • Edelbrock Pro Flo Intake (already have this puppy)
  • Edelbrock 90mm LS throttle body - 1000cfm WOT
  • Edelbrock fuel rails
  • FAST EZ EFI 2.0 30404 Retro Kit for Multipoint EFI
  • FAST Ignition System
  • FAST Dual Sync Distributor

Of course if the block and crank are cactus, then I will be looking for a 4 bolt and stroker crank!
Heads will then go to 72cc versions of the above head, probably 210cc and 12-467-8 cam...see how the testing goes...

Exhaust will be no cats...in the state I live in (Queensland - Gold Coast) 1985 and later cars must have the CAT as part of the exhaust system if it was fitted at the factory...guess what fellas...I might need ear muffs for the passengers!

:beer

Tony
 
Last edited:
...the planning continues

I sold my DNE 4+3 transmission today, it was a tear-jerker moment as I got to thinking that Blue and the DNE came together 31 years ago on the production line at Bowling Green and today, Blue (the 1984 Corvette) parted ways with the DNE 4+3...I was reluctant to part with it, but lets be honest, technology has changed and so have transmissions in the last 30 years.

Blue will end up with a Tremec TKO 600, good for 600ft/lbs of torque and has ratios close to the original DNE 4+3.

Anyway, that got me to thinking "oh shoot" (that's the polite version!) I haven't thought about the clutch.

So here it is after some research this afternoon...

  • Clutch needs to be capable of 500 hp - RAM 98764HD
  • Flywheel needs replacing - RAM 1501
  • I can upgrade the slave cylinder and fork, to a hydraulic throw out bearing assembly and use my new factory clutch master - RAM 78131
  • ...and more importantly...it is time to retire that cast aluminium bell-housing, not because it is stuffed, because if the flywheel decides to part ways with the crank or explodes (no I won't be revving the ring out of it), the cast aluminium bell-housing won't stop the flywheel or parts of it, coming through the floor and hurting me, the ones I love or the ones others love...:ugh - Lakewood Blow Proof Bell - 15000

I'm not cutting corners on that bit.

:beer
 
Last edited:
I love the updates- what an awesome project!!!

I'm certain you'll be making more power than I am... but was curious about what you thought about the factory rear end, gear ratios, and traction. :beer

I've considered running a 3.55 rear end in my '82 but somewhere between the 15" wheels and torque (upwards towards 400lbs-ft) I've wondered if I would start to run into a traction problem. Right now, with the 2.87, I can break them free from a dead stop for a pretty good distance. 0-60 is under 6 and even on 95 degree days after running hard (heat soak) for an hour it will still hit 6 flat. At some point, I'm wondering about traction as I know I can move it to 60 faster with a better gear.

Hi Kane,

Thanks for the feedback, the project of putting the Edelbrock Pro Flo is only really the tip of the iceberg hey, but it will come together.
It has already been done, so it fits, but only just...at least if I share my build, others can use it for reference.

I figure if I can update the drive-line a little, and replace worn parts (I have replaced every part in the rear end so far and the front will be the same), then I can use it for a daily driver...just doesn't hurt to upgrade a few things with current technology.

The diff...well that has always been in the back of my mind, but I have rebuilt the 3.07:1 Dana 36 and will have to see how she goes.
I am confident that as I won't be running slicks on it and the use is not the strip, I should get some life out of the Dana 36.
The Dyno Software is saying 460 ft/lbs of torque at the crank, so I expect that to be only around 350-ish at the wheels.

I could have gone a lower ratio, but I am not really looking for a quarter-mile car, I am looking at using stuff that is well engineered, good quality and reliability on the street.
The highway 3.07:1 diff will suit the 110 km/h speed limit on the highway and help with the fuel consumption...another reason I am changing to multi-point EFI.

I think that for your project, it depends on what it will be used for...as you know the track set up is not necessarily the road set up.
If your looking for traction, yes the lower ratio diff and a set of strip tyres and you will get the traction, but you could break the diff, the uni's and the spindle shafts.
The bigger slicks will put a crapload of pressure on spindles, actually the inner bearing from memory...either way it can break.

If your looking for traction on the street, the diff only would be the go, but be prepared that it will effect your cruising speed RPM...

I'm not sure what I would do mate, I had an 81 Coupe around 8 years ago and all me mates in the Corvette Club were saying put a lower diff in, but I loved driving that Vette on the highway.
I had a T350 auto in that, so the lower diff would have increased the RPM at the higher speeds...maybe a different tranny would have address that though.

Your 82, is it a manual or auto?

:beer

Tony
 
Last edited:
Getting closer to fitting the Edelbrock Pro Flo XT

Hi everyone,

I am getting closer to the big install.

i am just about to put the front spring back in after painting the chassis rails and firewall, but I can't remember what way the front Spring goes in and where the BMA code should be, left or right?

Any ideas?
 

Attachments

  • image.jpg
    image.jpg
    97.6 KB · Views: 201
Hi everyone,

I am getting closer to the big install.

i am just about to put the front spring back in after painting the chassis rails and firewall, but I can't remember what way the front Spring goes in and where the BMA code should be, left or right?

Any ideas?


All good, thanks anyway fellas.

I went back through my before photos and found the BMA code on the RH side, so that is where it is.

I finished torquing up the lower control arms, shock mount plate and am on too the upper control arms.
i am having trouble with the one piece bushing, but have sized it up with the smaller washer and am slowing grinding off the inner lip to assist with the push in.

As long as there is enough material to still form a small lip and sit against the small washer, we will be ok.

i will leave a small lip.

Any tips?

Thanks Tony
 
Upper Control Arm - One Piece Front Bushing

All good, thanks anyway fellas.

I went back through my before photos and found the BMA code on the RH side, so that is where it is.

I finished torquing up the lower control arms, shock mount plate and am on too the upper control arms.
i am having trouble with the one piece bushing, but have sized it up with the smaller washer and am slowing grinding off the inner lip to assist with the push in.

As long as there is enough material to still form a small lip and sit against the small washer, we will be ok.

i will leave a small lip.

Any tips?

Thanks Tony


Hi Guys,

I found the best way to fit these one piece upper control arm bushings, is to actually shave down the lip to allow it to push through the arm.

I took around half of the lip off, still left a bit on and when I was doing the final push, the bushing popped into place.

I replaced my large control arm lock nuts as my 31 year old ones were gone.

Having trouble with the upper ball joint bolts now...the ones supplied won't torque to 19 ft/lbs and I think they are stretching.
I purchased some replacements, but they too have stretched and won't torque up.

Back to the bolt shop today.

:beer

Tony
 
This is a great thread, Tony!

Keep the story, progress, and pictures coming!
 

Corvette Forums

Not a member of the Corvette Action Center?  Join now!  It's free!

Help support the Corvette Action Center!

Supporting Vendors

Dealers:

MacMulkin Chevrolet - The Second Largest Corvette Dealer in the Country!

Advertise with the Corvette Action Center!

Double Your Chances!

Our Partners

Back
Top Bottom