Welcome to the Corvette Forums at the Corvette Action Center!

I Officially Started My Project This Morning

Things Are Progressing Nicely

I got my crankshaft and #5 connecting rod back from the machine shop this morning so I'll be able to assemble my short block tomorrow morning. I also picked up a 4L-590 Gates v-belt for my air compressor and it fit perfectly. I am in the process of fabricating a fitting to attach to the compressor's 3/4" tubing outlet and convert it to 1/2" pipe threads. I bought a 1/2" X 24" flexible stainless steel gas line (for natural gas or propane) to connect the compressor's outlet to the tank's inlet. I should be able to run it tomorrow morning after the epoxy I used in the fabricated fitting cures overnight.

I think I'll have my '71 back on the road within a week.
 
I Can Finally Get Going Again

After being at a total standstill for a few days I can finally get going again. I picked up my crankshaft and #5 connecting rod yesterday morning so I'll assemble my short block today. And I managed to fabricate the special fitting I needed for my v-twin Harbor Freight air compressor pump to connect it's outlet to the tank's inlet. I bought a 24" flexible stainless steel gas line to use as the "connecting" line and I think it'll work just fine because I can't imagine it bursting at just 145 psi. And being flexible vibration shouldn't affect it much. I also ordered a new dip stick tube for my TH700R4 because the one I have been using for the last 6 years is way too short to be able to get to the dip stick very easily. This factory-original tube should stick up higher than my modified tube. My cylinder heads are almost finished as I just need to do the final intake valve seat grinding.
 
Short Block Almost Done

I almost have my short block built. I just need to install the oil pump, windage tray, timing chain cover, and oil pan and it'll be done. Now I just need to finish my cylinder heads and get them installed.

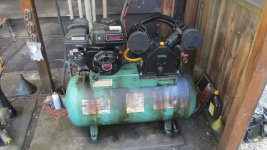
My new Harbor Freight v-twin air compressor pump really pumps my tanks up fast. As I am now using a 6 hp engine it only made sense to buy a larger pump to take advantage of the additional power.
 
Engine Coming Along Nicely

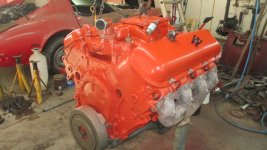
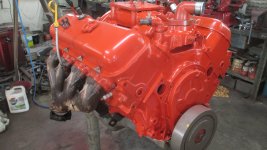
I got my 454" short block assembled just before it got dark this evening and it sure looks good. I just put my pictures (54 of them) into my computer and I'll be sharing them with you guys as soon as I get my cylinder heads finished and installed on the short block. And my new Harbor Freight air compressor pump REALLY works great. As I recently installed a 6 hp engine it only made sense to take advantage of the power and install a larger compressor pump. The pump is about 3 times the size of my old pump so I had trouble getting the monster mounted on my tank. My old inline twin pump wouldn't quite keep up with my A/C vacuum pump but this larger compressor pump will easily keep up with it.
 

Attachments

  • 1971 Corvette Engine Rebuild October 2016 042.jpg
    1971 Corvette Engine Rebuild October 2016 042.jpg
    258.6 KB · Views: 92
One Cylinder Head Done

I just finished the passenger side cylinder head. I lapped the valves to ensure a positive seal then set it on the floor next to my short block. After I rest a while I'll finish the driver's side cylinder head and MAYBE get them installed before the day is over. These Manley valves have an extremely narrow face so it's awfully hard to get the seat diameter correct. Lapping is a sure-fire way of seeing where the face is making contact with the seat and I had to make two of my exhaust valve seats about 1/16" smaller in diameter.

And I LOVE my new Harbor Freight v-twin compressor pump. As long as it's not revved to fast it should last a long time. I have been running my old pump about 1500 rpm and I'm sure that's why the reed valves were breaking. The recommended speed is 1040 rpm and I'm running this new pump about 1000 rpm.
 
Why is it that this surprises me?


I like the "about" 1000 rpm statement, i,e he has no clue how fast it is running..........
 
Getting Close Now

I got my cylinder heads finished and installed so all I need to do is adjust the valves, install the intake and exhaust manifolds, and the flywheel (flex plate). Maybe 3 hours of easy work. If my new transmission dip stick has arrived I could install my engine on Sunday or Monday. I'm really looking foreword to driving it again because it has been apart for about a month.
 
Larger Valves Installed

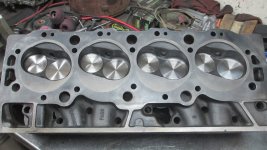
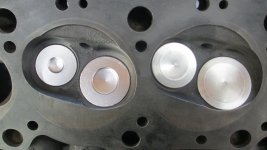
Here's a before-and-after picture of what I did. The valves on the left are the original valves painted silver so they would show up better next to the larger valves. Then a picture of a finished cylinder head.
 

Attachments

  • 1971 Corvette Engine Rebuild October 2016 006 (2).jpg
    1971 Corvette Engine Rebuild October 2016 006 (2).jpg
    253.3 KB · Views: 78
  • 1971 Corvette Engine Rebuild October 2016 019.jpg
    1971 Corvette Engine Rebuild October 2016 019.jpg
    247 KB · Views: 81
Engine Is Done

My engine is completely assembled and I'll install it tomorrow morning. But I'll leave the HEI out so I can install the new transmission dip stick tube. This has been a long and expensive job but it should be worth it because of the better high rpm breathing. And I have had fun doing the modifications.
 
If you're relaxing until tomorrow you should have time to post a picture of the engine.

Tom
 
Ready To Rumble

I'll start the installation first thing tomorrow morning and I should have it running by mid afternoon.
 

Attachments

  • 1971 Corvette Engine Rebuild October 2016 001 (3).jpg
    1971 Corvette Engine Rebuild October 2016 001 (3).jpg
    253.6 KB · Views: 92
  • 1971 Corvette Engine Rebuild October 2016 002 (3).jpg
    1971 Corvette Engine Rebuild October 2016 002 (3).jpg
    253.4 KB · Views: 87
Looks good. The plumbing elbow looks out of place but I guess it serves the purpose.

Tom
 
Really Hard To Install This Time

It took me four HOURS to get my engine stabbed. I had installed new Summit Racing polyurethane motor mounts and they are REAL tight where they attach to the frame. My engine/mounts is actually sitting on the frame and it still hasn't dropped all the way down because the new mounts are so tight. I'll have to climb up onto my engine and jump up and down on it until it goes all the way down. It's always a hassle to install an engine when the transmission is in place because the front of the transmission has to be jacked up higher than it normally is to get the engine attached..............while prying the engine backwards with the weight of it sitting on the mounts. But I FINALLY got it stabbed and a few of the bellhousing bolts installed before I quit for lunch. Once I get the motor mount bolts in the rest will be easy. Just time and I have lots of that.

If nothing odd pops up I should have it running before it gets dark. Right now I'm doing all of the "underside" work; attaching the torque converter to the flex plate, fastening the exhaust pipes, installing the starter and ground cable, and so on. Once I get it back onto the ground the rest will be easy. Can't wait to hear it run again as it's been torn apart for almost a month.

I will post the pictures I took once I get them into a step-by-step order. Right now the pictures are all mixed up so I need to get them into order. It is a very lengthy job to install larger valves and a LOT of metal has to be removed in the process so after I get the pictures posted you'll see what was involved.
 
I like the "about" 1000 rpm statement, i,e he has no clue how fast it is running..........

Lacks a tach.... ;)

The Corvette in background of TBTR's pictures has been sitting for a long time.
 
Last edited:
Mounts Aren't Made Right

After almost tearing my hair out and STILL not getting my engine to sit on the mounts correctly I finally resorted to jacking my engine up and removing the mounts. Once I got them out I found the mounts weren't made right and one of them had it's ears 1/16" too close together to fit over the frame mount. I had to modify the mounts and spread those ears apart on that one mount and it appears they will NOW work. I'll take a 30 minute break then dive into it again. I want my engine sitting on it's mounts CORRECTLY before I hit the sack tonight,
 
That's not too surprising. It seems like a lot of this stuff has to be trial fitted and adjusted as necessary.

Tom
 

Corvette Forums

Not a member of the Corvette Action Center?  Join now!  It's free!

Help support the Corvette Action Center!

Supporting Vendors

Dealers:

MacMulkin Chevrolet - The Second Largest Corvette Dealer in the Country!

Advertise with the Corvette Action Center!

Double Your Chances!

Our Partners

Back
Top Bottom