Welcome to the Corvette Forums at the Corvette Action Center!

Shinoda start

Just went back thru and read this entire thread from the beginning. DAMN, that's a LOT of work, but the pictures so far seem to indicate that it will be a GREAT looking Vette and one that you will be proud of.
Gosh, I hope so. Thanks.
I really like how you dished out the ends of the exhaust tips to conform to the rear "bumper". If you're not specifically looking for it you won't notice it, but it does add to the professional/quality look of the project.
That "dishing" was Jerri's idea and part of why I call him an artist.
I'm looking forward to seeing some pictures of the finished hood as well. Keep the updates and pictures coming, cause there are plenty more like me out there who follow this build but don't comment on it too much.
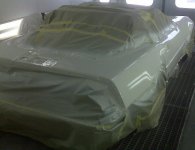
Andy Anderson :w
I do appreciate that and needed a boost for the effort.

I 320'ed the rear bumper cover but it just looks like gray (flex) primer. Only took me4 hours and I have a great deal more appreciation for why show cars look like they do. Depending on how well this rookie did, I may get to go right to 500, wet. That damn flexible polyurethane, well, flexes, when trying to get all the small waves out of it!

The hood vents were shot with primer for the first time, following the skim coat of the right one. They really look great, as you will see soon.

One black C6 headlight has been hacked up ('twas pretty broken already) and the second (silver) is supposed to be enroute. The intention is to mount these (carbon fiber redo) at the legal height, w/ or w/o 'bubbles' as the smallish lights demand, in their new, fixed mounts (from under, ala the stock 'flippers'. We'd like to make them simple to mount, in case others want them. During the hold-it-in-place test, OMG! :thumb

C6LightTrialFit.jpg

BTW, the targa-type roll bar will be black, similar to the glass and the Epison wheels.

:w
 
One black C6 headlight has been hacked up ('twas pretty broken already) and the second (silver) is supposed to be enroute. The intention is to mount these (carbon fiber redo) at the legal height, w/ or w/o 'bubbles' as the smallish lights demand, in their new, fixed mounts (from under, ala the stock 'flippers'. We'd like to make them simple to mount, in case others want them. During the hold-it-in-place test, OMG! :thumb

View attachment 2292


:w
i would definately like to see the end result on these headlights i think with some good work it could look really nice and start a new trend
 
Hood Vents

The fabricated-here-by-Jerri hood vents are ready for the first primer, then block sanding. They are more sedate than those that inspired me to do this, as you may see, while still being effective.

HoodVentsPrePrimeF.jpgHoodVentsPrePrimeR.jpg

I got both Shinoda door panels 500-wet sanded today, so they are ready for sealing, then color. Tomorrow should wrap that process up for the other Shinoda pieces; then the same for the car.

I already have no fingerprints! :w
 
I already have no fingerprints! :w
:boogie:boogie:boogie:boogie

The scoops look good.......functional but not in your face.
You can always grow new fingerprints, but you can't grow a Shinoda!
THAT takes time and a bunch of sweat equity and it looks like you are paying your dues!
Andy Anderson :w
 
The scoops look good.......functional but not in your face.
Great; that was the idea.

Wet sanded (500) four Shinoda panels, the rockers and cowl pieces; took all day. those flex pieces are a PITA to sand and the proper way to do that is with them removed. Still, no prints, nay my tips are so smooth, I cannot pick up some thing easily. There is a LOT of time and material to even out the top of the rear bumper cover. It takes flexible filler, which in not carried just anywhere, is costly and smells similar to the lovely home hair perm jobs my mom and sis used to do.

Jerri shot the hood and rear fenders for hopefully the last time before sealing and color. His artistic eye go the vents straight, equal and identical from mirror, but separate, processes.

HoodNewPrimed.jpgHoodFinalPrime.jpg

The rear and front bumpers were then shot with a flex primer, not the polyester (with catalyst) primer used on the 'glass pieces.

Still have to finish the under sides, so these look factory (and professional). Also, molds will be taken for the fixed clear headlight covers from those openings; also of these vents in case any of you want some.

I much better know why great paint jobs cost so dang much! :w

FWIW, I flew the 141s at end of Vietnam; never getting in country, but brought many refugees out to their new homes after Saigon fell.

Further, that avatar will be changed; the export, yellow taillights sold.
 
FWIW, I flew the 141s at end of Vietnam; never getting in country, but brought many refugees out to their new homes after Saigon fell.
WELCOME HOME BROTHER! :pat

Andy :w
 
FWIW, I flew the 141s at end of Vietnam; never getting in country, but brought many refugees out to their new homes after Saigon fell.
.

I think I saw those occasionally over Fay., NC (from Pope AFB), although they were easy to confuse with Galaxy, except for the sound of the fans spinning!!! Part of SAC???
 
I think I saw those occasionally over Fay., NC (from Pope AFB), although they were easy to confuse with Galaxy, except for the sound of the fans spinning!!! Part of SAC???
You did, and I did many of those airdrop missions at Fayet-nam, more than occasionally, it seemed.

Not SAC, MAC; now AMC. The Pratt & Whitney TF-33s that powered the Lockheed C-141A Starlifter sound quite different, to the trained ear, from the Lockheed C5 Galaxy engines. The birds look quite similar, but for size. AFAIK, the C5 has never done any airdrop.

I have learned that primer serves mostly as dust (after sanding(. :L The nose and tail were 150'ed, to be re- primed then, if they are straight enough, will be 500 wet sanded as the final, before seal/color.
 
The upper section of the two-piece Shinoda rear bumper is very wavy; got more thin scratch coats of the flex filler to remove the low spots, as primer didn't. Now, I have sanded all parts in prep for the final coat of primer, each coat dusted with black "guide coat" spray paint. The minor waves in the body panel are much easier to see; probably impossible to feel, so the contrasting paint makes it much easier to get a perfect panel. The nose pic shows the start of that sanding process. Moderate pressure on the paper is okay, here and some bare poly shows up; a high spot.

NoseGuideCoatSanding.jpg
All of that black gets sanded off (again) with 500-wet block-mounted paper to ensure that perfect base for the sealer and color. The last bit of guide coat is visible under Jerri's wrist, in the next pic. The idea is not to just remove the black traces, but to use it as a low-point guide in truing of the panel. This painting rookie can see improvement in every panel; the subtle kind that our eyes detect on show cars.
RRfenderGuideCoatSanding.jpg

The water filled spray bottle gets a small dab of liquid dishwashing detergent for sanding ease. A clean towel dries and removes all sanding residue; oily prints are major no-nos and all parts get stowed in a safe place. A lighter touch is used here, allowing the grit on the paper to do the work

Sanding a 'normal' car is a lot of work, but this flexible polyurethane panel thing is a PITA as it deforms easily while unmounted.

I expect the car to get sealed, color and clearcoat this week, then reassembled. :w
 
painful to see

I know there is a low point in many things before they improve (calm B4 the storm, et. al.) but this is hard to see and participate in. I'd never removed the rear glass, nor the interior trim covering the targa roll bar nor the shoulder belt anchors; now have. The weatherstripping is in fair condition, even as original rubber, but came out to ease the masking effort and get a hidden break line on the paint.

RearTornDown.jpg

Same, up front.
FrntTornDown.jpg
Almost weird to drive the car like this.

Then, the corner was turned; the hood inverted and masked. Say hi to the doberman, constant wanting to play fetch, Brodie, too.
UnderHoodMasked4Paint.jpg

Finally, some final paint on the car. Now those new vents look factory installed!
UnderHoodPainted.jpg
Tomorrow, the hood gets reinstalled on the car, final clean up and initial masking done before the car is moved to the spray booth for sealer, white color and clear.

Hopefully, the three extremely rare Shinoda stickers for this rare kit will 'go' under the clearcoat.

My pulse is near-apace! :w
 
Looks like the light at the end of the tunnel is getting brighter.
Thanks for the updates!
Andy Anderson :w
 
Awesome work... and a cute doberman!

-Mac
 
The body panels were moved to the spray booth and crowded inside.
PartsReady4sealing.jpg

After a proper cleaning of all surfaces and edges to remove all grease, fingerprints, etc. (NOT fun with those suckers hanging on or from things and flexing more than beach bodybuilders) the tack cloth grabs the last dust. Al this is done with the booth fans running, filtering the inside air.

Epoxy sealer is first; also white.
PartsGettingSealed.jpgPartsSealedDrying.jpg

Paint is measured and mixed.
MeasuringMix.jpg
Two coats of sealer, two of color, then three coats of clear, applied within an hour of the color coat for proper adhesion.

Dry time.
PartsInColor.jpg

Next day., all parts were carefully returned to the shop for color sanding and polishing. :w
 
Targo goes black

The new paints dry slower and 'travel' well, the sneaks! All non-target areas must be sealed off, including paper tape seals. This is almost an art form to get right and experience pays off.
CarTapedBaggedFrnt.jpgCarTapedBagged.jpg

The targa top area is ready.
CarTapedBagged4TargaColor.jpg

Unlike the panels, no sealer is needed, just color coats and clear.
TargaBlack.jpgTargaBlackRear.jpg

My buddy, Steve, suggested this to look great with the tinted windows and black Epsilon wheels. His 'eye' is much appreciated and I can feel the onset of some excitement, here.

After an overnight dry, the newly black part gets bagged off; opposite the soon-to-be repainted parts. This is part of where experience at this saves time and materials. A planned taping/bagging leaves most of that work alone; just adjustments for the next step.
pencil.png
 
Okay, the car is white again.
CarIsWhiteLR.jpgPartsInColor.jpg

After an overnight dry, then a day in the sun (plus Sunday) the body was color sanded today and some finish polishing started. The first color sand was 1500 wet, which removes the minor orange peel and any flaws; DAMN hard to see! That was followed with 2000 wet.

Tomorrow: start mounting the panels in turn and doing the like process to each.:w
 

Attachments

  • CarIsWhiteRR.jpg
    CarIsWhiteRR.jpg
    122.3 KB · Views: 83
Hood all polished

GlossNoseNoHeadlights.jpg

I damn near teared up when I saw the rear all one-color and super glossy... and......

ASSEMBLED with lights and all! (pic soon)

I can barely believe this is my old car. :w


Didja even notice the hood vents?
 
AWESOME Project..

Was this Raysur's Car and body kit?

looking for ward to the final assembled pictures
 
The paint looks spectacular! Well done!!

-Mac
 
AWESOME Project..

Was this Raysur's Car and body kit?

looking for ward to the final assembled pictures
My 1984 coupe; his old body kit (if that's Jeff L.), which needed lots of work. Some panels shrunk, it seems. I'd bought a few other parts from him and was real glad to have him (very nice guy) include all hardware and the Shinoda stickers, PLUS he dropped the parts at my house, as only he had a truck.

Finished all sanding but the two nose pieces and a couple of minor touch-ups.

I got the rear glass back today with new 1-piece tint; old tint removed. It gets prepped and painted black on the hinge area.
 

Corvette Forums

Not a member of the Corvette Action Center?  Join now!  It's free!

Help support the Corvette Action Center!

Supporting Vendors

Dealers:

MacMulkin Chevrolet - The Second Largest Corvette Dealer in the Country!

Advertise with the Corvette Action Center!

Double Your Chances!

Our Partners

Back
Top Bottom