Welcome to the Corvette Forums at the Corvette Action Center!

No battle plan survives contact with the enemy.

Holley

I am having a lot of fun learning this fuel system. Thanks to members of this forum and Holley.com it is coming together. When I was much younger I was working on my Rochester Quadrajet on the 1968 Camaro. I soon became good at getting a crisp response off idle. I liked the spread bore configuration, once I learned it's idiosyncrasies and adapted it was a set and forget fuel system. My friends who had Holley 4150s were ALWAYS tinkering with it trying to get a even idle and crisp tip-in acceleration. Forget the 4160 mechanical secondary dual accelerator pump 4 corner idle 750s! They took their Triple 5s, Chevelles and El Caminos to Forest Richardson (Local Chevrolet drag racing guru) to have them set up. He did a great job and was happy to take their cash. They all sneered and snickered at my "Rottenchester". I was okay with that, after a set of Hooker headers and a 30-30 Duntov cam for my 327/275 I was the one laughing. Of course that ended my career at the Drag Strips, you needed a scatter shield bell housing to run solid lifter cams at OCIR, Irwindale and Lions. You will need to be an old-timer to remember those strips. I love the smell of Nitro-methane on a cool weekend morning! Smells like AA/FA! Wild Willie Borsch was the king of the blown nitro fuel altereds. His all time best was 6.96 @ 213 MPH! That was in the 100 inch wheel base car, he crashed the 94 inch wheel base car made of 1-1/2 exhaust tubing in the 1970's.

Okay back to the Holley. I renewed the 2818-1 for the Coupe. Now there are numerous warnings on the accelerator pump needle pin under the squirter nozzle, but I blissfully ignored those warnings and upended the main body over the garbage disposal. Humh, I wonder what IS that tinkling sound the disposal is making? Hum, a little chrome plated brass rod. Nice! Whine, whine, snivel, snivel! Well Holley has the needle on the web site, part number and everything. The local parts houses wanted shipping on each and every part I needed to order. $9.95 for the needle, $9,95 for the float bowl screw gaskets, $9,95 for the airbleed screw seals. $29.85 for S&H. I was waiting for the parts anyway and Summit only charged S&H once. Now I like to support local business, to a point. The parts arrived the next day from the Sparks NV distribution point, versus 5 to 7 working days for my local guys.

My son's 1964 Chevy II has a Holley on it (80457-3). It wasn't running very well, massive hesitation off-idle, black smoke and nasty idle. The PO told my son that it was because he had installed a "3/4 Race Cam" in the 350 truck motor. I did ask him who made the cam (I don't remember, I got it at a speed shop), what was the lift, duration and lobe separation angle (3/4 Race!) and if he still had the cam card (cam card? waz'at?!). After setting the float levels (way too high), adjusting the air bleed screws to 12 inHg (inches of vacuum) @ 850 RPM, and adjusting the accelerator pump linkage/changing the pump cam I have a tiny off-idle tip-in hard edged hesitation. The fuel is squirting as the throttle is opened, I may have to go up a few numbers on the nozzle. Before the pump adjustment/cam change the fuel was not coming out of the nozzle until 5-7 degrees of throttle opening. The idle is smooth, smells right (not fat and nasty) and sure doesn't have that stutter lope of a "3/4 Race Cam". Curing the vacuum leaks at the manifold and carburetor base had something to do with that I'm sure. I'm only getting 12 inHg at idle so the engine may have a performance camshaft in it after all. The only way to find out is to degree the cam. That is way too much effort, I'm not that interested.

I am working on getting the 350/290 into the coupe. It is nice to have the Chevy II to play with and learn what is up with the Holley fuel system. Very adjustable, adaptable and sensitive to changes.

Mark.
 
As I am working to get the 350/290 installed in the Coupe there is more on the truck engine in the '64. The slow throttle response on the 80457-3 Holley is correct. When operating the throttle at 1/4 to 1/2 there is a massive hard-edged hesitation that will stall the engine. Slowly opening the throttle is smooth. The vacuum secondaries are falling open too quickly. Ordered secondary diaphragm and springs. My antique Snap On MT241 timing light will not flash, the pickup has too much of the carbon missing. I'm having a new timing light shipped to me. Found my old distributor wrench. Ready to time the Coupe engine and check the timing on the '64. Waiting for passenger side oil dip stick plug (Pt # 9421743) for the second dipstick hole in my Coupe 350/290 block.

Retirement is nice, no one telling me how slow I am and I'll never make flat rate times. If I want to think about things I can do that, if I want to walk away and sit under a shade tree I can do that. If I want to drive out to the range and put small round holes in some paper it's on.

Mark.
 
Holley carburetors are really touchy. The 80457-3 on my son's '64 was having some serious part throttle hesitation issues. Pulled off the front float bowl and metering block. The accelerator pump check valve (black neoprene disc) was rock hard and wouldn't seal half the time. This was reducing the fuel to the spray nozzle. Replaced the hard seal with a new seal. The new seal is silicone and is an umbrella shape that seals remarkably well.

The power valve on the metering block had no markings on it (non-Holley part) and two gaskets under it. Replaced the power valve with a 6.5 Holley part using only one paper gasket. Cleaned the float bowl and the metering block, replaced the gaskets. Started it up and set basic adjustments. I was able to pull 15 inHg at idle, the best I was able to get before was 12 inHg.

No hesitation, smooth acceleration and nice idle. Stop fixing.

Mark.
 
It's Alive!

Started the crate engine on the stand last night. Started up with a little spitting and hiccuping, settled into an even 1800 RPM run. Dropped it back to an idle, respectable idle. No squirting oil or parts flying through the air. Way too loud with open manifolds. I do want to do a cam break-in run of 20 minutes. Then set the timing and dwell on the points. I will need to get a temporary muffler set up so that can happen. Once that happens it is off the stand and clutch, bellhousing, transmission assembled and installation into the body.

Aaron was taking a video with his iPhone and was distracted by the noise and flames belching out of the manifolds then pointed the phone at the floor, didn't get a read on the oil pressure gauge. That's okay he doesn't have much experience with fire breathing extremely loud small block engines running (something I have done a lot in my career) in a shop. The flames out of the exhaust were due to the rich condition of running on full choke. I will get the jury rigged wiring sorted out on the run stand, find something to do about the open exhaust and give it a run next weekend for him and get the cam run out of the way. He can get the video then.

I am using the HF engine stand and some brackets that I welded up to brace the engine while it ran. The radiator is supported with some shelving material I had. A battery box and the control panel for the electrics are as far as I had gotten with the project when Aaron dropped by. We had hacked together some wires and had the fans ready to run when we ran into trouble getting a seal on the cooling system. We tried to use some period hose clamps, well they are not being nice or cooperative. I started it with the cooling system dry. Ran it maybe 20 seconds then shut it down. As I said, WAY too loud! I dropped by a parts house and bought some screw drive hose clamps. Photos and maybe the video from Aaron's phone next week.

Mark.
 
Thank you for keeping the updates coming!! I enjoy reading 'em!

Mac
 
Mark; Hope my window problem is less than your spirited encounter. Both my door glass are " frozen " in the up position. This may have something to do with being left outside, never lowered for 30 odd years. I haven't formulated an attack plan but soaking in some solution will be the first attempt. Soap and water.... then suggestions for harder release agents will be sought. Isn't this fun ???????

I would start with the seals on the outside of the doors against the glass. You have 3 decades of crud on them. Just don't force anything. You might slide a razor blade between the glass and the seal (careful there, replacing those seals is not my favorite task) and give it a gentle try on the handle. I use a very old putty knife that has a remarkably thin and flexible carbon steel that I have had forever. The edges are smooth and rounded so that it is hard to actually cut anything.

The inside of the door mechanism is lubricated whenever a mechanic has been in there. That was at least 30 years ago. That lubrication will be dried up and difficult to move at first. Try it, back it up a little and try it again. Listen for "crunchy" noises. If you do not get any movement out of the glass move to the inside seals and see if they are stuck.

Patience is the key word when working with these old girls, they are cranky and stiff. It is not high tech, it is an old Chevrolet. Generous Mothers built some very well thought out vehicles in those days. I think one of the key phrases for the engineering department was "The bolt that is engineered out of the design cannot loosen and fall off."

Mark.
 
Last edited:
Engine is ready to install.

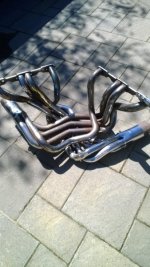
Have run in the camshaft, quality checked the electric fans, set timing and checked for oil leaks. Tomorrow I will be pulling it off the run stand and installing the clutch, bell housing and transmission for installation into the Coupe. The old Hooker Header Side pipes are really rough. I will try polishing them to bring the finish back. Holley wants $1,039.00 for new headers. It will be worth the price of admission IF they have done something with #2 cylinder inside bolt clearance. It is everything I remember about installing headers!:mad I will have to go out and get a 7/16 wrench, cut it up, bend the shaft so I can get enough swing to turn the bolt. Put a 6 inch long 3/8 bolt in the front and rear most bolt holes to hold up the ends of the flange to be able to start that miserable blanking blank of a bolt. Modify the alternator bracket enough that I can get my fingers in that tiny little space to actually get it started.

I have to say the factory manifolds are sweet. But when the money says side pipes we'll be installing side pipes. Maybe I can talk them into factory side exhaust.

I wonder if a gentle massaging with the ol' air hammer will sweeten the deal. What is a little bulge in one tube anyway. It is under the alternator after all, who will see anything. Well I'm off to see the Wizard !

Mark.
 
Aren't headers fun?
 
They are an amazing collection of twisted pipes. They leak, burn wires and people. A genuine pain to install. Rust out in a hot minute. The chrome ones turn blue. The stainless steel ones require a third mortgage on the home (Kids education was the second mortgage). The real question is what will they do for me. Just what is the value of that comment "Nice exhaust" when weighed against the hassle of "bolt on" convenience/horsepower? I'm sure I can get arrested/cited or in trouble with Local Law Enforcement with the factory manifolds. This IS a Mid-year Corvette. Shiny stuff rules I guess.

Mark.
 
Holley news

I was at my Union meeting this month and was talking to some of the Ford guys about Holley carburetors. They recommended the power-valve anti-backfire kit (P/N 125-500) in the vacuum passage to the power-valve. Quick fix, drill a hole in the passage and drop in the check valve BB, spring and drive in the retainer. He told me that some of the high performance Ford big blocks run spread bore Rochester Quadrajets not Holley's;):thumb.

Summit has the check valve kit for $14.00 + shipping. I will go to local parts house to see what they charge.

Still haven't gotten the engine off the assembly stand. I sure can find a lot of things in the way. I told the partners in the car that a new set of headers was $1,040.00. Aaron came over with a cleaning product to try to clean up the rusty junk set of Hookers. He lasted half a day. I can tell you that there is no real difference from what he started to when he finished. They were on the engine for 40 minutes maximum and they were leaking at the flanges on the heads. Chrome headers $1040.00. I checked the flanges and we have serious warpage. I have this huge double cut mill file I ran over the flanges (after knocking off all the chrome dingle balls left over from the welding). Yikes are those puppies wobbly!

Mark.
 
Last edited:
I always thought the factory side pipes were the best looking ones anyway. As I recall, back when I had my 64 coupe, those header/sidepipes were $700 and I just couldn't afford them. Listening to your complaining about them, I think I'm glad I didn't put them on. :D Good luck with those "snakes".
 
Yes Tom the originals look the best in my opinion. "Snakes" for sure! WP_20130917_001 (338 x 600).jpg:eyerole

Mark.
 
Not much to report, stalled while I think up a assembly jig for the engine/transmission. I have the wooden stand the 350/290 crate engine came on and some 1in square metal tubing engine stands. They all interfere with the bell housing/engine interface. Trying to get something to hold the engine steady while sliding the transmission into register. I really do not have fun with the engine swinging on a chain while I try to get the transmission in place. Ugly. I am trying to have the transmission stable and stationary with the engine/bell housing/clutch on wheels and sliding it together or the reverse sliding the wheeled transmission onto the fixed engine.

Mark.
 
How about using the wooden crate motor stand and cut away the rear portion that blocks access to the bell housing flange. Then build a wooden saddle onto it that would go up on both sides of the oil pan and support the rear of the engine on the oil pan flange ahead of the flywheel? Then the whole rear of the engine would be exposed.

Tom

Working on that now. I don't know how photogenic it will be. The crate engine stand is holding up the damaged 327 block I have. I set it on a 4X4 moving dolly to make it easy to move. The 283 is resting on the rolling 1 in square tubing support that bolts to the bell housing surface. The crate engine stand wouldn't allow the oil filter and starter to be on the engine and I wanted them to be on the engine.

Mark.
 
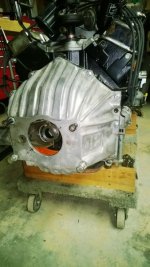
Okay I did fabricate a support for the 350/290 out of electrical metal tubing and some redwood 2X4 and 2X6 I had in the shop. Set it on a 4X4 furniture dolly . Yes it is BAU, but it holds that engine and allowed me to install the clutch assembly and Bell-housing (including the release bearing fork) without removing the starter and the oil filter. It is ready to wheel out to the garage where the Coupe sit waiting for that "Heartbeat". Now if you want photos I'll have to post a disclaimer of insufficient carpentry experience to produce fine motor furniture.

The clutch:
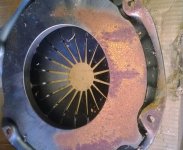
Went and purchased a 10 1/2 inch clutch disc for the 26 spline Tremec input shaft. After all that was all I needed right? I had the clutch cover in a box and a new release bearing. This happened several months ago.
And Then:
I was going to assemble the clutch and bell-housing. I opened the box and lifted the clutch cover out. Gack! Corruption! Nasty rust covering about half of the plate!:ugh I can't use that! So I bounce to the parts truck, drive over to the local parts house/machine shop (I like to support the local boys). Hi, I need to buy a clutch cover.
I'm sorry you can only buy a "kit". A kit? Yes, the cover, disc, release bearing and the release fork. We only sell kits. Well I knew an "upsale" when I saw one. Out the door I went. I had all that in GM boxes. :thumb
Of to the local speed emporium. Yes they would sell me a clutch cover! No problem! I had the receipt for the parts and the disc itself for show and tell. The counterman looks at my part and announces I have the wrong disc for a 1965 Corvette. Right at that moment one of the customers in the store walks up and asks if I had a Corvette, he has a '66. So we were jawing about our Corvettes and I absentmindedly told the counter man to get the right disc of course. I jump in the truck and head home after paying for my stuff. All is good! I have the Centerforce (formerly Hays Clutch) high dollar performance clutch.
Ah, the "correct disc" was a 15 spline input shaft. I must have forgotten rule # 1 "pay attention"! Open box and LOOK at your parts! Now I needed to go back and get the disc I had.:mad
Traffic was bad the 880 freeway was sold out SRO (standing room only). Well I'll hit it in the morning.:thumb
Back at the emporium I show my receipts (3 of them now) explain how I had goofed things up (one thing I have learned over the years is to never tell the counter guy is that he sold me the wrong parts) and asked for the correct disc back. I sorry we are out of stock on that part. We must have sold it. But we do have THIS disc but that will be an additional $29.95. :chuckle I should have bought the "kit"!
I drag my bleeding hemorrhoids back to the shop and install my $$$$$ clutch.
I am out of practice with the parts dance. I'll order on-line next time and my local guys will be out the sale. Sigh, I shoulda known. I could have paid shipping an still been ahead with more cash in my pocket.:L

Mark.

Rats! My phone picture files are too big. I have been trying to drop the data level but I am stuck right at the moment. Trying a program off the internet.WP_20130930_001 (600 x 494).jpgReady to go.jpg Ah got it.
 
Last edited:
Well, as soon as I get some warm bodies over to my place I will be installing the 350/290 and Tremec 5 speed into the Coupe. Checked the centering of the bell housing (3858403), it was 0.015. Installed the disc, pressure plate, release bearing and clutch fork check depth on the fork pivot ball (good, center line is forward of the pivot). Got the transmission into the clutch/bell housing all but 1/2 inch. Removed the transmission, bell housing and realigned the disc on the crankshaft mainshaft bushing. This time after the realignment the transmission slid home. Sweet!
Missing parts on the shifter for the 5-speed. I have the lever and lever housing with the coupling for the ball on the bottom of the lever. Very sloppy. I have to be missing some bushing, spring or both. Need to check the manual for the transmission to see if I can figure what is missing.

Mark.
 
The sloppiness in the shifter was a plastic bushing that fit in the Keisler offset shifter. WP_20140102_001[1].jpg The guys at Keisler were very helpful in sorting this out. I do have to also say that Joel Conklin over at Tremec who gave me the phone numbers for Keisler and American powertrain needs a thank you for his help. Picked up the replica Corvette shift handle at the same time. Ready to go for install. Maybe this weekend if I can get my son over here to help.
 
Last edited:
As simple as a bushing, eh? That's good news and better news to hear Tremec tech support take care of business!

Mac
 

Corvette Forums

Not a member of the Corvette Action Center?  Join now!  It's free!

Help support the Corvette Action Center!

Supporting Vendors

Dealers:

MacMulkin Chevrolet - The Second Largest Corvette Dealer in the Country!

Advertise with the Corvette Action Center!

Double Your Chances!

Our Partners

Back
Top Bottom